In the first article on exposure (All You Ever Wanted to Know about Exposure) we discussed the exposure basics, the four variables you have to work with – the intensity of the light, the ISO setting, the f-stop and the shutter speed. We made the comparison of light with water. With this analogy, getting the proper exposure is the same as filling a glass of water (or whatever). In this article we’ll take a closer look at the kinds of challenges we face getting the best exposure. But first let’s take a quick review.
So, to quickly review, the sensor in a digital camera or the film in a traditional camera requires a specific amount of light to produce a proper exposure. The amount of light that is required depends on the sensitivity of the digital camera sensor or the film. Sensors or film with lesser sensitivity to light requires more light while those with greater sensitivity require less light. Sensitivity is measured by the ISO number regardless of whether we are dealing with film or a sensor. Lower numbers mean lower sensitivity The numbers start at 100, possibly even 50, and increase to 400, 800, 1600 and even higher. Each time the number doubles it requires exactly half the amount of light to make a proper exposure.
Aperture, or f/stop, is the amount of light that is let through the lens. This is controlled by a diaphragm similar to the pupils of our eyes. It can open to allow more light in or close to allow less light. Apertures are measured with a strange set of numbers like f/22, f/16, f/11, f/8, f/5.6, f/4, f/2.8. The numbering system goes backwards so that higher numbers admit less light. Adjacent numbers either double of half the amount of light coming admitted through the lens. In other words, f/4 admits twice the light as f/5.6.
The only other variable then is shutter speed, or the length of time light is allowed to pass though the shutter. Shutter speed is measured in fractions of a second such as 1/30, 1/60, 1/125, 1/250, 1/500, 1/000.
We have control of three of the four variable – ISO setting, f-stop and shutter speed. These are all adjusted to respond to the fourth variable – the intensity of the light. Success as a photographer starts with getting the correct exposure and these are the three things we can manipulate to do so.
Correct Exposure
What is a correct exposure? Well, first we need to establish a term or two. The difference in brightness from the darkest part of our subject to the brightest is called the ‘dynamic range.’ The greater the difference between the darkest parts of our subject and the brightest, the greater the dynamic range. Each subject we shoot will have a dynamic range (unless you try to shoot in a cave a mile below the surface with the lights out). Our cameras have limits as to the size of the dynamic range it is capable of capturing. This is true of film and digital. The dynamic range of film varies from one kind of film to another. But the dynamic range of your digital camera’s sensor is fixed.
A correct exposure, then, is controlling the interaction of the dynamic range of your subject with that of your film or sensor.
For the rest of this discussion we’ll leave the world of film photography behind and deal exclusively with digital. It turns out that digital cameras have a very sophisticated feature built into them – the LCD screen on the back. This is used for a lot of things but one function in particular is indispensable in getting good exposures and that is the histogram. No longer do you have to wait until your film is developed to see if you over exposed or under exposed. You can check your exposure just moments after you snapped the picture. This is a kind of instant feedback that can eliminate a lot of disappointment later on.
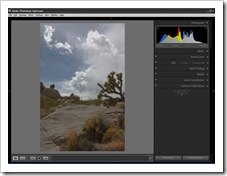 So, let’s take a look at the histogram It’s the colorful graph at the top right of the figure below. By the way, the histogram is so useful you’ll not only find it on the back of your camera but in most of the post processing tools you’ll use. The tool we’re looking at here is Adobe Photoshop Lightroom.
Now maybe the histogram looks a bit confusing at first but once you catch on it’s rather simple. It displays the range of light intensities that was captured when you made the exposure, the dynamic range. The histogram shows the amount of the scene that falls in the shadows and highlights and everything in between (the mid tones). Total black is on the left and total white is on the right.
By glancing at the histogram you can quickly see that this image has a pretty even distribution of light intensities from shadows to highlights. None of the image is pure black and likewise none is pure white. This, then, is a well exposed image.
The histogram can be divided roughly into three areas. The left-hand third represents the shadows. The middle third is your mid-tones leaving the right-hand third for the highlights.
This histogram from Adobe LightRoom has some other interesting features. This histogram displays the intensities of the three primary colors – red, green and blue. For example, you can see there is a peak in the reds in the mid-tones while the blues has peak in the shadows and highlights.
Virtually all digital cameras are capable of displaying histograms of the image you just took on the LCD screen on the camera back. They may not be able to display the three primary colors as the one in our example. In that case they display the ‘luminance,’ that is, intensity of the light as if the colors were rendered as gray.
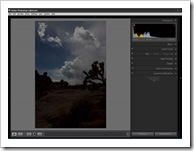
What would the histogram look like if this image was underexposed? You might anticipate the whole histogram will slide to the left and start bunching up there. The highlight end of the histogram may peter out somewhere in the mid-tones.
And this is exactly what we see. If you look carefully, you will see that the histogram is climbing the left wall. This image will not turn out well. One of the problems is we can’t see any detail in the shadows. The image is very dark with many areas that are totally black. For one thing this is not a very interesting picture but perhaps more importantly, there won’t be much we can do with it in post processing.
To correct for underexposed images you need to move the histogram to the right. You do this by increasing your exposure and thus allowing more light to hit the sensor. You can decrease the shutter speed (the longer the shutter is open the more light it admits), open the lens aperture (a larger opening, smaller f-stop number, means more light is allowed through the lens) or both. One other thing you might need to do is increase the sensitivity of the sensor to light. That means it needs less light to make a good exposure. And you do that by increasing your ISO setting.
If you’re in the habit of checking the picture you just took on the LCD screen you may find yourself temped to underexpose them a little, mainly because they look great on the screen that way. The colors will tend to be more saturated and often times we don’t have a problem psychologically with very dark shadow areas. But trust your histogram. If it’s climbing the left wall increase the exposure and shoot it again. What the heck, it’s digital. It’s not going to cost you anything.
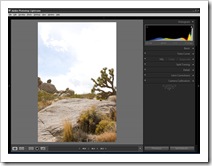
At the other end of the spectrum we have the overexposed photograph. Now the histogram is climbing the right wall. We’re going to have great shadows full of details. In fact the shadows are all but gone. Instead of loosing detail in the shadows we’ve lost the highlight detail. Look at the area of the photograph that used to have stunning dramatic clouds. Now they’re a washed out mass of pure white. It’s very uninteresting and really has nothing going for it. It’s a snapshot and not a very good one at that.
The whole point of photographing on this particular day was the exciting clouds. Now they’re all but gone and no amount of post processing can recover them. Once an area of your photograph is pure white it will remain so in spite of your best efforts.
To correct an overexposure you need to move the histogram toward the left by decreasing the amount of light that strikes the sensor. You can select a faster shutter speed or ‘stop down’ your lens (smaller opening, higher f-stop). You can also decrease the sensitivity of your sensor to light by choosing a lower ISO setting.
We have a way of describing each of these conditions. We call it ‘clipping.’ If the histogram is climbing the left wall we call it ‘clipped shadows’ and of course if it’s climbing the right it is ‘clipped highlights.’ Each type of clipping has its own problems. Let’s look at them in a bit more detail.
Clipped Shadows
One of the marks of a fine art photograph is that it retains detail in the shadows and the highlights. Is this rule ever broken? Well, like all rules dealing with creativity the answer is, ‘Yes, of course.’ But more times than not a photograph with clipped shadows will not be as expressive as one which preserves shadow detail. The detail can be very subtle but that adds to the interest of the image. So the goal is to strive for detail in the shadows.
When clipped shadows are printed they have the blackest black the ink and paper combination is capable of producing. It’s as black as the ink that created the letters on this page. (Please don’t give me a hard time. I know you’re reading this on your computer monitor but you know what I’m saying. And besides, we’re nowhere near ready to get into color management and calibrating…. But I digress.)
There’s another problem with underexposed images, at least with a digital camera and that’s the presence of ‘noise.’ Noise is caused by the electronics of the digital camera and it results from the fact that the light falling on the sensor in the shadow areas of the image is very faint. It’s like a sound you can just barely hear in a noisy room. It’s difficult to make out exactly what it is. You have to do some filling in, maybe guess a little. The sensor behaves the same way when the light is dim. It has to do some guessing, some filling in. The end result is that you will get splotchy colors in you shadow areas that you certainly don’t want. If you leave the shadows pure black this won’t be so much of a problem. But when you try to pull detail out of the shadows during your post processing you’ll run into this splotchy effect that can ruin the photograph. With a correctly exposed image you wouldn’t have this problem and your shadows would have detail and remain very crisp.
If it’s a silhouette you’re after, however, go for it. That’s when you will want to intentionally underexpose your photograph to produce some stark black shapes. Then you want the histogram climbing the left wall. Chances are you have a bright object in the picture like, oh, what could it be, maybe a setting sun with clouds that are on fire. If you expose that the way the built in light meter suggests you’ll be very disappointed because it will be a ‘normal’ exposure. Instead you want the picture to be underexposed, thus rendering the shadow areas totally black. Photographs shot of buildings or fireworks at night also want to be underexposed. You want the sky to be black so that the subject stands out against it.
Clipped Highlights
Clipped highlights are perhaps a worse sin than clipped shadows. As with clipped shadows, you don’t have any detail in the highlights. If the highlight is a brilliant cloud you just lost all of its shape and texture. Now the beautiful, dramatic cloud is a flat, featureless white blob. And there’s nothing you can do about it, even with the most sophisticated post processing.
Clipped highlights ruin more photographs than clipped shadows. When the image is printed all you see is the pure white of the paper. There is not a drop of ink on the paper and ink jet printers make really small drops. Aesthetically, we find deep shadows more appealing than featureless highlights.
Camera manufactures recognize this and have a feature built into their histograms. The highlight areas that are clipped will flash. This provides us with a dramatic warning that something is wrong and we probably need to decrease the exposure and re-shoot the image.
But now there are circumstances when clipped highlights are all right. This is when you are photographing what is referred to as ‘specular highlights.’ The sun glinting off of brightly polished chrome is an example. There is no detail and we wouldn’t expect any. In this case clipped highlights are not only ok; they are what we would expect. And of course, don’t forget the famous picture of two polar bears fighting in a snow storm.
Shooting in the snow is a classic example of needing to move the histogram to the right. Your camera’s built in light meter will want to put the histogram in the center of the range and that will make the snow like dingy and gray. You’ll need to increase the exposure to move the histogram back up to the right so that you get bright, white snow.
Rule of Thumb
An important rule of thumb regarding exposure is to avoid clipping of any kind – shadow and highlight. After capturing an image take a moment to check the histogram. Make sure it is not climbing either wall but is comfortably between the two ends. If there’s a little open area on either side of the histogram you would prefer it to be a bit closer to the right than to the left. This will help you avoid the problem of noise we discussed earlier. This is the mantra of many successful photographers, “Expose to the right.”
Now, this is a rule of thumb because we will want to follow it at least 90% of the time. That suggests that some times we will want to break the rule but the important thing is to understand when you want to break it and why, not for it to happen by accident or because we’re not paying attention.
Special Situations – the Flat Image
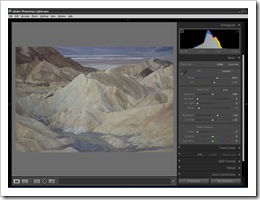
It won’t take long befe you encounter some special situations and you’ll want to now what to do with them. The first is very flat subjects. This is when the histogram is bunched up in the middle of the range. In other words, this is an image with a very low dynamic range.
This is a situation that is actually very exciting because it means there’s a lot you will be able to do with the image in post-processing. It probably doesn’t look like much of anything when you snap the photo but with a little experience you’ll be able to visualize the potential in the image.
From an exposure perspective you don’t want the histogram to be to far to either the left or the right. The center is the place that gives you the most to work with. This image could be just a bit more to the right. The light meter on my camera tends to under expose ever so slightly.
Many lighting conditions will produce flat images like this. The one above was taken at Zabriskie Point in Death Valley about a half hour before sunrise. Overcast days also give rise to flat images just as long as you keep the sky out of the frame. Now flat sounds like the image is uninteresting but the way the term is used here it just means that it has low contrast – no solid blacks or whites.
Why is this such a great image to work with? Because you can always add shadows and highlights; that is, you can always add contrast to the image. It’s not like trying to recover shadows from an underexposed image or highlights from an over exposed one. Amazing things will happen to this image as we add contrast. It will start to gain character and become alive. The colors that are very subtle and pale will grow in intensity and saturation.
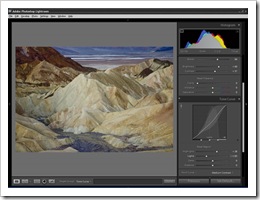
So how did it turn out you ask. Well, not too bad actually. Notice that now the histogram is much more spread out. It extends much farther to the left which gives the image a solid visual foundation. Also notice that it doesn’t extend all the way to the right. We could have done that but the results were too bright, too washed out.
All the colors that were pale and uninteresting in the first image are now vibrant and alive. It’s interesting that all the intensification of the colors comes strictly from adjusting the dynamic range. Additional saturation was not required. Now we can continue with some additional post processing if we wish but this is an excellent illustration of what can be done simply by manipulating the histogram.
You’re probably wondering how this was done. We’ll return to some simple post processing techniques in subsequent articles.
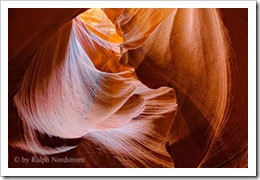
I’d like to digress here just a little. People ask me all the time, “Are those colors real?” I think it’s clear that the colors were not altered. The yellows are still yellow and the reds are still red. They are just more intense, more saturated. To my way of thinking, nothing was added to this image. What we are able to do is draw attention to what the eyes may have missed and that is the intricate shades and patterns in this remarkable sandstone. And while we’re at it, we can make our own personal statement about the feelings it creates in us. How far you want to take this is a matter of your own personal style and each of us would come up with something different, something personal.
Special Situations – the Clipped Image
So a low contrast (flat) image is really one to get excited about. But what about the opposite situation, an image where the dynamic range is so great that the histogram climbs both walls? This poses special challenges that force us to make some compromises.
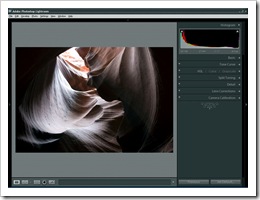
When this happens, the dynamic range is greater than the sensor or film can capture. This is called ‘high dynamic range,’ or HDR. This photograph was taken in Upper Antelope Canyon just outside Page, AZ. It’s an extremely difficult location in which to shoot. Antelope is a slot canyon that in some places is not wide enough for two people to pass. And yet it is 60 and 80 feed deep. In a situation like this the sun may never find its way down to the canyon floor whereas the top of the canyon walls will be bathed in full sunlight.
This photograph was taken looking up from the near total darkness of the floor to the bright canyon rim. As you can see from the histogram, most of the image is in the shadows. The histogram climbs the left wall, nearly to the top. But it also climbs the right wall – not a lot but it climbs it nevertheless. The bright spot at the top of the photograph is devoid of detail.
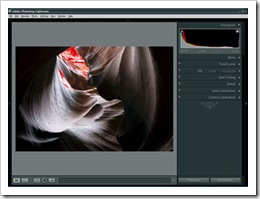
Your camera’s LCD image would be warning you right now by flashing the areas where the highlights are clipped. The areas in red in this Lightroom image illustrate this. If your camera showed highlight clipping (as most do), the red areas would be flashing.
Well, we have a problem with this photograph. We loose both highlights and shadows. What can we do? Most of the options we have involve making a compromise.
We can increase the exposure to allow more light into the camera and move the histogram to the right. This will give us detail in the shadows. But more of the bright area at the top will be clipped. In most instances this is the least desirable option, especially if there are large areas of highlight clipping.
The alternative is to decrease the exposure to eliminate the highlight clipping. This will plunge the rest of the photograph deeper into the shadows. This will generally be a more desirable solution, particularly in landscape photography.
Another option is to let the highlights and shadows clip. You will probably want to consider this if you are photographing people outdoors. You don’t want their faces to be overexposed or underexposed. A well exposed face against a backdrop of a beautiful blue sky with billowy white clouds will probably leave you with clipping in the clouds. Now, if you have a flash you can always use it for fill to lighten up the face and therefore reduce or even eliminate the clipping in the clouds.
There’s one final option. It is one that is done in post processing. It goes by various terms – ‘Digital Blending’ or ‘HDR.’ It’s a technique that works well in certain situations as in our last example. The process involves taking three or more exposures of the same subject, each at a different exposure. Your longest exposure will expose for the shadows. Your shortest exposure will expose for the highlights. In between you take as many exposures as necessary to bridge the gap. Then in tools like Photoshop or PhotoMatix you blend them together into a single image. The results can be absolutely stunning.
The morale of this little tale is simple – don’t rely on your light meter to give you a perfect exposure, check your histogram. Beware of clipping in the shadows and highlights, especially in the highlights.
With digital cameras we get instant feedback and can make adjustments immediately. So there’s really no need to be disappointed when we get home and upload our photographs to our computer. We are only in a specific place and time once so we have one chance to capture it. Don’t let a poorly exposed image ruin an otherwise glorious photograph.
(2534)

Thanks a million for an “in a nutshell” great explanation of a complex subject in photography. I will always use my histogram from now on.