I shoot a lot of HDR. That’s where you take multiple images at different exposures so that you capture the full dynamic range of the scene in front of you. Many people consider HDR to be unnatural and you can definitely get a surreal effect. But HDR is the only way you can capture certain challenging scenes and make the results look like what you see, not what your camera sees.
I had a talk with my good friend Andreas Waldeck who works for HDRsoft, the creators of Photomatix. This is the premier software for doing HDR. Andreas shared some things with me that were real eye-openers and I’d like to pass them along to you in a series of HDR Tips. So let’s get started with the first tip.
This tip has nothing to do with Photomatix or any HDR software for that matter. But it’s probably the most important tip of all. It applies to when you capture your images in the field. As with all photography, the exposure is critical and it’s the same with HDR. But this time there’s not a single exposure that you have to get right. There are multiple exposures that, taken together, all have to be right.
The aim of HDR is to capture the entire dynamic range and then some. Those last three words, “and then some” are very important. The histogram is the key to getting the proper number of exposures and the proper range. You will have an underexposed image that captures the highlights and an overexposed image that captures the shadows. In between you will generally have one or more exposures.
The trick is to get the underexposed image underexposed enough and the overexposed image overexposed enough. And the histogram is the best tool to make sure you’re getting what you need.
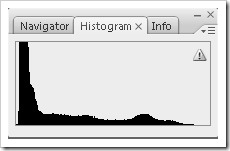
The underexposed image should be underexposed enough so that there is plenty of room between the right tail of the histogram and the right edge.
 The example above is about the minimum clearance I like to see. I’d actually like a bit more. A good rule of thumb is for the right tail of the histogram to end about 20% short of the right edge.
This is just the luminance histogram. You also need to be sensitive to the RGB histograms. Your luminance histogram may look like you have a comfortable margin but your RGB histogram may show that you have clipping in one of the channels. If that’s the case you need to underexpose even more. You don’t want clipping in any of the RGB channels. I find the red channel particularly problematical, especially photographing all the beautiful red rocks in the American Southwest. Blue clipping can be tolerated sometimes, especially if it is coming from the sky. There’s no detail in the sky. But when the red clipping comes from the rocks you’re loosing detail in the most important channel. So I always make sure the RGB histogram is displayed on the LCD and check it after every exposure, especially when shooting HDR.
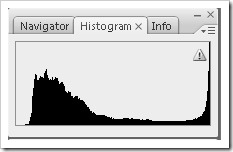
The considerations are a bit different when evaluating the overexposed histogram. In this case the luminance histogram tells the whole story.
 I follow the same rule of thumb; that is, I like the left tail of the histogram to be about 20% from the left edge. This example is find but a little more clearance would be just a bit better.
You really want a full exposure in your shadows. This will guarantee as much detail as you will ever want without any noise.
If you really want to be safe, spot meter the brightest highlight in your scene. This becomes the underexposure setting. Then spot meter the darkest shadow in your scene. This becomes your overexposure setting. The next question to resolve is how many exposures you will need between the overexposed and underexposed settings. Photomatix suggests intervals of 2 stops. So if the overexposed exposure is 1/8 at f/11 and the underexposed exposure is 1/500 at f/11, the entire dynamic range is 6 stops. If your exposure interval is 2 stops you would take the following exposures (all at f/11) – 1/8, 1/30, 1/120, 1/500 or four exposures.
Many experienced photographers advocate an exposure interval of 1 1/3 stops instead of 2. This would give you proportionately more exposures. I personally use 1 1/3 stops.
There are a few more quick tips for shooting in the field.
- Shoot aperture priority or manual. If you shoot manual, vary the shutter speed, not the f/stop.
- Shoot from a tripod
- If your camera supports 3, 5 and even 7 exposures, set it up to automatically take the required number. If it doesn’t than carefully adjust the exposure manually for each shot (again, on a tripod).
That’s it for the tip #1. Contunue with HDR Tip #2 where I discuss preparing RAW images for Photomatix in Lightroom.
Here are three articles I’ve written in the past about HDR that provide a bit more insight into the theory and practice behind this technique.
We work on HDR in our workshops where you can get real world hands-on experience with this powerful technique. Join me on one of them.
To see more of my photographs click here.
Become a fan on Facebook and follow along.
(2435)

One thought on “HDR Tip #1”