
HDR Exposure
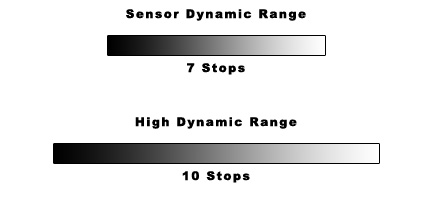
This is the third in a series of articles on high dynamic range, more commonly known as HDR. The previous article illustrated how HDR situations occur; namely, when the dynamic range of the subject exceeds the dynamic range the sensor (or film) is capable of capturing.
But with digital photography there is a technique for dealing with it. In the field, it begins with taking multiple shots at different exposures so that the combined dynamic range exceeds that of the subject.
Let’s use the example above. Our camera’s sensor is capable of capturing 7 stops of dynamic range. But our subject has a dynamic range of 10 stops. We’re going to bracket with three shots at +/- two stops. That is, we’ll take one shot two stops under, the second at the ‘normal’ exposure and the third two stops over. They look something like this.
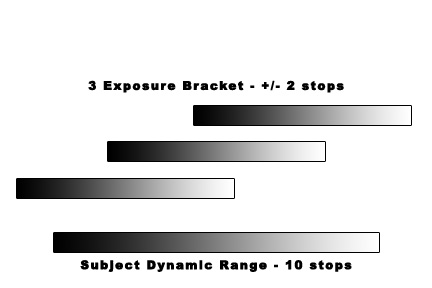
The two-stops-over exposure will severely clip the highlights. In fact, about half the dynamic range of the subject will fall above the sensor’s dynamic range. But the shadows are fully exposed, falling well above the darkest dark of the sensor..
The ‘normal’ exposure falls in the middle of the subject’s dynamic range. It will have both shadow and highlight clipping. But the mid tones will be well exposed.
The underexposed shot will severely clip the shadows. But the highlights will be well within the sensor’s range and be well exposed.
When all three exposures are later combined the total dynamic range will extend beyond that of the subject by a good 1 stop on either end.
HDR Considerations
There are a couple of things you want to keep in mind when shooting HDR in the field.
- Probably the most important is to recognize HDR situations. To do that, take the time to check your histogram after you’ve taken a shot. Check for clipping. If you have either shadow or, worse yet, highlight clipping the subject is a good candidate for HDR. Even if you don’t see clipping but the histogram extends from one side to the other, you probably should do HDR if or no other reason than the fact that your camera’s histogram isn’t perfect in identifying clipping. And besides, if you do shoot HDR you are guaranteed of much better shadows and highlights.
- Mount your camera on a tripod. You will want your images to register perfectly. It’s true that if you hand hold when you shoot you can manually register the images and also some HDR programs will align them for you. But why do the extra work? Put your camera on your sturdy tripod and make your exposures. In the interest of total openness, however, some of the new cameras are so fast that you can actually do HDR hand held. If you’re camera shoots at 10 frames per second, how much can you move in 3/10 of a second for a three exposure bracket? Not much. And even if your camera shoots 5 frames per second, you’re not going to move that much. So it is possible these days to shoot HDR hand held. But you’d still want to be using a good HDR utility that will align the images for you.
- Use a remote release. You don’t want to go to the trouble of composing your shot on a tripod only to jiggle the camera by tripping the shutter with your finger. Besides the possibility of the images being out of alignment, they may also be out of focus.
- Set your camera to aperture priority when you bracket. You want to vary your exposure by adjusting the shutter speed, not the aperture. If you do the latter you’ll change the depth of field and mess up the alignment. You don’t want to do that.
- Bracket plus and minus 2 stops. You can do less than that and may find marginal gains in the tonality of the final image but they probably won’t be that great. If you bracket the full two stops you’ll have a better chance of capturing the full dynamic range of the subject. But if you bracketed more than 2 stops the image will definitely suffer.
- You may need more than 3 bracketed shots. You may need 5 or even 7. If you’re fortunate enough to have a camera that takes up to 7 bracketed shots you’re in luck. Otherwise, you’ll need to shoot with your camera on manual and adjust the shutter speed yourself. Remember your sturdy tripod? Yep, you’ll really need it when you have to shoot on manual.
- In your overexposed shot (the light one) make sure the left end of the histogram is well above the left side of the scale. I like to have it 1 or even 2 stops above the left of the scale. A good friend of mine swears by overexposing to the point where there is no detail at all. The same holds true for the underexposed shot (the dark one). Make sure the right side of this histogram is at least one to two stops below the right side of the scale. Or, if you want to follow my friend’s lead, keep on underexposing until the image is entirely black.
In the next post we’ll start looking at how to process the bracketed images in our digital darkroom.
Here’s an example of a photograph I’ve been working on recently that used HDR. It was taken in Antelope Canyon in February of this year.
Here are the other posts in this series.
(1576)
2 thoughts on “High Dynamic Range #3 (HDR)”