We’ve all seen those photographs that stop us in our tracks, that inspire us, that speak to us. Some photographs seem to have a special power, a special presence. Often times we hear ourselves saying, “Wow.” They have qualities that make them stand apart from other photographs. These are images with impact.
The masters of landscape photography seem to have the ability to capture a special quality of light in their photographs. It doesn’t matter whether they use film or shoot digital, their images stand out.
There are certain things about these images that do more than just appeal to us – we are drawn into to them. They capture our imaginations, stir our interests and perhaps show us moments in nature we could only hope to experience. We want to linger with them, explore them, take them in, get lost in them.
Without a doubt these photographs have compositions that are very strong, are bathed in fantastic light and have technical qualities of exposure and sharpness that are perfect. These are all decisions that the artist makes in the field, decisions that are critical to a strong image.
In the days of film, a good portion of the magic was done in the darkroom. That’s where their genius really became apparent. And it hasn’t changed today. We don’t actually have dark rooms to work in, closed rooms with the strange array of mysterious orders and the soft, dim yellow lighting. Today we have powerful software running on even more powerful computers. But really, how is that different from what the film Masters did in the darkroom? I don’t believe it is. I can’t think of anything that’s been done with “Photoshopped” photographs that hasn’t already been done in the darkroom. It’s probably a lot easier to do it in Photoshop but in the end, both the chemical darkroom and the electronic darkroom serve the same end, that being creating those “Wow” images.
In this series of posts I want to spend more time considering some techniques you can apply in the darkroom that will add impact to your images.
Use the Full Dynamic Range of Your Medium
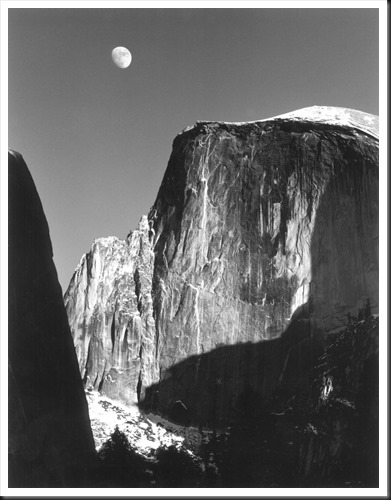
The first darkroom technique I would like to discuss is the importance of using the full dynamic range of your medium. This is not something new. When Ansel Adams developed the zone system it was precisely for this purpose – to use the full dynamic range of the black and white negative and ultimately the black and white print. But what exactly does it mean to use the full dynamic range of the medium. Let me illustrate with an Ansel Adams image I have loved for many years, one I’m privileged to be able to live with in my home – “Moon and Half Dome.”
In this exquisite photograph if you are able to examine an original closely you will notice that the shadow on the left may look like it is totally black but actually there is subtle detail. However, there are some very small areas that are pure black. Also, the moon and the bright parts of Half Dome may look like they are pure white but a closer look will reveal detail in these areas also. This photograph takes full advantage of the full dynamic range of the paper, from the blackest black to the whitest white.
Color film photographers pretty much had to use the full dynamic range of their medium. Most serious and professional color photographers photographed with color reversal film – slides. Exposure latitudes were very narrow so exposures had to be carefully calculated and bracketed so that you got the optimal image. But even more so, the most popular color reversal films had a very narrow dynamic range, typically about five stops. Most of the scenes that we photograph in nature have a dynamic range of at least five stops. So by definition, photographs of nature were going to use the full dynamic range of the film.
The photographic world changed dramatically with digital photography. The dynamic range of our sensors continues to expand, having surpassed color reversal films years ago. Today we are able to capture tricky lighting conditions that we had to walk away from when our cameras were loaded with film. Adam’s technique of utilizing the full dynamic range of black and white film is no longer a possibility with digital (it wasn’t a possibility with color film either). Now utilization of the full dynamic range of the medium occurs largely in the darkroom.
Lightroom Techniques
I want to share with you some Lightroom techniques that can be used to create images that use the full dynamic range. But before doing that let’s talk a little bit about the histogram because that’s our guide to not only using the full dynamic range of the medium but other very important techniques that will be discussing in subsequent posts.
The histogram is nothing more than a graph that simply shows how much of each tonal value we have in our image. The left side of the graph is dark, the right side is bright. The far left is black and the far right is white. If the histogram extends from the left to the right, no matter what the shape, the images using the full dynamic range available to it. That is, as long as the graph doesn’t climb the left wall or the right wall. When that happens you have clipping – shadow clipping and highlight clipping. As we will see as we go through these posts, this is something to be avoided. But a histogram that fills the full range from left to right indicates that you’re using your full dynamic range.
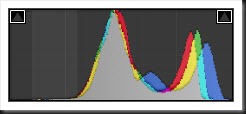
Above is an example of a histogram that does not use the full dynamic range of the medium. There’s a small gap to the right but a much larger gap to the left. The impact of this image can be strengthened if we can only stretch the histogram more to the left…, like this.
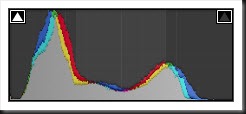
This histogram is of the same image after it’s been adjusted in Lightroom. Now a lot more of the images is darker. The histogram tells us that because more of the histogram is in the darker area on the left. But what effect did that have on the image itself? Let’s take a look.
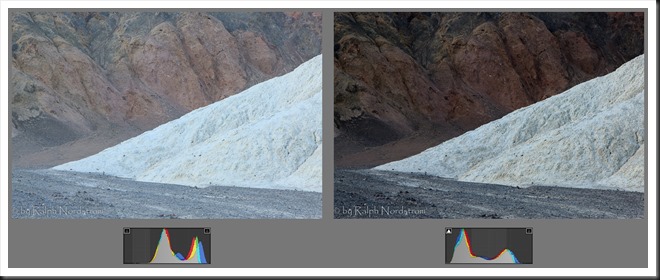
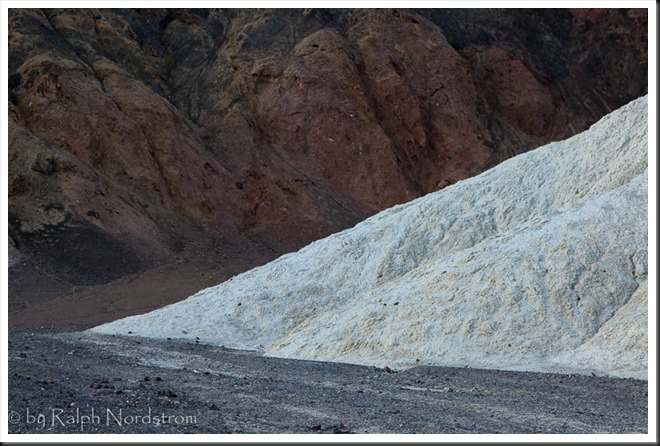
Here are the before and after images with their histograms below them. The before image looks kind of washed out. It doesn’t have anything that really draws you into it. It’s pretty weak. The after image on the other hand is very dramatic and very strong. You can see a lot more detail in the white triangular portion and the darker background serves to set the white off even more.
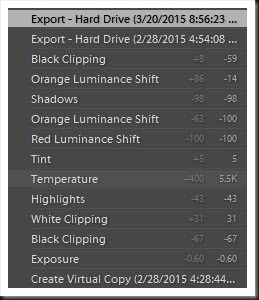
So how did we get from the before to the after? This was done in Lightroom so let’s take a look at the Lightroom adjustments that were applied. The first thing I noticed in the before image was that the histogram was to the right making the image brighter than what I really. So I use the Exposure adjustment to move the whole histogram to the left. The value I used was -.6 or about minus two thirds of the stop. This is like decreasing the exposure in your camera two thirds of a stop.
The next thing I did was something I do with virtually every image and that is to set a black point. This means making some minuscule areas of the image pure black. This makes full utilization of the lower end of the histogram. To set the black point I used the Blacks adjustment. As I made the adjustment I watched the histogram as the left toe stretched out towards the left side. I also watched the little triangle in the upper left-hand corner. Just at the point where it turned a solid white I had my black point. It turns out that a -67 gave me what I was looking for.
Now, these two adjustments have darkened the triangle too much so I needed to breathe some light back into it. I added +31 of Whites for this.
The white triangle in the image was brighter now but still a little washed out so I use the Highlights adjustment to darken it a little. My goal was to add more detail and that’s just what the Highlights adjustment did. I ended up using a -43 and that turned out to be just about right.
The next thing I wanted to do was darken the cliff in the background without darkening the rest of the scene. I wanted to do this so that it would set off the white better. I used one of my favorite Lightroom adjustments, one that is often overlooked. It is in the HSL section where you can adjust – hue, saturation and luminance. And the cool thing is, it only adjusts those qualities for the colors you select. All other colors are left unchanged. So I selected Luminance and adjusted the red and orange channels to -100. That made the brown cliff even darker without darkening any other part of the image.
But the shadows were still too bright to my liking so I use another favorite Lightroom adjustment – Shadows. I usually use it to open up shadows but this time I needed to darken them. In this case a -98 work just fine.
One last tweak of the Blacks adjustment from -67 to a -59 and the image was done. Here’s the history from Lightroom of all the adjustments that I made.
Lightroom Adjustments Summary
Let me summarize the Lightroom controls I used for this photograph.
Exposure –This control can be used to slide the histogram to the left when the overall image is too bright or to the right when it is too dark. For this photograph I needed to darken the image so I applied a -0.6 adjustment.
Blacks – This control works on the far left end of the histogram without affecting the right end much if at all. I used this to set the black point for the image.
Whites – This control works the opposite of Blacks; it adjusts the far right end of the histogram. I used this to bring back some of the brightness I lost in the triangle from the Exposure control.
Highlights – This control also works on the bright end of the histogram but not the far right end. It works more toward the center. I used this control to add more detail to the white triangle.
HSL-Luminance – This control just affects the brightness of particular colors. In this case I wanted to darken the brown cliff that and was able to do that without affecting any of the other colors.
Shadows – This control is the opposite of Highlights; it affects the dark end of the histogram but the darks closer to the center. I used this to darken the shadow areas a bit more.
So you see that using the full dynamic range of your medium can help to create an image that has a lot of drama, an image with impact.
Besides using nearly all of the dynamic range of the medium, the final image has some other qualities that are worth pointing out. There is plenty of detail in the shadows, something that I think is very important. When you look at the cliff and the background it’s not like you looking into a cave where you think there is something you should be able to see but you can’t. No, it’s shadowy but at the same time is still very clear. Similarly with the white triangle. It’s bright and stands out calling attention to itself. But it also has texture and detail, it’s not washed out. And this adds even more to its interest. And ultimately the sharp contrast between the bright and the dark makes for a very dynamic image – an image with impact.
Coming Up
In the next blog post I want to talk about black point and share with you a few ideas on its importance and how to achieve it.
We do photography workshops. Come on out and join us. Click here to check us out.
You can also check out our photography. Click here.
(4731)

Thanks Ralph, enjoyed this post and look forward to reading the new ones. It was good seeing you last Saturday in 29 Palms.
Thanks Roberta. It was good seeing you too.