In the first article (All You Ever Wanted to Know about Exposure) we identified the four variables of exposure – ISO, aperture, shutter speed and light intensity and compared exposure to filling a glass of water. We can control the first three in order to respond to the fourth. In the second article (Mastering Exposure – Next Steps) we discussed how to use the histogram on a digital camera to help us get the best exposure. We looked at examples of overexposed and underexposed images. We also introduced the concept of dynamic range and took a look at some of the challenges and opportunities we enjoy when we have images that have a very low dynamic range (low contrast) and a very high dynamic range (high contrast).
You may have thought we said all there was to be said in the first two article. Well, believe it or not there’s more – how to use exposure creatively. We can start by talking about the four variables. Let’s not get into the last variable, light intensity, just now. Rather let’s start with aperture and shutter speed.
Now you will recall that if the ‘perfect’ exposure is ISO 100, f/11 and 1/125 sec. then we’ll get the same perfect exposure at f/8 and 1/250 sec or f/16 and 1/60 sec. In each of these exposures, the same amount of light is striking the sensor. In going from the first to the second example we increase the amount of light coming through the lens by changing the aperture from f/11 which is fairly small to the larger f/8. In fact, you’ll recall this doubles the amount of light. So we use a faster shutter speed changing it from 1/125 sec to 1/250 sec and the end result is the same amount of light. Back to our glass of water example, if the water comes in faster it takes less time to fill the glass.
Similarly, going from the first to the third example we’re doing just the opposite. In this case we decrease the aperture from f/11 to f/16 which decreases the amount of light coming through the lens by half. So we need to double the length of time the shutter is open from 1/125 sec to 1/60.
So if all of these plus a host of other combinations give you the ‘perfect’ exposure how do you choose one over the other? And does it matter which one you choose? Well, it certainly matters (of course) and your selection will affect your image. You can approach your decision from the perspective of aperture or shutter speed. Let’s take aperture first.
Creative Use of f/stops
Have you heard of a pin hole camera? Recently the world’s largest photograph was taken at the abandoned El Toro Marine Corps Air Station in Irvine, California by a group called the Legacy Group led by Jerry Burchfield. The camera was an airplane hanger! Yes, an airplane hanger that was made light tight. The photograph is 3 stories high and 11 stories long! For the lens they drilled a ¼” hole in the hanger door. A perfectly sharp formed on the opposite wall where the photographic ‘paper’ was hung.
This was the worlds largest pin hole camera. The principle is very simple. If you use a very small hole as your lens you will get a perfectly sharp image. As the size of the hole increases the picture will get fuzzier. But the trick of a pinhole camera is that everything is in focus from the closest objects to the horizon and beyond.
But, you say, when you shoot your pictures very often part of the image is in focus and part is out of focus. And, I answer, that’s because you’re not shooting with a pin hole camera. Your lens is anything but a pin hole. In fact people pay a lot of money for a fast lens; that is, a lens that has a very wide opening and thus allows more light to enter. Without all the optics in your lens, nothing would be in focus with a hole that large.
What does this have to do with the creative use of aperture? It’s very simple. As you ‘stop down’ your lens such as going from f/5.6 to f/11, the diaphragm in your lens becomes smaller. This effectively turns your lens into a bit of a pinhole camera. The result is that more of your image is in sharp focus. It’s called, ‘Depth of Field.
So if you’re taking a photograph where some objects are close to you and others are far away and it’s important for all of them to be in focus you will want to shoot at the higher f/stops – f/11, f/16, f/22… This increases the depth of field and gives you a sharper image. And to get a correct exposure you’ll need to compensate by using a slower shutter speed and thus increasing the length of time your shutter is open.
Another factor worth mentioning is that you get greater depth of field from a wide angle lens than you get from a telephoto lens. So those wonderful photos of something in the foreground with the background also in focus employ two tricks – a wide angle lens and an f/stop of f/11 or greater.
(It’s worth mentioning that some photographers are reluctant to use the really small f/stops; e.g., f/11, f/16, f/22, etc. There is a very real phenomenon with the smaller f/stops called ‘diffraction’ that compromises the sharpness of the image. Other photographers, myself include, hold that uniform sharpness through the entire image is more important than every little thing being tack sharp.)
But sometimes you want to do what many people refer to as ‘Selective Focus.’ That’s where part of the image is in focus and the rest is out of focus. This is really nice in portrait photography. The face and especially the eyes are very sharp and the background is soft. I bet you’ve figured how this is done. To selectively focus on one part of the image and let the rest of it go out of focus you will shoot at the lower f/stops – f/5.6, f/4, f/2.8…. This decreases the depth of field. And to compensate for the increased amount of light coming through the lens you’ll need to use a faster shutter speed to decrease the length of time your shutter is open. You can also use a telephoto lens to enhance the effect.
This gives you one more thing to think about before you snap the shutter. Do I need a deep or shallow depth of field? Or does it even matter? Where do I want to set the focus to take the most advantage of depth of field? If I need a deep depth of field, can I get away with the longer exposure that will be required? Is the wind blowing leaves around that will blur with a longer exposure? Can I increase the sensitivity of my sensor (higher ISO number) to get the exposure length back down? But don’t worry. All these questions have answers and with the knowledge of exposure that you are gaining, you’re now in control.
Creative Use of Shutter Speed
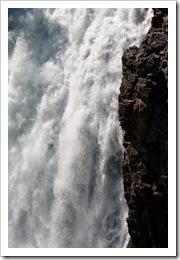
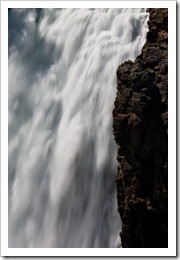
So if aperture gives you creative control of depth of field, what sort of creative control can you get with shutter speed? When photographing a waterfall, for example, you can give your photographs an ethereal feeling by using a long shutter speed. The longer the shutter speed the more ethereal the water becomes.
Compare these two photographs taken of Upper Yellowstone Falls. The one of the left was shot at 1/200 sec and the other at 1/8 sec. It’s interesting to look at the two and think about the different stories they tell. By getting just the right exposure length the same waterfall can be a statement of raw power or delicate softness. You can depict surging motion or fine lace. Try it the next time you get a chance to shoot a waterfall. Vary your exposure from very fast which will turn the waterfall into an ice sculpture to very slow which turns it into gossamer and many stops in between. You will be amazed at what a different emotion each conveys.
To get long shutter speeds you will want to set your ISO at the lowest possible setting and your f/stop as high as possible. Still, in bright sunlight you may only get a relatively short shutter speed, say on the order of ¼ sec. That may not give you the soft ephemeral look you are after. At this point many photographers reach into their camera bags and pull out a neutral density or polarizing filter.
A neutral density (ND) filter is simply a gray piece of glass (very high quality glass to be sure) that you screw on the front of your lens that has the effect of decreasing the amount of light that comes through. The fact that the glass is gray means it does not add a color cast to your image. ND filters are rated in the number of stops of darkening they provide, starting at 2 f/stops. So if you added a two stop ND filter on top of your ¼ sec. exposure you now have a full 1 second exposure. If you added a four stop ND filter your exposure time increases by yet another two stops giving you a 4 second exposure – very ephemeral.
A polarizing filter works like Polaroid lenses in sunglasses. Without getting into the physics of polarized light, polarizing filters block some light from coming through while allowing other. Polarizing lenses are typically used to give intense blue skies or decrease the reflection off of water. These lenses actually let you rotate the glass part of the lens and as you do you will see the effect it creates come and go. To get the blue sky effect you need to be taking your shot at roughly right angles to the sun. If you shoot directly into the sun or with the sun at your back the effect is negligible. But at the right orientation, as you rotate the filter you will see the sky go from dark to light with every 90 degrees of rotation. The same holds true of reflections from the surface of still water. You can pretty much rotate the filter so that all reflections are removed.
The polarizing filter looks very much like a ND filter in that it is a dark gray. The number of stops of darkening you get with one of these filters is between 2 and 4 stops, depending on the orientation and the conditions of the light.
Of course you won’t be able to hand hold your camera perfectly still for 4 seconds or even ¼ second. You’ll definitely need a sturdy tripod to get this shot.
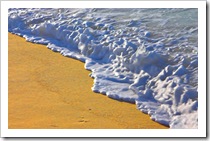
Often times a short shutter speed will allow you to see beautiful patterns in water that simply happen too quickly for our eyes to catch. The surf is great place to use a short shutter speed, capturing the waves in fantastic forms that pass too quickly for our eyes to see and appreciate. There are some marvelous shots to take this way.
You can experiment with short and long exposures in other situations as well. For example at a sporting event a long shutter speed allows you to create a sense of motion and speed. Panning with your subject as it goes buy keeps your subject sharp but blurs the background.
Using Your Camera Settings Creatively
Your camera has a built in light meter that automatically tries to determine the best exposure. And quite often it does a very good job. Many people shoot in fully automatic mode. In this mode your camera will make a conservative choice that balances depth of field with shutter speed. Often this works just fine.
But if your subject requires that you control depth of field a little more carefully you will be concentrating on aperture. In this situation you want to control the aperture and let the camera determine the shutter speed. This is referred to as ‘aperture priority’ mode. Most cameras have an aperture priority or Av mode. Your attention is on setting the aperture to give you the depth of field you want. The thing you have to be careful of, however, is stopping down so much that your shutter speed drops to the point that you can’t hand hold the camera any more without getting a blurred image. Great landscape shots with extreme depth of fields are taken from a tripod with a wide angle lens.
Speaking of depth of field, slow shutter speeds and hand holding the camera, there’s an important rule of thumb you should know. You can hand hold the camera if your shutter speed is 1 divided by the focal length of your lens. Let’s do a couple of examples. If your focal length is 35mm then you can hand hold your camera if your shutter speed is 1/30 or faster. Likewise, if your focal length is 100mm then your shutter speed needs to be 1/100 or faster to get a sharp image. So the longer the focal length (the more powerful the telephoto) the faster shutter speeds you need in order to hand hold your camera and get a sharp image. That kind of makes sense since very slight movements are exaggerated with a telephoto lens.
Likewise, if you want to control the shutter speed you can set your camera to ‘shutter priority’ or Tv mode. You select the short or long shutter speed depending on the effect you want to create. The camera’s light meter will set the aperture.
When using either Av or Tv modes the light intensity may be such that the camera just can’t pick what it thinks is a good exposure. For example, if the maximum shutter speed your camera has is 30 sec. and you want to have good depth of field in low light conditions, you may need an exposure of 2 minutes at f/11. If you’re trying to shoot in Av mode your camera won’t be able to set a 2 minute exposure. The best it can do is 30 sec. So it will have a way of alerting you to the fact that it can’t set the exposure. You will have to do one of two things – decrease the f/stop or switch to manual mode where you control both f/stop and shutter speed. In this case you’ll set your shutter speed to Bulb to get your 2 minute exposure. You can count – “One thousand one, one thousand two, one thousand three, one thousand four,…. – or you can use a remote shutter release with a built in timer. I’ve done it both ways with exposures up to ten minutes the counting way. Believe me, the remote shutter release is a whole lot easier.
Most cameras also have ‘creative program’ modes. These modes are created for those that don’t want to think about shutter priority or aperture priority. If you have one of these cameras you will find a landscape mode. This will give you the best depth of field and picture quality. So it will set your ISO very low and stop down the aperture as much as possible. Portrait mode will give you a shallow depth of field so that the person will be in focus while giving you a nice blurred background. Sports mode will go for a higher ISO and shorter shutter speeds to stop the action.
‘Fireworks’ is an interesting mode found on some cameras. Besides adjusting ISO, aperture and shutter speed, this mode underexposes the image. With the night sky as the dominant element of the picture and the built in light meter will attempt to lighten it. To keep the night sky dark as it should be the image has to be underexposed.
This raises an interesting point that’s worth sharing. If you are shooting extremely bright scenes like snow, your light meter will want to darken it. You’ll end up with gray, dingy snow and the histogram will be centered. To correct that you need to overexpose your shot and move your histogram to the right. Now your snow will be bright and shiny like you expect.
The fireworks example above requires the opposite correction. Shooting against a dark background like the night sky will also fool the light meter. It will want to make it brighter, probably not what you want. To get the sky dark again you will need to underexpose.
These corrections may seem counterintuitive at first but if you think about them a bit they make sense.
So that about covers exposure. If you’ve read all three articles you have an understanding of the fundamental concepts.
Happy shooting.
(1673)

