Background
Depth of Field (DOF) is a staple of near-far landscape photography. It is used when the composition contains object that are very near to the lens as well as objects that are distant. Traditionally, it has been achieved by using a wide-angle lens with a small aperture or a tilt-shift lens. Using this technique, it is possible to have the nearest object one or two feet from the lens and everything is in focus from the object to infinity.
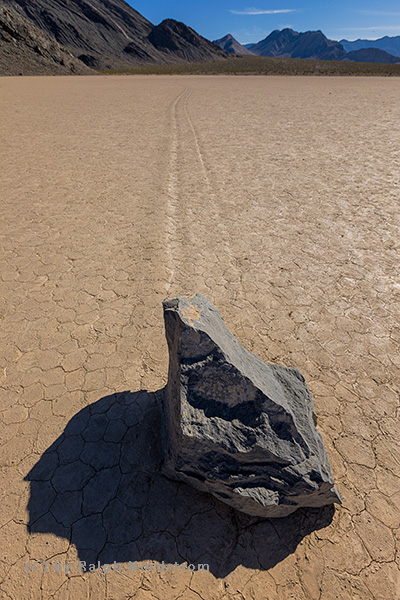
The disadvantage of this method is you must use a wide-angle or tilt-shift lens, preferably on a full-frame sensor camera body, and a small aperture. (In this image, the rock was 18” from the lens. I used a 16mm lens on a camera with a full-frame sensor and was able to get the needed DOF at f/11.). But small apertures introduce lens diffraction which work against you by softening the entire image. And what if you don’t have a wide enough lens. You couldn’t get this shot with a 24mm lens. And getting any kind of DOF with a telephoto lens is virtually impossible, even with fairly distant subjects.
Determining Depth of Field
What is depth of field and how do you know if you have enough of it? Depth of field is a range in front of your lens where everything within the range is in focus and things in front of or behind the range are out of focus. Depths of field can be shallow or deep, depending on three factors that you can think of as ‘the 3 Fs.’ They are Focal Length, Focal Distance and F/stop.
Focal Length
With your zoom lens, you can determine the focal length by reading it directly from the barrel of lens once you have composed your image (on a tripod of course).
Shorter focal lengths (wide-angle lenses) produce deeper depths of field.
Focal Distance
With auto-focusing we seldom think of Focal Distance. That is left up to the camera to determine. But in near-far compositions it is critical that you focus on the hyperfocal distance. That is twice the distance to the nearest object in your composition. In the example above, the rock is the nearest object and is 18 inches from the lens so the hyperfocal distance is twice that or 36 inches. I focused on a sport behind the rock and 36” from the lens.
Shorter distances produce shallower depths of field.
F/stop
Once you get your near-far composition dialed in, you know the focal length and focal distance (the hyperfocal distance). The only thing you don’t know is the f/stop. Some people carry DOF charts with them. I even had a circular calculator like the circular slide rules of old. But now there are apps for that. The app I prefer is Jeff Menter’s Lens*Lab. Specify the size of your sensor, focal length and focal distance and Lens*Lab will tell you the f/stop you need to get everything in focus. More on Lens*Lab later.
Smaller apertures (higher f/stop numbers like f/22) produce deeper depths of field.
Focus Stacking to the Rescue
It was just a few weeks ago that I finally took a deeper look at focus stacking in preparation for the Death Valley workshop. Focus stacking is a simple concept. Instead of taking one photograph with a depth of field to cover the entire scene (if that is even possible), take multiple photographs focusing on different focal distances.
The shortest focal distance has the near objects in focus, but the distant objects are out of focus. Successive shots are taken at increasingly longer focal distances bringing that part of the image into focus, but the rest would be out of focus.
Then, in the digital darkroom, the images are blended, selecting the sharp part of each image and ignoring the out of focus part.
Focus Stacking in the Digital Darkroom
At first, I thought the digital darkroom part would be the hardest, but it turns out to be the easiest, at least with Lightroom and Photoshop. So we will start with that. Here are the steps to follow.
- Import your images into Lightroom.
- Identify the images that are focus stacked and select all of them.
- From the Lightroom menu, select Photo | Edit In | Open as Layers in Photoshop…
This loads all of the selected images into Photoshop creating a single file with a stack of layers where each layer is one of the images. - In Photoshop select all of the layers and, from the menu, select Edit | Auto-Align Layers…. Choose the Collage option.
This will line up each of the layers, making any adjustments necessary so all of the elements are aligned. This is important because by changing the focal distance the location of each element can change slightly within the frame, causing them to be slightly out of alignment. Photoshop does a good job of making adjustments to each layer to get them all back into alignment. - Finally, again with all of the layers selected, select Edit | Auto-Blend Layers…. Select the Stack Images option and check Seamless Tones and Colors just to be safe.
Photoshop now creates layer masks for each layer, selecting the in-focus part of the image while masking out the out of focus part. When it is done, all of the layers you added will show masks and a new blended layer is added at the top of the stack. - Flatten the layers and save the file.
You can now continue working on the focus-stacked image in Lightroom.
Focus Stacking in the Field
So, as you can see, Photoshop makes blending the stacked images a snap. The thing you need to look out for occurs when you take your shots in the field.
The process is pretty straightforward. Set up your tripod and compose the image. Once composed, focus on the nearest object and take a shot. Then focus on a more distant object and take another. Repeat this process until you have enough shots so that every part of the image is in focus. Keep in mind that as the focal distance increases, the depth of field also increases.
You may be able to get all the depth of field coverage in two shots or it may take 50 shots. (By the way, 50 shots would be common for macro photography and rare in landscape photography.) How do you know how many you need? We’ll get to that. But first we need to talk about how to focus on a specific object.
How to Focus
Focusing at different focal distances requires identifying objects at the desired distances and focusing on them. This is virtually impossible through the viewfinder. You need to use the camera’s LCD screen.
- Put your camera in manual focus mode.
Some cameras have a switch on the lens, some have a switch on the camera body, and some have both. - Turn on Live View.
If you have a mirrorless camera you’re always in Live View. - Magnify the view.
Normally there will be a control on your camera with a little magnifying lens icon and a + sign. Pressing it once will magnify the view 5x. Pressing it twice will magnify it 10x. Your camera may be a little different, but you get the idea - Navigate to the object you want to focus on.
Your camera has some sort of ‘joy stick’ control that lets you navigate to different parts of the image when magnified.
You may need a lower magnification to find the object. - Magnify the object to full magnification; e.g., 10x.
- Using the focus ring on your lens, bring the object into sharp focus.
If you have a loupe, this will be very helpful. - Take your shot.
- Repeat beginning with Step 2 for each successive shot.
Now that you know how to use your LCD screen to get a tack sharp focus at the desired focal distance, it’s time to introduce two methods for doing focus stacking. It comes back to the question, “How many shots do I need go get everything in focus?”
The Overkill Method
One way to answer this question is to shoot way more shots that you possibly need. This will insure you don’t have any DOF gaps.
- Start with focusing on the nearest object and taking your shot.
- Using your camera’s screen, move your focus about 1/6th of the way up from the bottom of the screen, refocus and take your next shot.
- Repeat Step 2 at 1/3rd of the way from the bottom.
- Repeat Step 2 at ½ of the way from the bottom.
- Shoot one more shot focusing on your distant object.
These numbers are just guidelines. It is better to err by taking too many shots than not enough. The idea is to make sure you adequately cover the full depth of field. The tricky part of this is you won’t know if you are successful until you get back to the digital darkroom and blend the images.
The Calculated Method
This is a more precise way of determining both the number of shots and the focal distance of each.
Remember Lens*Lab? Well, you can use it to determine the exact number of shots you need. We will use this image as the example.
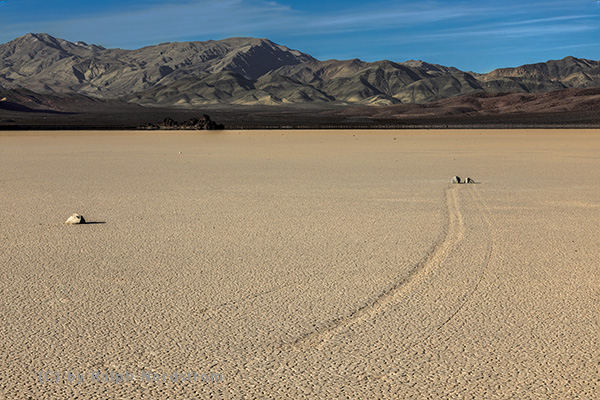
This image was shot with a 100mm lens at f/8. The longer lens was chosen to get the composition I envisioned. F/8 was to use the sharpness sweet spot of my 100-400 lens. But those two settings would not give the depth of field I needed.
Here’s the process I went through.
- Determine relevant distances.
a. The first relevant distance is the nearest object. This is at the bottom of the screen right below the start of the track. I paced it off and determined it is 40 feet.
b. The next relevant distance is to the subject of the image, the pair of rocks. Pacing it off gave a distance of 150 feet.
With this information, I need to determine the number of shots I need and the focal distance of each shot. Enter Lens*Lab.
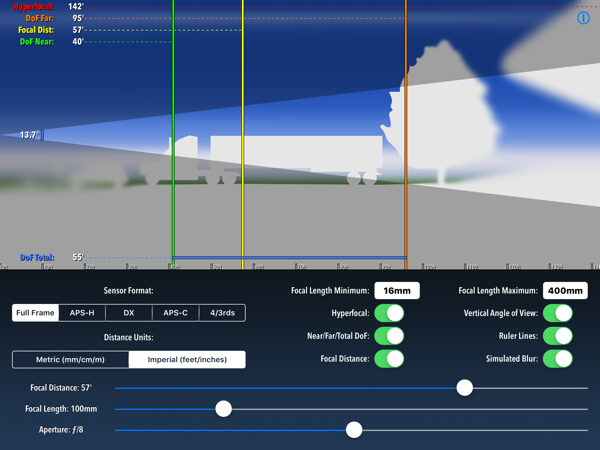
Here is a Lens*Lab screen shot. At the bottom you see three sliders. The middle one is Focal Length which is set to 100mm. The bottom slider is aperture and is set to f/8. These are the two DOF factors that we know based on the composition and settings I selected. They will not change.
Only the focal distance will change. That’s the first slider and is set to 57’.
At the top left corner of the screen you see four numbers with colored labels. These numbers are calculated from the Focal Length and Aperture mentioned and the Focal Distance of 57’.
The red label is Hyperfocal which says that the hyperfocal distance is 142’. But since we’re focus stacking, we’re not interested in hyperfocal distance. That would only be important if we wanted to capture the full DOF in one shot.
The orange label is Dof Far , that is, the farthest distance from the lens at which objects are in focus. Beyond that distance objects become progressively out of focus. The value is 95’.
The yellow label is Focal Dist. This is the same Focal Distance as is set in the slider below – 57’.
The green label is Dof Near with a value of 40’. This is the opposite of Dof Far in that any object closer than Dof Near will be out of focus.
The depth of field for this setting, then, is the distance between Dof Near (40’) and Dof Far (95’). Notice that Dof Far falls short of the two rocks which are 150’ from the lens.
With this introduction to Lens*Lab, let’s proceed with the Calculated Method.
- Determine the Focal Distance of the first shot.
a. From what we see in Lens*Lab, we see that the Dof Near is 40’ and that is the same distance as the distance to the nearest object at the bottom of the screen.
b. The Focal Dist. to get the near depth of field the same as the distance to the nearest object is 57’. This, then, is the focal distance for the first shot. - Place an object at 57’ and focus on it.
There is no object to focus on that is at 57’ so I got another rock, paced of 57’ and placed it on the playa. That’s what I focused on. - Take the first shot.
I took two shots, one with the rock in place and one with it removed. I’ll use the one without when I blend the images in Photoshop.
- Determine the focal distance of the next shot.
My first thought is to see if focusing on the pair of rocks will give me a depth of field that overlaps the first shot. So, I adjusted the Focal Distance in Lens*Lab to 150’, the distance from the lens to the rocks,
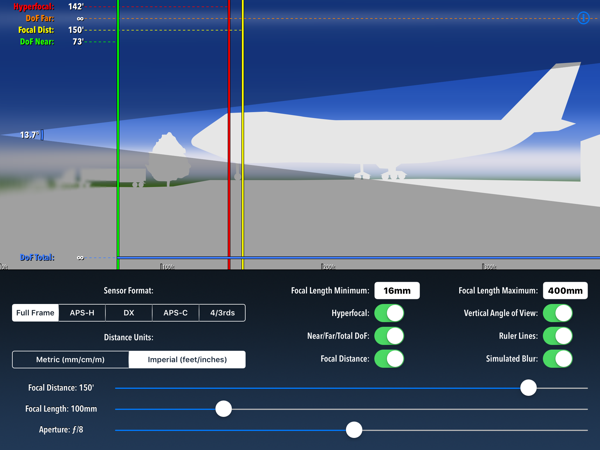
Lens*Lab is used again to be sure that focusing on the pair of rocks for the second shot will have enough depth of field to overlap with the first shot. It does,
With the Focal Distance slider set to 150’, you can see that the Dof Far is infinity and the Dof Near is 73’. The Dof Far from the first shot was 95’ so there’s an overlap of over 20’ in the two shots. That’s more than enough. And the Dof far is infinity so the distant mountains will be in focus. You can ignore the red Hyperfocal line as it doesn’t apply to focus stacking,
- Focus on the pair of rocks and take the second shot.
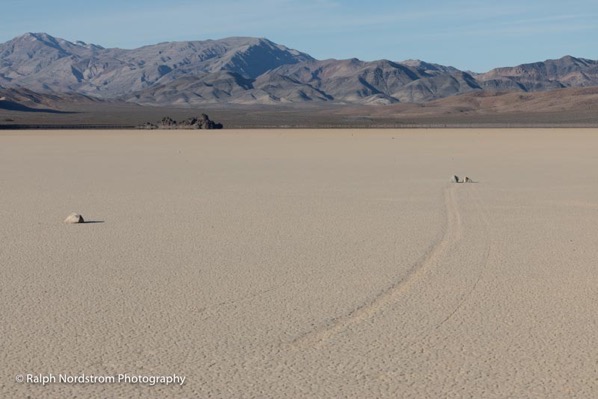
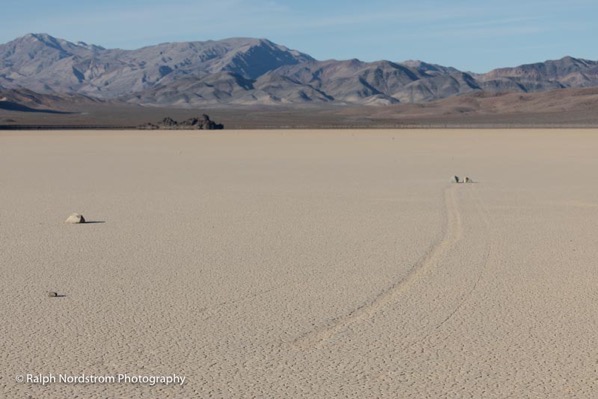
It’s important to change only the focal distance. The focal length and f/stop must remain the same. If you look at the image above closely you can see the foreground is out of focus.
- Align and Blend the two images in Photoshop using the steps above.
This turned out to require only two shots. If the conditions were different it might have required more. Every situation will be different.
Summary
Focus stacking provides the ability to get sharp images when it’s not possible or feasible to do so with a single shot. For landscape photographers, it provides the option of using longer lenses and wider apertures. Also, if you don’t have a super wide-angle lens or a full frame sensor, no problem. You can still do those extreme near-far compositions. For macro photographers it allows for unprecedented detail.
It’s interesting that focus stacking originated with cellular biology. A microscope has extremely limited depth of field. It doesn’t even span from the front of a cell to its back. There was no way to see an entire cell in focus. So, the pioneering product, Helicon Focus, was developed to solve this problem and today it is used by biologists and photographers alike.
There are some limitations to focus stacking for landscape photographers. Nothing can move in the scene. And since there is considerable time between shots, this can cause a problem. Also, because of the latency between shots, it’s not a practical technique to use for portraits or macro photography involving live insects and other small critters.
One might anticipate, however, that cameras will evolve to include auto focus stacking just like they now include auto HDR. In the meantime, you can use either of the two methods described to take your photograph into new realms.
Join us on one of our exciting photography workshops. Visit our website – Ralph Nordstrom Photography.
(423)

Very comprehensive Ralph! Good work!
Jeri
Thank you for this post. I have wanted to use focus stacking for years to achieve clarity front to back.