High dynamic range (or HDR) is a condition frequently encountered by landscape photographers where the digital camera’s sensor cannot handle the dynamic range of the scene. In other words, the scene has very bright highlights with areas of deep shadow. The resulting image will have clipped highlights (highlights that are pure white with no detail), clipped shadows (shadows that are pure black with no detail or at best, muddy) or both.
In digital photography we have several options including HDR, the techniques whereby we take multiple shots at varying exposures. The most underexposed image will capture the highlights and the most overexposed image will capture the shadows. Then we blend them all together with software like PhotoMatix Pro. The result is an image with bright highlights that still have detail and dark, crisp shadows, also with detail.
But what do film photographers do when they face this same situation? After all, film may not be able to capture the dynamic range of the scene any better than digital can. And with film there is not the option of taking multiple shots at different exposures and blending the negatives together.
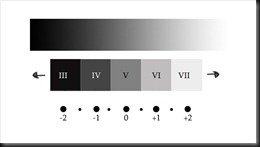
The technique black and white film photographers use is called ‘water bath development.’ This is best explained in terms of the Zone System that Ansel Adams, Edward Weston and others used. In the Zone System the dynamic range is divided into ‘zones’ numbered 0 though 10. Zone 0 is pure black and zone 10 is pure white. Zone 5 is right in the middle, neither dark nor light. In other words, zone 5 is neutral gray, just like the 18% reflectance neutral gray cards that we used to used.
The change in exposure from one zone to the next is one stop. So if part of the scene is exposed for zone 5 than those parts of the scene that fall into zone 6 will be one stop brighter than the zone 5 areas. Zone 7 areas will be two stops brighter than zone 5 areas. Likewise, zone 4 areas will be one stop darker than zone 5 areas and zone 3 areas, two stops darker than zone 5 areas.
The water bath development technique begins with the exposure. The exposures is set so the brightest parts of the scene fall in zone 7 or 8. (Spot meters are used to measure the luminance of separate areas of the scene.) This will make them look bright while still preserving detail. But this places the shadows well below zone 2. That’s where the actual water bath development technique comes into play.
The negative is developed but the development is interrupted several times by removing it from the developer solution and placing it in a bath of water where it will rest for a minute or two. This is repeated several times. The chemistry here is fascinating.
When the negative is in the developer the solution is agitated so that the film emulsion is always exposed to fresh developer. But when the negative is placed in a water bath it sits quietly without any agitation whatsoever. The emulsion will still be saturated with developer which becomes quickly exhausted in the heavily exposed areas where development stops. But in the lightly exposed areas, the shadows, it will not be quickly exhausted and will continue to develop these areas. As this goes on, more and more detail will be brought out.
After a couple of minutes the negative is returned to the developer where normal development resumes. Then it is returned to the water bath where just the shadows will continue to develop. The photographer must determine ahead of time how many times this must be repeated since they do not know how this will turn out until they can examine the negative after it has been completely developed.
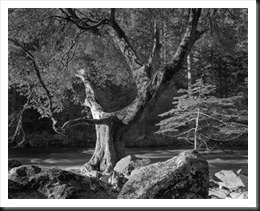
Early Morning, Merced River, Autumn (1950)
Ansel Adams
This photograph is just one of may for which Ansel Adams used the water bath development technique. Often times it was trial and error. So his practice was to expose two sheets of film identically for a scene he anticipated would be significant. If, after developing the first he concluded it needed a different development treatment he developed the second as was the case with this negative.
It’s worth pointing out that water bath development is a technique that can only be used with black and white film because this medium allows for wide variations in the way the negatives are developed. Color film requires such precise temperature, timing and developer strength controls that any deviation from a very narrow range produces unpredictable and generally unacceptable results. Galen Rowell in his instructional video makes the point that with color film in these challenging situations you have no other choice but to pass up the shot no matter how beautiful it is or how strongly you respond to it. Galen was in to seeing the world the way film seeks it.
So the problem is the same for film and digital photographers – scenes that the film or our camera sensors can’t capture. Nothing has changed here. What has changed is the way we compensate for each medium’s shortcomings. The advantage digital photographers have is that the HDR technique can be applied to not only black and white but also color photographs. But with either technique the result is photographs that can capture the full tonal range that we perceive with our eyes.
HDR is a dirty word in some circles because it can be pushed beyond simply controlling excessive dynamic ranges. It is often the painterly or grunge effect that many people associated with the term ‘HDR.’ My own opinion is that there are some photographs where this works well to communicate the artist’s intent but many where it is just a gimmick. In my own work I prefer the more conservative approach where HDR allows me to create natural looking images that could not otherwise be captured.
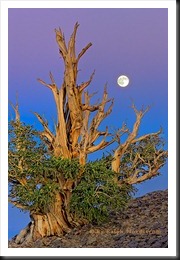
Bristlecone Moon (2008)
Ralph Nordstrom
The thought I’d like to leave with you is that problems with dynamic range are not new. They have challenged serious photographers from the beginning. We are fortunate to be photographing in a time when we have powerful techniques and tools such as Photomatix Pro to capture images and make photographs that were not possible in the days of film.
WordPress Tags: Ansel,Adams,High,sensor,words,highlights,image,shadows,photography,PhotoMatix,result,situation,option,technique,development,System,Edward,Weston,exposure,Likewise,places,times,solution,emulsion,agitation,River,Autumn,Often,error,treatment,worth,Color,temperature,strength,deviation,results,Galen,Rowell,advantage,word,grunge,opinion,artist,gimmick,images,Moon,Ralph,Nordstrom,problems,tools,areas,options,techniques,exposures,variations,situations,photographers,digital,camera,black,brighter,developer
If you found this post informative, please Like it. Also, if you know of others who may also enjoy it please feel free to share it. Links can be found at the top of the post.
And feel free to join the conversation and share your thoughts and experiences by leaving a comment.
Join me on an upcoming workshop. Click here for more details.
To see more of my photographs click here.
(7570)


After I initially left a comment I clicked the Notify Me Of New Comments checkbox and now every time a new comment is added I get 2 separate emails with the same comment. Is there any method you can remove me from that service? Thanks for your help.
Sorry for the harassment Marianne. That feature is a WordPress plugin so I’m not sure what I’ll be able to do but I’ll take a look.
Thank you for this article was interesting, very informative
A well written and thoughtful post. And thanks for showing an image of Ansels’ that is not one we frequently see. I really enjoyed seeing it.
Thanks Michael. I appreciate your feedback.