Do you love to travel? Of course and when you do, I bet you have at lease one camera with you, whether it’s a smart phone, a high-end DSLR or mirrorless camera with at least one lens or something in-between. You bring your camera so that you can capture the memories of the places you visited and experiences you had. And with a little bit of advanced preparation and thought, you can bring back pictures that are even more memorable and that enable you to relive some of those fond moments.
Where are many tips that can be given about travel photography. Here are five that I think you will find very useful.
1. Be Prepared
Advanced preparation can dramatically enrich your travel experience, And this can lead to more meaningful photographs because you have a better idea of what you will encounter and what to look for.
Often a big trip is a powerful excuse to convince your partner you need a new camera. But don’t make the mistake of dashing out a week before you depart to buy it. Rather, purchase it at least a month in advance, preferably two, so you have time to become familiar with it. Learn its features and how to use them to improve the quality of your pictures. Practice so that they start to become second nature. Even if you already have a camera you’re familiar with, purchasing a new one, even one of the same brand, is often different enough that the things you normally do with your old camera have changed in the new one. You don’t want to be fumbling around with camera settings as a fleeting moment passes you by.
Another good thing to do before you leave is to read up on the areas you’ll be visiting. Get a sense of the history and culture. Become familiar with the architecture. Look at photographs. Discover events that may be going on while you’re there. The more you know about your destination the more you will see and experience.
By all means, take selfies in your favorite places but don’t stop there. Take city tours to get an overview of a city but then go off the beaten tourist path to see the people as they really live. Eat in restaurants that cater to locals. Maps can be a great help in preparing for a more wanderlust adventure.
Another good idea is to keep a travel journal. Jot down the places you visit, dates and times and the impressions you have. This can be a big help when you’er going through your photographs after you return home.
2. Document Where You Are
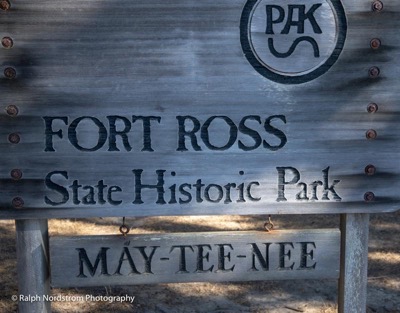
Even with a travel journal, it’s also a good idea to document the locations you see by taking pictures of signs. If there’s an information kiosk, take a picture of it too so you can read it and recall more of the details later on.

If a location does not have an identifying sign, your travel journal will help. But there’s another help that is built into many of today’s crop of cameras. Even smart phones have this feature. The feature is GPS. Cameras with GPS automatically record the exact location (latitude and longitude) for each picture as part of the metadata for that picture. This information is stored in the picture’s file. Lightroom can read the GPS coordinates and display the location of the photograph in the Map module. With built-in GPS it becomes much easier to identify the locations where your pictures were taken. The limitation of GPS, however, is that it will not work inside buildings or anyplace that does not have an unobstructed view of the sky.
With the combination of pictures of signs, a travel journal and the camera’s GPS it is much easier for you to identify the location you were shooting. This can come in handy if you decide to create a scrapbook of your travel.
3. The Chapter Shots
You will be bombarded with a lot of impressions as you explore new places. If you’re walking through a town, you may notice the colored buildings that line the streets, the cobblestones and storm drain covers in the roads, the decorative windows and doors, the park with people sitting on benches reading their newspapers. It’s all jumbled. But there’s a way you can straighten it out. Think in terms of Chapters, Paragraphs and Sentences. In other words, photograph from the grand overview down to intimate details.
The series of photographs presented here are from a recent visit to Fort Ross along the Central Coast of California, It was established by the Russians in 1812. They had worked their way down the coast from Alaska, establishing settlements along the way. We begin with two Chapter images of Fort Ross.
Here’s an idea of three questions you can ask yourself to get your Chapter, Paragraph and Sentence shots. “What am I photographing at this location?” Answer – fort (Chapter), “What tells me more about the fort? Answer – Buildings and other things within the fort (Paragraph). “What tells me more about the buildings?” Answer – windows, doors, construction, interiors, etc. (Sentence).

The first shot shows the fort as it looks as you approach it. You get a sense of the sea bench it was built on (although you can’t see the ocean). It has an open feeling, not heavily populated with buildings, The second shot shows the interior with the stockade, several buildings, a well and two canons. It’s quite spacious. Note that the second picture is taken from a higher vantage point that better shows off the grounds. I climbed up to the second level of a corner blockhouse to get this view. Finding unique viewpoints, such as getting down low or standing on top of something, can add interest to your pictures.
Now that we have two shots that give the overall sense of the fort, we can move in closer for more detailed shots.
4. The Paragraph Shot
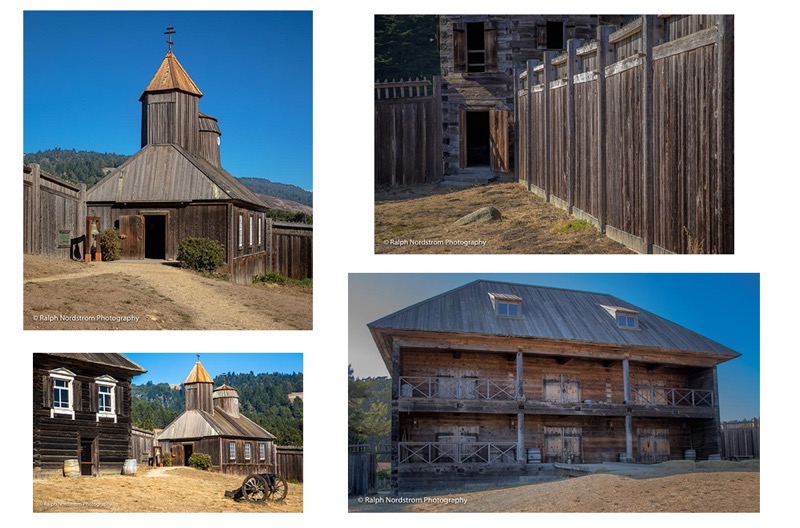
The Paragraph shots are ones that tell us more about the fort. In these shoots, I chose to make compositions of the buildings. Each one tells its own story of the role it plays in the mission of the fort.

The Russian Orthodox chapel is probably the most interesting (and photographed) building at Fort Ross. But other buildings also have their on function in the operation and life of the fort. And the stockade leading to the corner blockhouses gives the idea of how the different elements come together.
5. The Sentence Shot
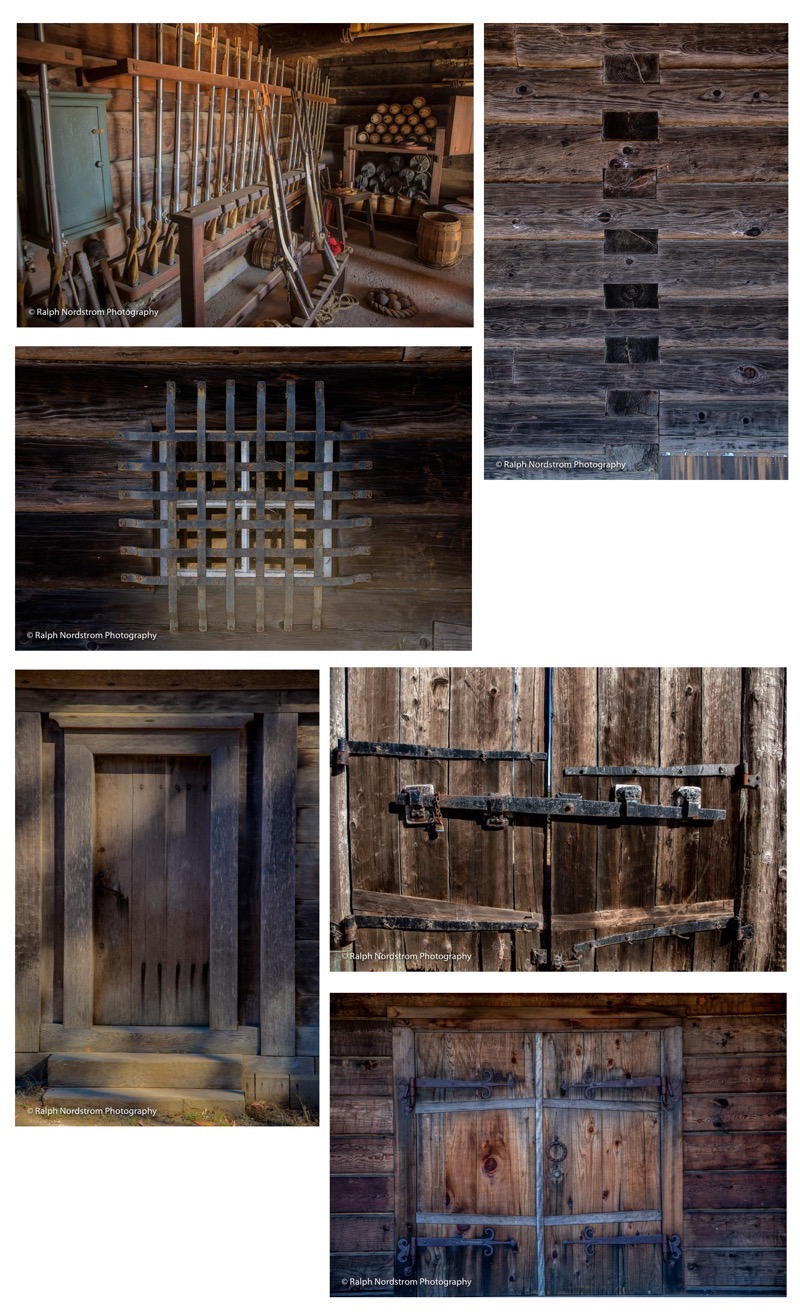
The Sentence shots capture small details that catch your eye, things that you might consider too insignificant to warrant a photograph. But photograph them anyway. Because they add richness to the Chapter and Paragraph photographs. With them you can capture the texture of the location and of your experience.

This set of Sentence photographs range from, on the one hand, the interior of an armory with the rifles used to protect the fort to a detail of the construction technique they used (the photo next to the armory one). And then there are some interesting windows, doors and gates, all of which caught my attention. They give a more intimate sense of the fort and how it reflects the age in which it was occupied. You get a feel for the way they lived.
You may have gotten the sense that the Chapter, Paragraph and Sentence shots should be taken in that sequence. That’s not the intention. Don’t restrict yourself to that. Just keep these three perspectives in mind so that you’re sure to capture them all. But shoot what you see when you see it.
There are many more aspects to travel photography but these five tips can go a long way to ensure that you bring home photographs that will allow you to relive the thrill of your adventure for years to come.
We’ll be at Fort Ross and other sights along the rugged Central California Coast November 2018. Come on out and join us. For more information, click here.
(133)
