Photographing the Redwoods

Photographing the coastal redwoods of Northern California is both rewarding and challenging. Explore some of the conditions you will face and how best to capture them.

Walking among the redwoods is an inspirational experience. But wait, if we’re talking about the redwoods in California, the trees I am thinking about could be 600 miles from the trees that are conjured up in your mind’s eye. That’s because there are two species of redwoods in California – the massive giants found in Sequoia and Kings Canyon National Parks on the western slope of the Sierra Nevada Mountains and the tall ones that hug 450 miles of the fog-shrouded California coast, culminating in the Redwoods National and State Parks of Northern California. While both species are spectacular, each is unique in its own way and photographing them presents dramatically different challenges and opportunities. In this post, I will be taking you through the Coastal Redwoods of Northern California.

The Redwoods National Park was established in 1968. California had already created three state parks, beginning in the 1920s, that encompassed some of the remaining redwood old growth groves – Jedediah Smith, Del Norte Coast and Prairie Creek.  The two park systems were joined in 1994 to create the Redwoods National and State Parks.  Now 139,000 acres of the Northern California coast are under the joint management and protection of the National Park Service and the California Department of Parks and Recreation.

Being along the Northern California coast, temperatures are moderate throughout the year and moisture is plentiful, not only from winter storms but also from life-giving fogs that roll in year-round from the Pacific Ocean.

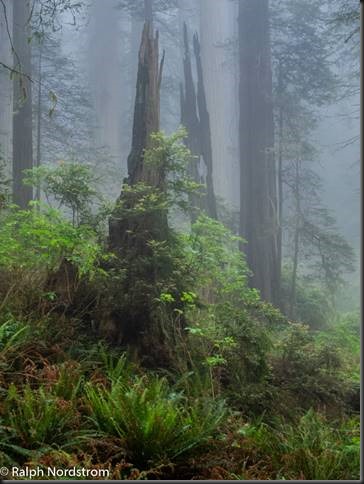
Fog is an ever-present possibility in the groves and presents unique challenges and opportunities. The light in the groves is soft and delicate and contrasts and, tp some extent, masks the strength and power of the trees. This light is perfect for capturing this more delicate mood of the redwoods. Slightly overexposed images best capture the lite airiness of the fog.  Compositions with strong foregrounds enhance the feeling of depth created by the fog.
Castles in the fog
‘Castles’ in the fog

Continue reading “Photographing the Redwoods”

(275)

Photographing Death Valley National Park

Enjoy some of the photographic wonders of Death Valley National Park on an exciting photography workshop.

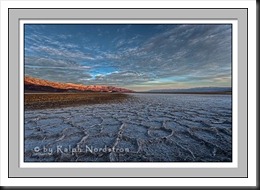
People sometimes ask me if there’s anything to photograph in Death Valley.  At 5,262 square miles of desert and mountains, it’s one of the largest national parks.  The valley itself is 140 miles long.  Think of it.  It takes three hours to drive from one end to the other.  And surely, in all that space there should be something to photograph.  And yet, most of it is desert.  In fact, the valley itself is the hottest, driest place on earth. It’s also the lowest spot in North America at 282 feet below sea level.  So what’s to photograph?

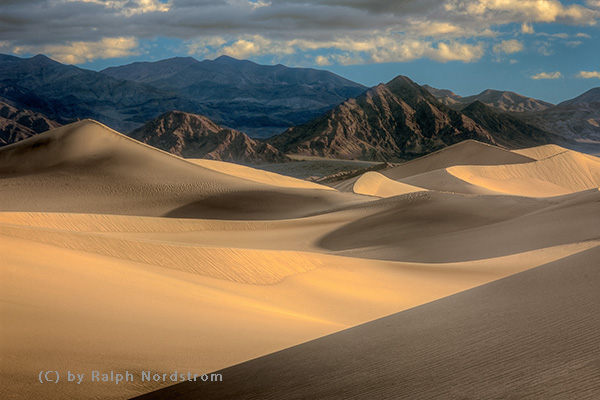
Mesquite Flats Dunes

Death valley dunes 2011

Being a desert you might expect sand dunes and you would be right.  The Mesquite Flats Dunes are in the middle of the valley near Stovepipe Wells.  While not excessively high, they cover a large area and provide wonderful photographic opportunities at both sunrise and sunset.  I prefer sunrise which means heading out across the desert while it’s still dark to arrive at the dunes just as it’s starting to get light.  I go to a place that’s not heavily visited.  It’s an exciting experience.

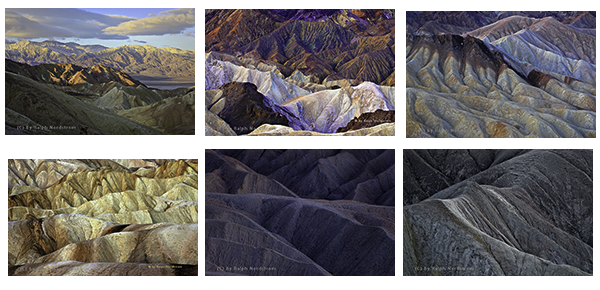
Zabriskie Point

Zabriskie point pano 140211

Zabriskie Point is one of the most visited places in Death Valley.  It attracts photographers and tourists alike.  At first it looks like an inhospitable badlands with not much to offer the photographer except a lot of tan wilderness.  But at the right time of day these ‘bad’ lands become extraordinarily beautiful.

Zabriskie collage

It’s all a matter of being there at the right time.

Continue reading “Photographing Death Valley National Park”

(206)

5 Tips to Bring Home Great Travel Memories

Use these tips to improve your travel photographs.

Do you love to travel?  Of course and when you do, I bet you have at lease one camera with you, whether it’s a smart phone, a high-end DSLR or mirrorless camera with at least one lens or something in-between.  You bring your camera so that you can capture the memories of the places you visited and experiences you had.  And with a little bit of advanced preparation and thought, you can bring back pictures that are even more memorable and that enable you to relive some of those fond moments.

Where are many tips that can be given about travel photography.  Here are five that I think you will find very useful.

1. Be Prepared

Advanced preparation can dramatically enrich your travel experience,  And this can lead to more meaningful photographs because you have a better idea of what you will encounter and what to look for.

Often a big trip is a powerful excuse to convince your partner you need a new camera.   But don’t make the mistake of dashing out a week before you depart to buy it.  Rather, purchase it at least a month in advance, preferably two, so you have time to become familiar with it.  Learn its features and how to use them to improve the quality of your pictures.  Practice so that they start to become second nature.  Even if you already have a camera you’re familiar with, purchasing a new one, even one of the same brand, is often different enough that the things you normally do with your old camera have changed in the new one. You don’t want to be fumbling around with camera settings as a fleeting moment passes you by.

Another good thing to do before you leave is to read up on the areas you’ll be visiting.  Get a sense of the history and culture.  Become familiar with the architecture.  Look at photographs.  Discover events that may be going on while you’re there.  The more you know about your destination the more you will see and experience.

By all means, take selfies in your favorite places but don’t stop there.  Take city tours to get an overview of a city but then go off the beaten tourist path to see the people as they really live.  Eat in restaurants that cater to locals.  Maps can be a great help in preparing for a more wanderlust adventure.

Another good idea is to keep a travel journal.  Jot down the places you visit, dates and times and the impressions you have. This can be a big help when you’er going through your photographs after you return home.

Continue reading “5 Tips to Bring Home Great Travel Memories”

(133)

Photography Class on Mt San Jacinto

I recently taught a photography class for the Mt San Jacinto Natural History Association.  At an elevation of 10,834 feet, San Jacinto is the second highest peak in Southern California.  The Natural History Association operates in conjunction with the Mt San Jacinto State Park and has a rich program of mountain activities.  I was fortunate to be invited to teach the first-ever photography class for the association.

The class would consist of lectures and demonstrations, and be conducted in one of the meeting rooms in the mountain station of the Palm Springs Ariel Tram.  We would have a morning and afternoon shoot in nearby Long Valley,

In preparing for the class, I anticipated that there would be a large cross-section of experience and abilities, with gear ranging from smart photos to high-end digital cameras,  And that proved to be true.  So rather than getting into the technical aspects of photography, the emphasis was on the creative.  This normally consists of talking about light and composition which we took a bit of time to cover.  But the main emphasis was On Seeing.

I wasn’t sure what there was to actually See in Long Valley.  It was always something to pass through on the way to more exciting places like Round Valley or the summit,  So, to find worthwhile things to photograph, our quest became to find and capture the essence, the soul of Long Valley.

And here’s what we found…

Continue reading “Photography Class on Mt San Jacinto”

(92)

Making a Photograph – Witch’s Hat

It’s no surprise that Bandon Beach in Oregon is a powerful attraction for photographers. It has one of the largest concentrations of sea stacks on the entire Oregon coast. This makes it a prime sunset destination. Read the story behind the making of a sunset photograph on one special afternoon.

clip_image002

The Pacific coast at Bandon, Oregon is graced with a generous collection of sea stacks of various shapes and sizes. It has the potential for dramatic sunsets and is on many photographers’ bucket lists. Some go so far as to crown it the best stretch of shore on the entire Oregon coast.

The day began about 80 miles to the south and we made our way north, stopping along the way in the Samuel H. Bordman Scenic Corridor and other locations that demanded our attention. It was overcast as we moved up the coast. But that didn’t dampen our enthusiasm for the many wonderful places to shoot. As the day continued, the clouds gave away to hazy sun. But by the time we got to Bandon Beach, the marine layer with its bank of clouds was again encroaching on to the shore.

Still, our motto is, ‘You work with what you got.’ So we gathered our gear and descended the long stairway leading from the overlook to the beach below.

Continue reading “Making a Photograph – Witch’s Hat”

(240)

The Gems of Oregon Photography Workshop

Come explore the wonderful gems that wait to be discovered in the southwest corner of Oregon. Photograph the stunning Oregon coast, magnificent waterfalls, wild rivers and incredible Crater Lake. Join our photography workshop.

I knew Crater Lake would be exciting.  Just think of it. Volcanic Mount Mazama emptied its huge magma chamber in a colossal eruption about 7,500 years ago. When the fireworks were over, the empty magma chamber collapsed, swallowing the mountain top and creating a crater over 2000 feet deep. Then the winter snows slowly but inexorably filled the crater with beautiful deep blue, crystal clear water.

My first experience of the lake was not with camera in hand but on a family trip as we paused for an evening while on or way to Seattle, Washington to visit more family. It was in June and the snow drifts were still piled high, preventing travel but to a small portion of the rim. And yet the experience was profound.

When I conceived of the Oregon photography workshop I knew Creator Lake had to be the culmination, the grand finale of the experience. From Wizard Island (a volcanic cone within the crater), Phantom Ship (the skeleton of a volcano that has long since passed), the Pinnacles (mysterious towers piercing the atmosphere) and the hard-to-imagine blue of the lake itself, Crater Lake is in truth a fitting highlight of the other wonders in this corner of Oregon.

Continue reading “The Gems of Oregon Photography Workshop”

(73)

Touch the Sky

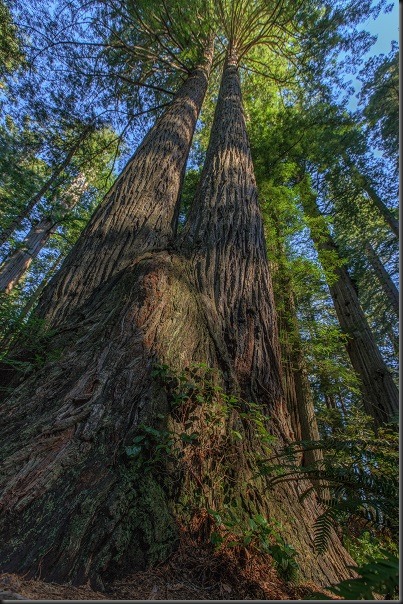
redwoods_170523__SM34682_3_4_5_6

How many times have you seen a photograph of tall trees taken with the camera pointing straight up and the trees converging high in the sky? It’s a pretty common shot. Standing in a grove, turning your eyes upward and wondering at the enormity of these living things, putting camera to eye and pressing the shutter is compelling.

But, to paraphrase Minor White, one of the great pioneers of fine art photography, it’s important to get into the habit of seeing ‘what else is there.’ And one way to find the ‘something else’ is to say to yourself, ‘OK, let’s do something craaaazy!”

I mounted my widest lens on my camera, got my tripod as low as it would go and laid down in the dirt to compose this image. People looked at me like I was craaaazy – which I was. I wanted to capture this incredible tree from ground to crown. There were a few technical details to work out like depth of field and exposure (there always are technical details with digital photography) but the main thing was to capture as much of this tree as I possibly could, so I could share with you the wonder I was feeling.

And a very close second was to let my inner child out and lay in the dirt, gazing into the upper reaches of this towering marvel.

Notice how the tree comes out of the bottom left corner and stretches to the right on a slight diagonal. That was intentional because that little angle changes this image from something static to a much more interesting one that is dynamic, alive. A simple, yet powerful technique.

You can do this yourself. Here are a couple of tips. When you see something you want to photograph, shoot it the way you normally would. But then, get crazy. Let yourself go and play with other ways of viewing your subject. You don’t have to get in the dirt if you don’t want to…, but I highly recommend it.

Also, be aware of diagonal lines in your image. They add motion and energy and make the photograph more interesting.

And finally, fill the frame with your subject. Don’t be afraid to move in closer or, if you have a zoom lens, zoom in tight. Like this tree, make your subject the dominant element in your photograph.

Oh, and don’t forget the experience itself. Bringing home a nice photograph, a keeper, is rewarding but that does not outshine the thrill of being there among these tall giants. It is a time to grow quiet and let Mother Nature speak to you in her soft, still voice.

By the way, this tree is in the Lady Bird Johnson grove at Prairie Creek State Park in Northern California. The tree stands in a small clearing where Lady Bird, Richard Nixon and other dignitaries stood when the grove was dedicated to her. There’s a nice bronze plaque commemorating the moment. Makes it kind of special.

Join me to photograph Redwoods National and State Parks in May from the 21st to the 24th. It’s the perfect time to be there.  For more information, click here.

(163)

12 Tips on Nighttime Photography

Nighttime photography poses its own challenges. Here are some helpful tips on preparing for and getting the most out of your hours spent in the dark.

Here are some tips on nighttime photography from an informative article by Dan Richards in a recent issue Popular Photography.  Credit for these tips goes to three great photographers – Matt Walker, Darren White and Mashahiro Miyasaka.  Here is the heart of what they shared…

  • Use a fast, wide lens.  Wide lenses slow the apparent motion of the stars.  Fast lenses gather more of the faint light.
  • Use a tripod.  The shortest practical exposure is 30 seconds.  Star trails require anything from tens of minutes to an hour or more.
  • Use an intervalometer.  This is essential for exposures greater than 30 seconds or if you plan to take a sequence of 30 second exposures.
  • Be aware of the weather.  An overcast sky will foil nighttime photography plans and a wind will wreak havoc with long exposures.
  • Be careful.  Scout the location ahead of time.  Use a headlamp, especially  one that has a red light so as not to destroy your night vision.
  • Include interesting foregrounds.  They can be silhouettes or you can light paint them.  You also have the option of creating a composite image by capturing a well exposed image of the foreground at low ISO and a high ISO image of the sky and then blending the two.
  • Focusing is really difficult.  Autofocus doesn’t work so you must use manual focus.  Pick the brightest star in the sky and use live view to focus on it (don’t change your focal length to focus; use the focal length you’ll be using for your image).  Another alternative is to focus on an object at infinity during the day and then marking the focus point with fluorescent tape so you can reset the same focus at night.  Again, use the focal length you will be shooting with as the infinity focus point changes as you zoom in and out.
  • Exposure is critical.  If you’re going to shoot starry  night photographs your exposure length will be 30 seconds (with a 24 mm lens or wider).  Shoot wide open and run tests with different ISO settings.  If  you’re going to use a long exposure to get star trails determine the ISO setting your 30 second exposure and then adjust ISO and f/stop to compensate for the length of exposure.  If your ISO is 6400 at f/2.8 and 30 seconds, if you want a 60 second exposure reduce your ISO to 3200.  A two-minute exposure requires an ISO of 1600.
  • Take a workshop.  That’s always good advice, no matter how experienced you are.  There’s always more to learn.
  • Don’t get disheartened.  This is not easy stuff but practice pays off.
  • Get in shape.  Good locations for night photography are going to be where there’s minimal light pollution and that’s a long ways away from city lights.
  • When the temperature is cold wrap a hand warmer around your lens to keep it from fogging over on those long half hour to hour exposures.

Well, that’s it.  Yea, and I confess; I threw in a couple of my tips too.

Hey, here are a couple of blog posts I’ve done on nighttime photography a while back there.

Exciting Nighttime Photography in 10 Easy steps

Nighttime Photography

So, go on out there and give it a try.  Have fun and be careful.


We always enjoy hearing from you so please feel free to leave a comment and share your experiences with us.

Also sharing this post on Google+, Facebook, Twitter and the like is also appreciated.

Join me on an upcoming workshop.  Click here for more details.

To see more of my photographs click here.

(914)

Mastering Composition – Balance

Strengthen your images by considering Balance in your compositions.

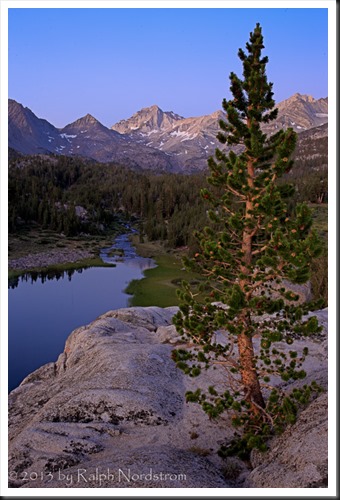
There are many rules of composition.  I know people don’t like to use the term rules and for good reason.  If you treat these rules as if they are hard and fast you can end up with compositions that are mechanical.  So I prefer to call them ‘principles of composition.’  Now I’ve said before that composition is a problem solving endeavor.  That is, you have been inspired by what lies before you, you have connected with it and you have an idea of what you want to say.  And one of the key elements in communicating your message is the composition you choose.  There is generally a point where this becomes very much of a problem solving effort, meaning it can get very analytical.  And while the analysis may be important if not essential, it can cloud aesthetic considerations.  Take for example this photograph of dawn in the Little Lakes Basin up Rock Creek in the Sierra Nevada Mountains of California.

eastern_sierra_130713__SM37004-Edit

I was drawn to this Lodgepole Pine growing from a cleft in the granite above the lake.  I gave a lot of thought to this composition and compositional principles came very much into play.  The way I saw it, the two key elements were the tree and the lake.  I didn’t think of the peaks in the distance as being a key element although I knew they were important.  And I was aware of the lake as a leading line the drew the eye to them. I placed the tree on the right 1/3 line so that it wouldn’t block the lake.  And I enjoyed the wonderful alpenglow as I captured a few images through the final minutes of civil twilight.  Then I wandered off looking for other photographs.  But later, after the sun came up I was drawn back to this tree and saw it completely differently.

Continue reading “Mastering Composition – Balance”

(1668)

Twelve Tips for Buying Your Next Lens

Know what to look for when purchasing your next lens and get the one that will serve your well for years to come.

A student of mine asked me for help in selecting a telephoto lens – what to look for and what to avoid.  I put down a few ideas for him and thought that maybe you might also find this topic interesting.

Sooner or later we all buy a lens or two or five or six.  I currently have four lenses in my camera bag – a wide angle zoom (17-40 mm, f/4), a mid range zoom (24-70 f/2.8), my workhorse lens (24-105 mm, f/4) and a telephoto zoom (70-200mm, f 2.8).

I have two ground rules for buying lenses that I have shared with many people.

1.  There must be a demonstrated need.  In other words, if you can’t realize your vision because you’re missing a particular lens then it’s time to consider adding one.  Students, friends and colleagues ask me if I think they should buy a hot new lens.  I always ask them, “What would this lens permit you to do that you can’t do with your current lenses?”  Often, the answer is that it does nothing new for them, they just think it’s a cool lens.

2.  Purchase the best glass you can afford.  You will go through several camera bodies in your career but you’ll never outgrow a high quality lens.

So those are the ground rules but what else is there?

death_valley_sunrise_2012

Continue reading “Twelve Tips for Buying Your Next Lens”

(1328)