These HDR tips resulted from a conversation with my good friend Andreas Waldeck, an HDR expert who happens to work with HDRSoft, the publisher of the premier HDR software Photomatix Pro.
In Tip #1 we talked about the correct way to capture multiple images HDR images in the field. See HDR Tip #1.
Now I want to start discussing the processing of these image files. The software tools we’ll discuss are Lightroom, Photomatix and, to a much lesser extent, Photoshop. So let’s get started.
This next tip is one of those that is so obvious once you know it but one that doesn’t jump out at you. It has to do with Develop settings in Lightroom. The assumption is you’re shooting RAW images and not JPEGS. This really doesn’t apply to JPEGs, only RAW.
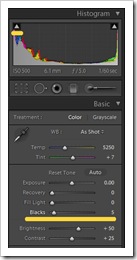
When you import images into Lightroom there are a couple of default Develop settings that make the image look good but actually work against you in Photomatix. The first of these is Blacks. Lightroom defaults this to +5. But often at this setting you’ll have some shadow clipping and even if you don’t you’re giving up shadow detail.
 Notice that the left tail of the histogram climbs the left wall and the triangle in the upper left is bright, indicating black clipping.
As we discussed in Tip #1, one of the things you really want to pay attention to in HDR is your shadows. You want to give them a full exposure so that you capture all the detail you could ever want without noise. Lightroom’s default of Blacks +5 adds blacks back in where you don’t really want them. So the first part of Tip #2 is to set Blacks to 0.
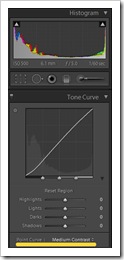
The other Lightroom default that works against you is hidden away under Tone Curves. It’s the control at the bottom – Point Curve:. This control makes some modest yet very effective changes to the curve. Again, it makes the image look great but it’s not so great for HDR.
The default value is Medium Contrast. This introduces a pleasing amount of contrast to the image by lowering the Shadows part of the curve just a little and raising the Highlights part an equally small amount. The other two settings are Strong Contrast which increases the contrast changes even more and Linear which makes no changes to the curve at all; that is, it is perfectly straight.
 Both of the contrast settings darken the shadows a bit so we want to change the setting to Linear.
You might want to make a few other tweaks to one or more or the images. For example, maybe you didn’t underexpose your dark image quite enough and you feel the histogram tail extends too far to the right. If that’s the case, use Recovery to pull it back some. However, this is not at all desirable and should only be used in an emergency.
Likewise, with the overexposed image you may still feel the left tail of the histogram is too close to the left. You can use Fill Light to open that up a little. This too is highly undesirable and should only be used in emergencies. The best solution is to make sure your exposures are correct while still in the field.
I like the Blacks and Point Curve settings so much I apply them to all my images, whether they’re intended for HDR or not.
One last thought is you might want to create a preset with these settings. Lightroom can run the preset for you every time you import files. If you choose to create a preset you can set some other adjustments at the same time. Here’s a summary.
- Exposure, Recovery, Fill Light and Blacks should all be set to zero.
- Brightness should be set to the default (50)
- Contrast should be left at the default (25) although some advocate setting it to zero.
- Clarity, Vibrance and Saturation should be left at their defaults (0).
- Point Curve set to Linear.
Some Lightroom adjustments that are safe to change are:
- White Balance (color temperature and tint)
- Noise Reduction
- Chromatic Aberration
In fact, if there are chromatic aberration problems with the image it’s best to correct this before you import into Photomatix.
Now that your RAW image files are ready we’re ready for the next tip.
HDR is one of the more popular topics we cover in our photography workshops. The advantage is we are able to cover it in real-life situations. Come join us.
To see more of my photographs click here.
Become a fan on Facebook and follow along.
(2619)

One thought on “HDR Tip #2”