This post may fall in the category of what you might call ‘mundane.’ It doesn’t have the creative thrill of a new and exciting photograph. It’s more under the category of ‘Things-I-Should-Do-But-Haven’t-Gotten-Around-To-Them-Yet.” Actually, this is really under the category of “Making-My-Life-Easier.” So, what is this all about?
I usually take my laptop with me when I go out on a workshop or a shoot. There are several good reasons besides the fact that I’m always eager to see what I got during the day and want to start working on my photographs before I get home. What are the other reasons? Well, primarily I want to back up the files. I like to have three copies of each – one on the memory card, another on the laptop and a third on an external drive.
So, back in my hotel room I back up the files, import them into Lightroom and start the selection process. I’ll delete files I know I won’t work on and give stars to those that I find interesting. And usually I’ll get started on them. If I need to do HDR I’ll do that too. And if the photograph is really inspiring I’ll edit it in Photoshop.
But back to Lightroom. I’m in the habit of creating a virtual copy of the images I work on, maybe several virtual copies if I’m trying different things with them. But here’s the rub. All the metadata, stars, virtual copies and adjustments are captured in the Lightroom Catalog. So the big question is how can I keep from loosing everything I did on the road when I transfer the files to my desktop computer back in the studio?
DNG
The answer in part lies in the DNG raw file format. If you’re not familiar with DNG, it is an open raw file format for which Adobe is the custodian. Unlike the proprietary raw file formats of Canon, Nikon, et al., any sort of metadata can be added to DNG files – like Lightroom adjustments.
In fact, many of the things you do in Lightroom besides adjustments like creating virtual copies, rating your images with stars or flags and things like that can be stored in the DNG file. These are things the camera manufacturers do not store in their proprietary formats.
Now, if you use the manufacturer’s raw file formats Lightroom can store the metadata in sidecar files. But the rub comes when you want to transfer your now photo files and all the adjustments and other things you did with them to your desktop computer. If you use the manufacturers’ raw file formats you have to transfer both the raw file and its sidecar file. But if you use DNG files you can save all of that Lightroom stuff to the DNG file and then just have to worry about one file.
Transferring Your Files to Your Desktop Computer
So here’s what you have to do. There are a couple of steps involved but they are not complicated.
When you return home from the shoot…
- Launch Lightroom on your laptop (connected to your home network of course).
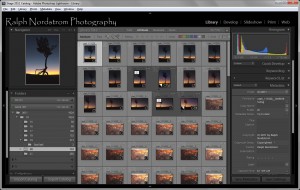
- In Library mode, expand Folders in the left panel and select the folder that contains the files you want to transfer.
- Make sure you are displaying the Grid (press G).

Select Lightroom Folder - Expand any stacks you my have by right-clicking on one and selecting Stacking | Expand All Stacks.
- Select all the files in the folder by pressing Ctrl-A (Command-A on the Mac).
- Now, here’s the crucial step. Save all of the Lightroom metadata to the files by pressing Ctrl-S (Command-S on the Mac).
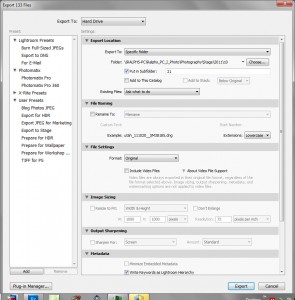
- Now export the files to your desktop. Click Export…and complete the Export dialog

Export Dialog - In Export Location select the drive on your desktop where you want the files to reside.
- In File Naming, leave Rename To: unchecked.
- In File Settings, select Original in Format:.
- Make sure the rest of the options are unchecked.
- For Post Processing, I like to Show in Explorer after export.
- Click Export and your files will be exported to your desktop computer with all of the Lightroom metadata in tact.
The coll thing about this is that if you’ve created virtual copies of any of the files Lightroom will export one file for each copy. It appends a -2 suffix on the first virtual copy, -3 on the second and so on.
Now the only other thing you need to do is import the files into your Lightroom catalog on your desktop.
- Launch Lightroom on your desktop.
- Make sure you are in Library mode.
- Click Import….
- Navigate to the folder where the exported files reside.
- All you need to do is Add the files to the catalog.
- Add any keywords you may like and click Import.
So it’s pretty simple. Using this procedure allows you to start working on your photographs while you’re still on the road and retaining all the work you’ve done when you move them to your desktop computer.
Yep, this isn’t as exciting as creating that really terrific image. But it’s very practical.
You may have your own way of dealing with this situation. If so, let’s hear from you. I’ve tried several different ways of solving the problem and this is the one that works the best for me. But if you have something different I’d like to hear about it. There’s always more to learn.
Thanks for reading this. And may your journeys always be blessed with great light.
(4505)

Ralph
I appreciate your thoughts above. I have been using Scott kelby’s method described in his book “Lightroom 3”. I export the folder to an external hard drive using “export as catalog”. Then attach that hard drive to my studio computer and copy that folder to my desk top. Then in Lightroom I “import as catalog” the catalog in that folder as well as the photos. It has seemed to work for me. I know you told me that that method did not work for you. I would be interested in understanding how it did not work for you. Maybe it is not working for me and I do not know it.
Thanks Larry. So you’ve been able to get that to work. When I tried it somehow a space got added to the front of the file namds and I couldn’t import them. I’ll give it another try now that I’m no longer running Vista on my laptop.