The First Photographers: 1840 – 1860

Meet the influential pioneering photographers that created the medium in its first 20 years and on whose shoulders we stand today.

The First Photographers – 1840 – 1860

The 20-year period beginning in 1840 saw an explosion in photography. Prior to that the camera obscura could project upside down and backwards images on a sheet of paper that could be traced to produce a drawing. In fact, that is how painters used it. But the projection could not be captured and saved…, until Louis Daguerre invented the daguerreotype.

Before the daguerreotype, if you wanted a portrait you hired a painter, an option that was available to only the wealthy. But the daguerreotype made portraits available to many more people. Painters initially rejected the notion, believing that their portraits were superior. But most eventually conceded that the daguerreotype could reproduce a more accurate image of the person in less time and more economically.

The daguerreotype had a life of merely ten years and was followed first by the calotype and then by the collodion process.  And before the end of the century Kodak processed the role film which opened photography to everyone.  Read more at In the Beginning There Was a Camera but No Film.

Since the daguerreotype and its successors were fast, accurate and highly detailed, they were seen as great ways of documenting the physical world but incapable of creating art. But, even in those early days, some pioneering photographers pursued photography as a legitimate artistic medium and produced stunning, ground-breaking images that still touch our souls more than a century and a half later. The struggle to recognize photographs as art began with the daguerreotype and continues to this day (although to a lesser degree).

Continue reading “The First Photographers: 1840 – 1860”

(1652)

Creating Images with Impact – Dynamic Range of the Medium

The pros create dramatic photographs, images with impact. You can add impact to your images too using these simple Lightroom techniques.

We’ve all seen those photographs that stop us in our tracks, that inspire us, that speak to us. Some photographs seem to have a special power, a special presence. Often times we hear ourselves saying, “Wow.” They have qualities that make them stand apart from other photographs. These are images with impact.

The masters of landscape photography seem to have the ability to capture a special quality of light in their photographs. It doesn’t matter whether they use film or shoot digital, their images stand out.

There are certain things about these images that do more than just appeal to us – we are drawn into to them. They capture our imaginations, stir our interests and perhaps show us moments in nature we could only hope to experience. We want to linger with them, explore them, take them in, get lost in them.

Without a doubt these photographs have compositions that are very strong, are bathed in fantastic light and have technical qualities of exposure and sharpness that are perfect. These are all decisions that the artist makes in the field, decisions that are critical to a strong image.

In the days of film, a good portion of the magic was done in the darkroom. That’s where their genius really became apparent. And it hasn’t changed today. We don’t actually have dark rooms to work in, closed rooms with the strange array of mysterious orders and the soft, dim yellow lighting. Today we have powerful software running on even more powerful computers. But really, how is that different from what the film Masters did in the darkroom? I don’t believe it is. I can’t think of anything that’s been done with “Photoshopped” photographs that hasn’t already been done in the darkroom. It’s probably a lot easier to do it in Photoshop but in the end, both the chemical darkroom and the electronic darkroom serve the same end, that being creating those “Wow” images.

In this series of posts I want to spend more time considering some techniques you can apply in the darkroom that will add impact to your images.

Use the Full Dynamic Range of Your Medium

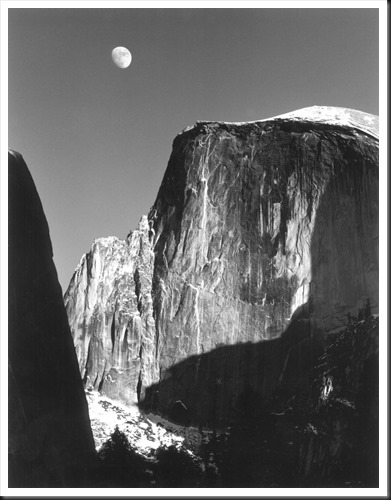
The first darkroom technique I would like to discuss is the importance of using the full dynamic range of your medium. This is not something new. When Ansel Adams developed the zone system it was precisely for this purpose – to use the full dynamic range of the black and white negative and ultimately the black and white print. But what exactly does it mean to use the full dynamic range of the medium. Let me illustrate with an Ansel Adams image I have loved for many years, one I’m privileged to be able to live with in my home – “Moon and Half Dome.”

Adams-moon-and-half-dome-1960

In this exquisite photograph if you are able to examine an original closely you will notice that the shadow on the left may look like it is totally black but actually there is subtle detail. However, there are some very small areas that are pure black. Also, the moon and the bright parts of Half Dome may look like they are pure white but a closer look will reveal detail in these areas also. This photograph takes full advantage of the full dynamic range of the paper, from the blackest black to the whitest white.

Continue reading “Creating Images with Impact – Dynamic Range of the Medium”

(4737)