Creating Images with Impact – Black Point

Add Impact to your Images by setting a black point. Here’s the how and why.

In this series of blog posts were talking about how to create Images with Impact. You know what I’m talking about. These are those images that really grab our attention, that capture our imaginations. There’s something special about them and it doesn’t have to be a mystery how they are created. There are a few simple techniques that you can use in Lightroom and Photoshop to add impact to your images. Now if you don’t use Photoshop, you can still do everything were talking about in Lightroom.

In the first article we talked about utilizing the full dynamic range of your medium. This is something Ansel Adams taught in his books and classes that was an essential element of his stunning landscape photographs. As he developed his technique which became known as the Zone System, the primary goal was to use the full dynamic range of his medium which, in his case, was the black and white print.

So we talked about that technique first because it is the most appropriate place to start. I do want to add that in color photography or color prints not every print benefits from a white point but virtually all prints benefit from a black point – which is what we want to talk about in this article.

IMG_0012-2

What exactly is a black point? It is small portions of the print that are pure black. If you’re printing on paper than these are small portions that are the blackest black that the combination of paper and ink can achieve. As a side note, different combinations of paper and ink achieve different levels of blackness. But regardless of the combination you use, the blackest black that can be achieved is your black point.

You want to keep the black point areas very, very small because they have no detail. And generally speaking we like to see detail in our shadows, another guideline that I picked up from studying Ansel Adams. But you don’t want to eliminate black points, that is, in most cases. There are a few exceptions to this rule that I will talk about later.

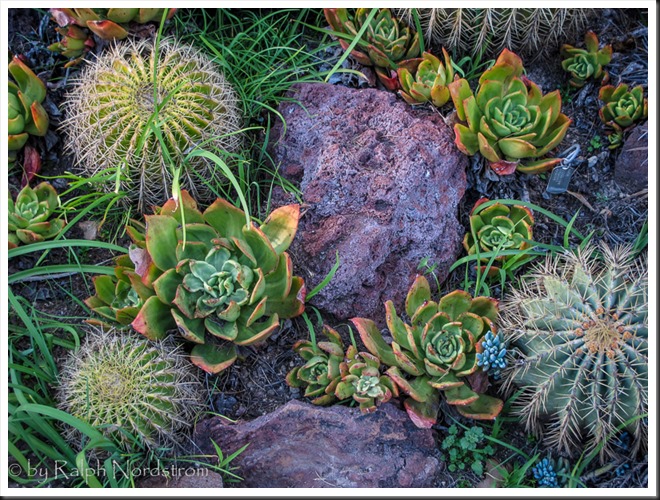
Let’s take a look at the before and after images of our photograph. I shot this at the Huntington Library in South Pasadena a few weeks ago. It’s in their incredible cactus garden – endlessly fascinating.

Continue reading “Creating Images with Impact – Black Point”

(8327)

Creating Images with Impact – Dynamic Range of the Medium

The pros create dramatic photographs, images with impact. You can add impact to your images too using these simple Lightroom techniques.

We’ve all seen those photographs that stop us in our tracks, that inspire us, that speak to us. Some photographs seem to have a special power, a special presence. Often times we hear ourselves saying, “Wow.” They have qualities that make them stand apart from other photographs. These are images with impact.

The masters of landscape photography seem to have the ability to capture a special quality of light in their photographs. It doesn’t matter whether they use film or shoot digital, their images stand out.

There are certain things about these images that do more than just appeal to us – we are drawn into to them. They capture our imaginations, stir our interests and perhaps show us moments in nature we could only hope to experience. We want to linger with them, explore them, take them in, get lost in them.

Without a doubt these photographs have compositions that are very strong, are bathed in fantastic light and have technical qualities of exposure and sharpness that are perfect. These are all decisions that the artist makes in the field, decisions that are critical to a strong image.

In the days of film, a good portion of the magic was done in the darkroom. That’s where their genius really became apparent. And it hasn’t changed today. We don’t actually have dark rooms to work in, closed rooms with the strange array of mysterious orders and the soft, dim yellow lighting. Today we have powerful software running on even more powerful computers. But really, how is that different from what the film Masters did in the darkroom? I don’t believe it is. I can’t think of anything that’s been done with “Photoshopped” photographs that hasn’t already been done in the darkroom. It’s probably a lot easier to do it in Photoshop but in the end, both the chemical darkroom and the electronic darkroom serve the same end, that being creating those “Wow” images.

In this series of posts I want to spend more time considering some techniques you can apply in the darkroom that will add impact to your images.

Use the Full Dynamic Range of Your Medium

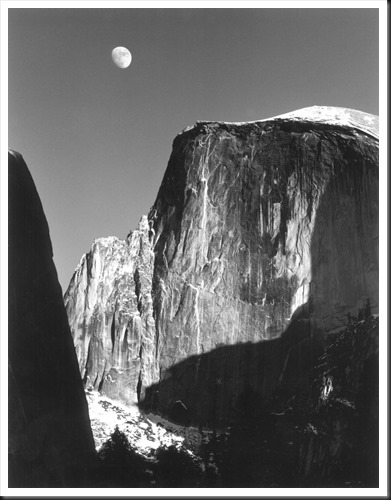
The first darkroom technique I would like to discuss is the importance of using the full dynamic range of your medium. This is not something new. When Ansel Adams developed the zone system it was precisely for this purpose – to use the full dynamic range of the black and white negative and ultimately the black and white print. But what exactly does it mean to use the full dynamic range of the medium. Let me illustrate with an Ansel Adams image I have loved for many years, one I’m privileged to be able to live with in my home – “Moon and Half Dome.”

Adams-moon-and-half-dome-1960

In this exquisite photograph if you are able to examine an original closely you will notice that the shadow on the left may look like it is totally black but actually there is subtle detail. However, there are some very small areas that are pure black. Also, the moon and the bright parts of Half Dome may look like they are pure white but a closer look will reveal detail in these areas also. This photograph takes full advantage of the full dynamic range of the paper, from the blackest black to the whitest white.

Continue reading “Creating Images with Impact – Dynamic Range of the Medium”

(4731)

Taking Your Photography to the Next Level

In this post we take a look at photography skills with the aim of helping the interested photographer understand where he is and what needs to be done to advance to the next level.

I read a great series of articles by George Barr on taking the next step in photography.  They were passed along to me by a good friend – Brian Graham.  I have some early thoughts on what Barr proposes.

In his articles he defines six or seven steps for both technical and aesthetic growth in photography.  His articles define each step, discuss ways you can determine what step you’re in and gives ideas on how to advance to the next step.

Continue reading “Taking Your Photography to the Next Level”

(5662)

Mastering Exposure–Histograms Part 4

Learn more about histograms. We explore the histogram that results from low contrast scenes – how to capture it and what can be done with it in post processing.

In this series of articles we’ve been exploring the histogram.  In the first two articles we discussed what it is.  Now we’re looking at different types of histograms and exploring how to work with them both in the field and during the post processing.  If you want to review or catch up, here are the links to the preceding three posts.

Mastering Exposure – Histograms Part 1: Introduction

Mastering Exposure – Histograms Part 2:  A Closer Look

Mastering Exposure – Histograms Part 3: The Rocky Mountain Histogram

In this article I want to discuss my favorite histogram, the Mole Hill histogram.  I like this one because so much can be done with it in the post processing.  Subtle colors and tonalities can be revealed in soft radiant light.  It lends itself to some of the most creative and expressive images.

Read on and we’ll look at what it is, the conditions in which it occurs, how to photograph it and how to work with it in the post processing to reveal the scene in all of its hidden glory.

Continue reading “Mastering Exposure–Histograms Part 4”

(4683)

Mastering Exposure–Histograms Part 3

This is the third post in a series on the histogram. This post discusses the Rocky Mountain histogram, what it is, when you can get it, how to photograph and how to do the post processing.

This is the third post in a continuing series on the oft misunderstood but oh so important histogram.  In the first two posts we discussed the histogram in general.  If you missed them, click on these links.

Mastering Exposure – Histograms Part 1

Mastering Exposure – Histograms Part 2

Recap

To recap, the histogram displays a graph of the tonal values in the scene you are about to photograph.  It shows how the dynamic range of the scene matches and fits into the dynamic range of your camera’s sensor.  There are two critical pieces of information a histogram tells you:

  1. If your exposure is correct
  2. If you have problems capturing the dynamic range of the scene

To recap, the exposure is displayed by the position of the histogram curve within the boundaries of the graph area.  As you increase the exposure the histogram moves to the right.  As you decrease the exposure it moves to the left.  If the exposure is increased so that the histogram moves all the way up against the right side of the graph area you will have highlight clipping. Likewise, if it moves all the way to the left side you will have shadow clipping.

The dynamic range of the scene is displayed as the breadth of the histogram,  The wider the histogram the greater the dynamic range of the scene.  The narrower the histogram the lower the dynamic range.  When the histogram is so wide that it extends from one end of the graph area to the other you are facing a situation where your camera’s sensor will have a difficult time capturing the full dynamic range of the scene.  The worst case is you will have both highlight and shadow clipping.

Continue reading “Mastering Exposure–Histograms Part 3”

(2312)

Mastering Exposure–Histograms Part 2

Take a deep dive into the often misunderstood histogram and discover the critical role it plays in capturing great photographs.

A few weeks ago I published the first of a series of articles on histograms, “Mastering Exposure – Histograms Part 1.”  I eventually want to talk about different types of histograms and how to work with them in the field and during the post processing.  But before getting into that I want to take a deeper dive into the histogram itself.

Continue reading “Mastering Exposure–Histograms Part 2”

(2697)