I’m a landscape photographer who likes to do it all himself. I don’t want my camera making decisions for me. That’s one reason why I shoot RAW. And I don’t want Lightroom doing it either. Lightroom has default presets that it applies to your photographs when you import them.
To make things interesting, I shoot with two cameras (three if you count my iPhone). My main camera is a Canon 1Ds Mark III and my don’t-leave-home-without-it camera is a Canon G11. These cameras have widely different characteristics to say the least. Lightroom applies the same default preset to files from both cameras when they are imported.
Wouldn’t it be nice if you could set up separate presets for each camera and set them up the way you like them. Well, that’s exactly what you can do. In fact, you can go a step farther than just undoing the Lightroom defaults. If there’s something you always do to every file you can create presets specific to each of your cameras and apply all the adjustments you want.
This all started with release 2.2 when Adobe gave us the ability to tell Lightroom what specific adjustments to apply to images for each of your cameras. You control this feature in the Presets tab in the Preferences window (Edit | Preferences > Preset).
 To create general camera-specific presets make sure the check boxes for Make defaults specific to camera serial number and Make defaults specific to camera ISO setting are both turned OFF.
Now make sure you’re in Develop mode and open an image from the camera you want to define the default settings for. I’ll use the G11 for this example.
Lightroom Default Settings
Lightroom applies its own default settings. Under Basic it sets Blacks to 5, Brightness to +50 and Contrast to +25. I prefer setting Blacks to 0 and leaving Brightness and Contrast as they are.
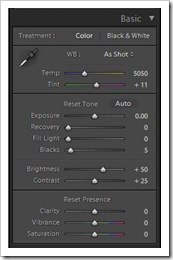
Lightroom Default
|
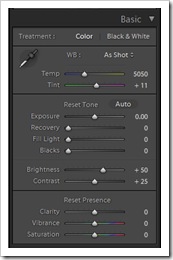
My G11
|
Lightroom also sets Point Curve: in Tone Curves to Medium Contrast. I prefer Linear.
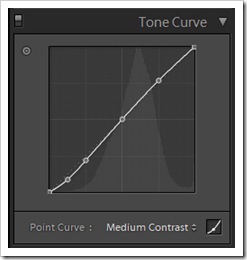
Lightroom Default
|
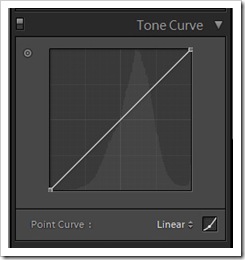
My G11
|
These settings give me more control over black point and overall image contrast.
Camera Specific Settings
Moving on down to Detail, this is where I like to do capture sharpening. We know that sharpening is the last thing you do before printing, frequently referred to as Output Sharpening. But because of the geometrical arrangement of the pixels in our camera sensors they introduce a small amount of image softening so capture sharpening is also very important.
The Detail settings allow you to do two things – capture sharpening and noise reduction. The LR defaults for both are very general. The Sharpening defaults are Amount 25, Radius 1.0 and Detail 25. (I’m not going to make any Noise Reduction changes for now.) As a landscape photographer I prefer capture sharpening that is a bit stronger and edgier. So I changed the settings to Amount 50, Radius 0.8 and Detail 35. This is a good balance for the sharpness I’m looking for in my work.
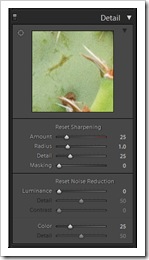
Lightroom Default
|
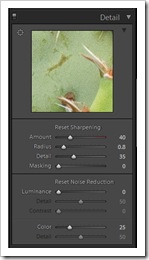
My G11
|
Lightroom 3 offers a very powerful adjustment that corrects for distortions caused by our lenses such as barrel and pin cushion distortions and vignetting. It is called Lens Correction. With this control you can specify your camera Make and Model and LR will apply the appropriate adjustments.
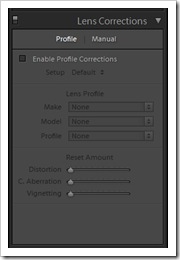
Lightroom Default
|
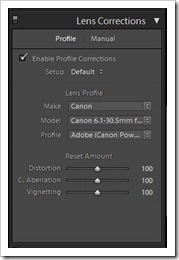
My G11
|
One final adjustment I like to make is in the Camera Calibration section. This is often overlooked because, well, it’s been pretty difficult to figure out in the past. But with LR 3 Adobe has made that job a lot simpler. Now the control has a Process adjustment with which you can select the older process LR applied back in 2003 or the current process 2010 (current). The other control is Profile: that contains a drop down menu. You can use the Adobe Standard setting or select a profile that is more specific to your camera. I prefer Camera Neutral.
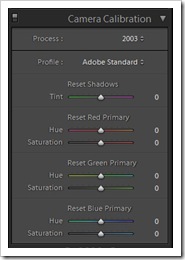
Lightroom Default
|
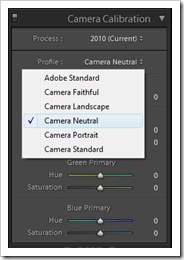
My G11
|
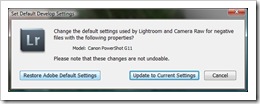
Once you get everything set up it’s time to save these settings as your camera’s default preset. While still in Develop mode click Develop | Set Default Settings…. Lightroom displays a dialog box for your camera. Click Update to Current Settings.
Well, that’s it. If you have more cameras you can repeat the process for each.
The next thing to try is to Make defaults specific to camera ISO setting. I plan to make presets that automatically increase the amount of noise reduction as the ISO increases.
I’ve shown you the settings that I use. These are the settings I feel are appropriate for a landscape nature photographer. Your settings may very well be different. But the fact remains that this is a cool way to import your photographs and apply a consistent set of initial adjustments. You can create whatever starting point you want and then take it from there.
Join me on an upcoming workshop. Click here for more details.
To see more of my photographs click here.
(4102)

This is great Ralph. I haven’t dug this deep into Lightroom but I will now. Thanks