Dig into the mysteries of exposure and explore how it works and how it is controlled.
What is Exposure?
When we photograph nature, some scenes are very bright like sand dunes in the middle of a sunny day. Others are very dark like the deep shade of a forest. Other scenes are both bright and dark like a blazing sun that just rose above the horizon on a brilliant morning.
There are many unique situations with different amounts or intensities of light.
Exposure is basically dealing with these different levels of light and making sure the sensor gets enough light to make a good photograph without getting too much light.
How Much Light Does the Sensor Need?
One way to think of it is that in low light situations (dark) the camera needs more light. In bright light situations it needs less. But that’s not true. The camera needs the same amount of light in either situation. A more accurate way of looking at it is in low light situations, it will take longer for the camera to get enough light than in a bright situation.
But there’s another aspect to this so let’s take a deeper look.
The image that passes through the lens is captured by the sensor and eventually stored as a file on a memory card. (There’s a lot that goes on between these two steps, but they are not important for this discussion.) The sensor, as you know, is made up of millions of pixels, microscopic elements that are sensitive to light. Actually, a pixel is three light-sensitive elements, one for red, another for green and a third for blue. But let’s keep it simple and speak of it as just one element that captures tones of gray.
When a picture is taken a different amount of light falls on each pixel depending on the subject photographed and the nature of the composition. In the shadow area there may not be enough light to even register on the sensor. This is called ‘shadow clipping’ and will produce a black dot.
In the bright areas there may be so much light, more than the sensor can measure. You can think of this as a glass filled to overflowing. There’s a limit to how much water a glass can hold and light a sensor can capture. This is called ‘highlight clipping’ and results in a white spot.
If a moderate amount of light falls on a pixel, it will capture the light and that pixel will render a gray spot that falls somewhere between black and white, depending on the amount of light.
Now, if the difference in the amount of light between black clipping and white clipping is ten stops, then the sensor has a dynamic range of ten stops. That is fixed and cannot be changed.
Back to the question – how much light does the camera need to make a proper exposure? If you took the amounts of light recorder by all of the millions of pixels and average them, the camera considers it a proper exposure when they average out to a neutral gray, a gray that is perceived as being neither dark or light but right in the middle. The definition of neutral gray is very precise. It is a gray that reflects 18% of the light.
There are different metering modes that go beyond just taking a simple average of all the pixels. There is center weighted which pays more attention to the pixels in the center of the frame, spot which only looks at the pixels covering about 5 degrees in the exact center of the frame and matrix which attempts to analyze the image and make a smarter determination.
But whichever metering mode you choose, the basic goal is to have the result produce a neutral gray.
The processor in the camera (all digital cameras are computers after all) has the logic to make this calculation. With the results, the computer can set the exposure settings.
The Exposure Triangle
The camera has three exposure settings that can be adjusted to get a proper exposure. They are ISO, aperture and shutter speed.
ISO controls the sensitivity of the sensor. The higher the ISO, the greater the sensitivity and less light will be needed.
Aperture controls how much light comes through the lens. You can think of it as adjusting the brightness of the image falling on the sensor.
Shutter speed controls how long the sensor is exposed to the image.
Shooting Modes
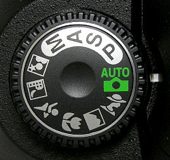
Most cameras have at lest four shooting modes – Auto, Aperture priority, Shutter priority and Manual. The setting you choose determines how many of the exposure settings the camera sets and how many you control.
Auto – The camera decides all three exposure settings.
Aperture priority – You decide the ISO and aperture and the camera decides the shutter speed.
Shutter priority – You decide the ISO and shutter speed and the camera decides the aperture.
Manual – You decide all three exposure settings.
In Summary
To sum it up, an exposure is the amount of light falling on a sensor, taking into account the sensor’s sensitivity. A proper exposure from the camera’s perspective is one where the amounts of light captured by all of the pixels being monitored average out to a neutral gray.
In a bright snow scene where most of the pixels are registering the bright white of the snow, the camera will make the snow a neutral gray.
In a dark scene with most of the pixels registering deep shadows, the camera will make the shadows a neutral gray.
But in a scene with a balance of bright and dark areas the exposure will be more like what we see.
Join me for a great workshop. Click here to see what’s possible.
Read more:
Tell Me More About ISO
Tell Me More About Aperture
Tell Me More About Shutter Speed
Tell Me More About the Exposure Triangle
(44)
Like this:
Like Loading...

