How Many Megapixels Do You Need?

How many megapixels do you need? That depends….

Let’s face it, megapixels have been a great marketing tool. “The more there are, all the better,” or so the logic goes. And when a camera manufacturer announces another big jump in megapixels, the photography world sits up takes notice. The question, however, is, ‘How many megapixels do you really need?” Admittedly, this may be different from, “How many megapixels do you want?” The answer to the second question kind of depends on your financial resources and the desire to stay on top of new technology developments. But there is an objective answer to the first question (although it may not be gratifying). But to answer it we need to start at the beginning…

What is a Pixel?

A pixel, or picture element, is a term commonly used across many media – camera sensors, monitors, TVs, etc. But each has its own design. We will stick to the camera sensors.

A single pixel is made up of four elements called pixel sensors arranged in a square pattern. And each element has a colored filter – one red, one blue and two green. It’s called the Bayer pattern.

image

Cambridge in Color has a great article titled Digital Camera Sensors, if you care to take a deeper look. The high-level overview begins with colored light coming through the lens and falling on the sensor. At each pixel element the intensity of red, green or blue light is captured. The intensity is voltages that capture a continuous range of brightness, something like dimming or brightening a light bulb. The computer’s processor, among other things, converts the continuous signal from each element into 32,766 discrete digital steps (14 bits). And that is what gets saved on your memory card as a RAW file.

The important takeaway, however, is that each pixel is made up of four elements – one red, one blue and two green.

By the way, you’re probably asking, “Why two green elements?” Well, as it turns out, that mimics the color sensitivity in our eyes. You see, the cones in our retina are sensitive to red, green and blue light. But it turns out that our eyes are more sensitive to green than red or blue. So, making the sensors with two green elements mirrors what the way our eyes work.

Moving on….

Continue reading “How Many Megapixels Do You Need?”

(1017)

Tell Me More About ISO

Explore ISO as part of the exposure triangle and the role it plays in getting a proper exposure.

What is ISO?

To start at the beginning, ISO stands for International Organization of Standards. It sets the standard for measuring the sensitivity of camera sensors. It dates back to the film days when it referred to the film’s speed or, as it was called then, ASA which stands for American Standards Association.

Films had a fixed ISO. To change the ISO, you had to load a different film in your camera. Digital cameras can change the ISO whenever it is needed. This is a huge advantage as the digital photographer can instantly respond to changing light conditions.

What Does Changing the ISO Do?

Changing the ISO increases or decreases the sensor’s sensitivity. What that means is when the sensor is set at a low ISO it is less sensitive, requiring more light go get a proper exposure. When set at a higher ISO it is more sensitive, requiring less light to get a proper exposure.

In most cameras the lowest ISO is 100. With the advancements that have been made in recent years, it’s common to see the high ISOs around 12,800.

The ISOs are laid out in f/stops or Exposure Values (EV). These measures are based on doubles or halves. Doubling the ISO from 100 to 200 doubles the sensitivity resulting in needing half the amount of light to get a proper exposure. Increasing the ISO from 100 to 400 quadruples the sensitivity resulting in the amount of light needed for a proper is reduced by 4.

How Does ISO Work in a Digital Camera?

The technology that allows us to change ISOs has gotten very sophisticated. And different sensors (CMOS vs CCD) employ different technologies. Part of the ISO increase is by increasing the voltage to the sensor. This can occur in the sensor itself or outside the sensor. The signals coming out of the sensor need to be converted from analog to digital and in some cases additional ISO boost is done to the digital signal. The engineering that goes into this is highly sophisticated as I’m sure you can imagine.

What Are the Effects of Using High ISOs?

Lower ISOs produces higher quality images. Most landscape photography is shot at ISO 100. Higher ISOs make it possible to shoot in low light conditions, but they run the risk of increased noise, especially in the shadows. Noise manifests itself in a way that is similar to grain in high ISO films. It produces a blotchy look.

But the technology has progressed so far that ISOs in the 800 to 1600 range that were unthinkable just a few years ago now produce excellent results. And one can expect the situation to only get better. This is great news for night photographers.

Summing It Up

Most landscape photography can be shot with the lowest ISO, especially when using a tripod. However, higher ISOs are available for tricky low-light conditions and can be used with confidence.

Exposure Triangle

ISO is one of the three sides of the Exposure Triangle. It works in conjunction with aperture and shutter speed to get a proper exposure.

The sides of the exposure triangle are measured in stops. The ISO determines how much light is required to get a proper exposure. An ISO of 100 requires twice as much light as ISO 200.


Join me on an exciting workshop. Click here to see what’s available.

Read more:

Tell Me More About Exposure
Tell Me More About Aperture
Tell Me More About Shutter Speed
Tell Me More About the Exposure Triangle

(40)

Tell Me More about Exposure

Dig into the mysteries of exposure and explore how it works and how it is controlled.

What is Exposure?

When we photograph nature, some scenes are very bright like sand dunes in the middle of a sunny day. Others are very dark like the deep shade of a forest. Other scenes are both bright and dark like a blazing sun that just rose above the horizon on a brilliant morning.

There are many unique situations with different amounts or intensities of light.

Exposure is basically dealing with these different levels of light and making sure the sensor gets enough light to make a good photograph without getting too much light.

How Much Light Does the Sensor Need?

One way to think of it is that in low light situations (dark) the camera needs more light. In bright light situations it needs less. But that’s not true. The camera needs the same amount of light in either situation. A more accurate way of looking at it is in low light situations, it will take longer for the camera to get enough light than in a bright situation.

But there’s another aspect to this so let’s take a deeper look.

The image that passes through the lens is captured by the sensor and eventually stored as a file on a memory card. (There’s a lot that goes on between these two steps, but they are not important for this discussion.) The sensor, as you know, is made up of millions of pixels, microscopic elements that are sensitive to light. Actually, a pixel is three light-sensitive elements, one for red, another for green and a third for blue. But let’s keep it simple and speak of it as just one element that captures tones of gray.

When a picture is taken a different amount of light falls on each pixel depending on the subject photographed and the nature of the composition. In the shadow area there may not be enough light to even register on the sensor. This is called ‘shadow clipping’ and will produce a black dot.

In the bright areas there may be so much light, more than the sensor can measure. You can think of this as a glass filled to overflowing. There’s a limit to how much water a glass can hold and light a sensor can capture. This is called ‘highlight clipping’ and results in a white spot.

If a moderate amount of light falls on a pixel, it will capture the light and that pixel will render a gray spot that falls somewhere between black and white, depending on the amount of light.

Now, if the difference in the amount of light between black clipping and white clipping is ten stops, then the sensor has a dynamic range of ten stops. That is fixed and cannot be changed.

Back to the question – how much light does the camera need to make a proper exposure? If you took the amounts of light recorder by all of the millions of pixels and average them, the camera considers it a proper exposure when they average out to a neutral gray, a gray that is perceived as being neither dark or light but right in the middle. The definition of neutral gray is very precise. It is a gray that reflects 18% of the light.

There are different metering modes that go beyond just taking a simple average of all the pixels. There is center weighted which pays more attention to the pixels in the center of the frame, spot which only looks at the pixels covering about 5 degrees in the exact center of the frame and matrix which attempts to analyze the image and make a smarter determination.

But whichever metering mode you choose, the basic goal is to have the result produce a neutral gray.

The processor in the camera (all digital cameras are computers after all) has the logic to make this calculation. With the results, the computer can set the exposure settings.

The Exposure Triangle

The camera has three exposure settings that can be adjusted to get a proper exposure. They are ISO, aperture and shutter speed.

ISO controls the sensitivity of the sensor. The higher the ISO, the greater the sensitivity and less light will be needed.

Aperture controls how much light comes through the lens. You can think of it as adjusting the brightness of the image falling on the sensor.

Shutter speed controls how long the sensor is exposed to the image.

Shooting Modes

Most cameras have at lest four shooting modes – Auto, Aperture priority, Shutter priority and Manual. The setting you choose determines how many of the exposure settings the camera sets and how many you control.

Auto – The camera decides all three exposure settings.

Aperture priority – You decide the ISO and aperture and the camera decides the shutter speed.

Shutter priority – You decide the ISO and shutter speed and the camera decides the aperture.

Manual – You decide all three exposure settings.

In Summary

To sum it up, an exposure is the amount of light falling on a sensor, taking into account the sensor’s sensitivity. A proper exposure from the camera’s perspective is one where the amounts of light captured by all of the pixels being monitored average out to a neutral gray.

In a bright snow scene where most of the pixels are registering the bright white of the snow, the camera will make the snow a neutral gray.

In a dark scene with most of the pixels registering deep shadows, the camera will make the shadows a neutral gray.

But in a scene with a balance of bright and dark areas the exposure will be more like what we see.


Join me for a great workshop.  Click here to see what’s possible.

Read more:

Tell Me More About ISO
Tell Me More About Aperture
Tell Me More About Shutter Speed
Tell Me More About the Exposure Triangle

(44)

Photographic Gear – the Camera Body

I’m taking you on a tour through my camera bag and the first stop was the bag itself.

Click here to read the article: Photographic Gear – A Tour of a Photographer’s Camera Bag

The next stop is the camera itself. Now, by this, I mean the camera body, not the body and lens. I’ll talk about lenses later.

Like so many of us, my camera got put aside for quite some years. I was very active in photography in the 1970s. I took frequent trips to Yosemite, camping and exploring with camera in hand. I even worked in a photography studio lab for several years, learning the intricacies of color film processing and printing. But then things changed and time for photography dissolved. Until my daughter was about to be born in 1994, that is.

I bought a Canon EOS ELAN with a Tamron 28-200mm lens and shot countless rolls of film, mostly of the new joy in our lives.

clip_image002[4]I resisted the digital movement for a long time, preferring 35mm film. But when I finally joined the movement around 2000, I purchased a digital point and shoot with a big zoom lens. It was a Canon PowerShot Pro90 IS that I cut my digital teeth on with all of its 2.6 megapixels.

I tried to apply what I had learned in the film world for both color slide and negative films to the digital world. I also tried to apply what I had learned in the color darkroom to Photoshop. It took a while to realize that very little of the knowledge and experience I had gained carried over into the digital world. This required a whole new way of thinking, both in the field and in the digital darkroom. For example, with color slides, you normally want to underexpose a little to saturate the colors more. With digital, you overexpose a little to get more detail in the shadows.

clip_image004[4]It was in September of 2004 that I made the jump to a digital SLR when I upgraded to the Canon 10D. With a little over 6 megapixels, I was a big step up from the PowerShot. This is the camera I was carrying around in the duffel bag I mentioned in the previous article.

I did a lot of shooting with the 10D. I was intimidated by RAW processing at first so I shot in JPEG. Sadly, there are a lot of JPEG files that would have been great had I been able to capture them in RAW but, alas…. Eventually, I moved to RAW when I found a software program that made sense. Adobe bought the software when they were developing Lightroom. It made RAW conversion much less intimidating.

Continue reading “Photographic Gear – the Camera Body”

(272)

Dust, Darn Dust

Safely remove dust from your digital SLR sensor.

Dust spots. How annoying. They can give a blue sky chickenpox.

Dust spots on your sensor can mean hours of laborious effort removing them one by one in the digital darkroom. But, because they are on the sensor, that most sensitive component of our digital cameras, we are sometimes terrified to attempt removing them. So we either put up with them or we send our cameras out to a repair guy and pay good money to have him remove them.

Oh yeah, our cameras do the dust removal shake thing every time you turn them on and off. But some cameras work better than others. And there are conditions where the camera can shake the sensor as much as it wants but it won’t get rid of all the dust.

As frightening as it seems, removing dust from your sensor doesn’t have to be all that dangerous. As it turns out, there are three levels of dust removal – which are performed in that order. Any one of us can do the first level. And most of us would have enough confidence to do the second. The most stouthearted of us will even attempt the third but that’s not a level that needs to be resorted to very often. So what are these levels?  Let’s take a look at them one by one.

Level 1 – Blowing

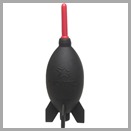
When the camera is turned on there’s a small static charge on the sensor that can attract particles of dust. They are held to the sensor by the static electricity and typically the attraction is fairly weak. So the first level involves giotto rocketblowing the dust particles off the sensor with a gentle stream of air. The trick is to use the right source for the gentle stream of air. One thing you absolutely do not want to use is canned air. The aerosols contain propellants which can squirt out solvents along with the air. And that’s not very good because the solvents will get on your sensor and create an even worse problem. But there are blowers that are specifically designed just for this purpose. The Giotto Rocket is one excellent example. The thing that makes the Giotto and others like it so special is that it draws the air in from the back and blows it out the front. That way it doesn’t inadvertently pull in a particle of dust that it just dislodged, only to shoot it right back out at the sensor – and at high velocity. Smart.

To blow the dust off your sensor, check your camera’s manual and find the menu option for manual sensor cleaning. Remove the lens from your camera body and activate the option. When you do this, the mirror will flip out of the way and expose the sensor. Hold the camera body so the lens opening is facing down and gently (with emphasis on the word ‘gently’) blow a stream of air against the sensor. I like to direct the air not only to the center of the sensor but the edges and the corners. When you’re done turn off the camera and the mirror will drop back in place. (Of course, if you have a mirrorless camera there is no mirror to flip out of the way. When you take the lens off the sensor is already exposed.) Many digital SLRs will not allow you to do a manual cleaning if the battery does not have enough charge. I think that is so that the camera will not run out of juice before the mirror is put back in its place. This process is  pretty easy isn’t it.  Nothing touches the sensor but air. Continue reading “Dust, Darn Dust”

(228)

Is HDR a Four Letter Word?

Is HDR really a four letter word or is it a powerful technique that let’s capture images we would have had to pass up in the past?

HDR.  Many people respond to those three letters in shock and disgust.  For them, HDR is synonymous with over the top processed images.  It embodies all that they think is wrong with digital photography and the implied MANIPULATION that goes with it.  It is a shocking insult on reality.

I’ve heard of photography contests that strictly forbid HDR and insist that all the photographs that are submitted be a single exposure.  I’ve judged photography competitions in which the other judges viewed an HDR image that was just slightly over the top and felt it should be placed in the Manipulated category.

But the letters HDR stand for High Dynamic Range.  Nothing sinister about that.  It’s a situation frequently encountered when out photographing.  That’s when the dynamic range of the scene, the difference between the darkest and brightest spots in the scene, is greater than the dynamic range our camera’s sensor is capable of capturing.  When we encounter this situation we’re going to get clipping where the highlights or shadows or both lack detail, are blank.  This is not a desirable situation.  If there’s anything that’s shocking here it’s that the camera, that supposedly great recorder of reality, does not, cannot see what our eyes see.  So what can be done about that?

Well, if you’re shooting color film the answer is simple. Nothing.  Move on.  You’ll never be able to capture high dynamic range images on color film (without clipping) no matter how beautiful they are.  If you are shooting black and white you can do what Ansel Adams did – water bath development.  He exposed for the shadows and adjusted his development process and chemicals to get a proper development of his highlights.  Sounds to me like he’s doing what we digital photographers do with HDR – adjusting the process to capture the full dynamic range (Read “How Ansel Adams did HDR”).

If you’re a digital photographer you can use the HDR technique – capture two or more images with bracketed exposures that span the dynamic range and then blend them together using software like PhotoMatix Pro.  So where’s the problem?  I mean, doesn’t that sound like a good thing, taking photographs we weren’t able to do at all with color film or with great difficulty with black and white?

But somehow HDR has become a four letter word in some circles.  It’s become synonymous with that word that is so offensive to some – MANIPULATION.  HDR images are manipulated images.  Never mind that HDR can be used to create photographs that are a lot more like what our eyes see than what our cameras are even remotely capable of capturing.

Many of these same people that think that HDR is a four letter word are also prone to look down their noses and ask, “Did you PHOTOSHOP that picture.”  Yes, with Photoshop we can easily drop in moons that weren’t there.  And our photographs are cheap because of that.  But it was OK in the days of film when the masters that we so admire did it.  What’s the difference?  Is it that it was hard when you did it with film and therefore to be admired but it’s easy with Photoshop?  Don’t know.  Could be.

And with HDR a similar thing might be happening.  With the software tools that are available you don’t have to settle for recreating what our eyes saw, you can take your images over the top, give them that grunge look.  Or that painterly look.  It’s up to you and your vision.

Now, for the record (not that it’s important) I choose not to go for the grunge or painterly look in PhotoMatix Pro.  I prefer to control the dynamic range, remove highlight clipping and return an image to Lightroom that I can continue to work on.  And when it comes to moons in my  photographs I prefer to be there when the full moon comes up behind my  favorite bristlecone pine.  It’s a lot more fun that way.

But I have no argument with those that drop moons or cloudy skies or whatnot in their photographs.  And I have no argument with those that choose to express themselves with grunge HDR images.  I readily confess that some of them are extremely effective with the grunge look.  That’s just not my style, not my personality.

The only thing I think we all owe our viewers is to be honest about it.  When people come into my booth at an art festival and ask if I manipulate or Photoshop my photographs I  answer, “Of course.”  I often go on to say, “Let me put it this way.  I approach photography from the mindset of a painter.  I want to have all the creative freedom a painter would have.’”  And more than once, they have responded, “Oh, I get it.  You’re an artist.”

Smile

Love it when that happens.


What do you think of HDR?  What do you think of manipulation in Photoshop?  Leave a comment.  We’d love to hear your opinion.

If you found this post interesting or relevant please feel free to share it on Facebook, Twitter or the like.

Join me on an upcoming workshop.  Click here for more details.

To see more of my photographs click here.

WordPress Tags: Four,Letter,Word,Many,images,photography,MANIPULATION,exposure,judges,image,category,High,Dynamic,Range,situation,difference,sensor,highlights,shadows,Move,Ansel,Adams,development,Read,technique,PhotoMatix,PHOTOSHOP,Could,tools,grunge,vision,Lightroom,argument,viewers,booth,festival,mindset,painter,freedom,artist,Love,competitions,chemicals,exposures,digital,camera,black,software,were,moons

(1995)

Canon 1Ds Mark III Sensor Clean #2

I got dust on the sensor of my Canon 1Ds Mark III and couldn’t get it off.  The vibration on startup and shutdown didn’t dislodge it.  I tried cleaning it witn a sensor brush and that didn’t work.  So I took it into the local Canon Express Service Center to have them do it.  I was expecting to pay about 50 bucks for it but was delighted to find out they did it for free.  That put a smile on my face.  Another satisfied Canon customer.

(531)

Thoughts on Raw vs JPEG

I’ve been having a discussion with a friend regarding the benefits and challenges of JPEG and RAW file formats.  There’s already a lot of discussion on this topic out there but here’s a bit more.

The challenge my friend has with RAW is that the images are not as striking as JPEG.  In fact, she says the RAW images are rather flat and she’s right.

Continue reading “Thoughts on Raw vs JPEG”

(851)