A Conversation about Fine Art

Listen in on a conversation about the nature of fine art photography.

What’s on your mind?

I’ve been thinking about ‘fine art.’

You’ve got to be kidding. I mean there are PhDs that study this sort of thing, masters of the arts that won’t touch the topic. What makes you think you can think about ‘fine art?’

I don’t know. I just wonder about it. I’m trying to be an artist and I wonder what it all means, if I’m truly an artist or if I’m getting any closer.

Ok, you’re a photographer, aren’t you? So you must be thinking about fine art photography. You must be nuts! Nobody agrees on what fine art photography is.

Yea, fine art photography, that’s it. What do you think? Do you have any ideas of what it really is? I mean I’ve heard people say that if you want your photography to be art all you have to do is to call it art and it is so. ‘My photographs are fine art.’ Lord knows you hear that enough. But that seems a bit too simplistic, a bit too easy. It seems like it should be more than that.  I mean, can you snap a picture, run down to Costco to get a large print and call it art?


Continue reading “A Conversation about Fine Art”

(1126)

Lightroom Tutorial – Workflow Made Easy

Simplify your Lightroom workflow with these easy steps.

Lightroom is a great tool. It’s quick and easy to use – once you get the hang of it. But sometimes mastering the workflow, the steps you go through to take a raw file to a ‘final’ image, can be a bit daunting.

Let me say up front that Lightroom is an important part of my workflow but it’s not the only part.  Every photograph I work on starts in Lightroom but is completed in Photoshop.  Nevertheless, Lightroom gets a photograph to about 80% of the final product.  I know many people who use Lightroom exclusively and Photoshop only in rare circumstances if at all.

So back to the workflow.  Can it really be made easy?  Yes it can.  There are four major steps (not counting import – see Lightroom Tutorial – Importing Photographs):

  1. Mechanical adjustments like dust spot removal and cropping
  2. Tonality adjustments
  3. Hue adjustments
  4. Saturation adjustments

Let’s skip the first step and start with the second.  The example will be in Lightroom 4.

Continue reading “Lightroom Tutorial – Workflow Made Easy”

(7129)

Is HDR a Four Letter Word?

Is HDR really a four letter word or is it a powerful technique that let’s capture images we would have had to pass up in the past?

HDR.  Many people respond to those three letters in shock and disgust.  For them, HDR is synonymous with over the top processed images.  It embodies all that they think is wrong with digital photography and the implied MANIPULATION that goes with it.  It is a shocking insult on reality.

I’ve heard of photography contests that strictly forbid HDR and insist that all the photographs that are submitted be a single exposure.  I’ve judged photography competitions in which the other judges viewed an HDR image that was just slightly over the top and felt it should be placed in the Manipulated category.

But the letters HDR stand for High Dynamic Range.  Nothing sinister about that.  It’s a situation frequently encountered when out photographing.  That’s when the dynamic range of the scene, the difference between the darkest and brightest spots in the scene, is greater than the dynamic range our camera’s sensor is capable of capturing.  When we encounter this situation we’re going to get clipping where the highlights or shadows or both lack detail, are blank.  This is not a desirable situation.  If there’s anything that’s shocking here it’s that the camera, that supposedly great recorder of reality, does not, cannot see what our eyes see.  So what can be done about that?

Well, if you’re shooting color film the answer is simple. Nothing.  Move on.  You’ll never be able to capture high dynamic range images on color film (without clipping) no matter how beautiful they are.  If you are shooting black and white you can do what Ansel Adams did – water bath development.  He exposed for the shadows and adjusted his development process and chemicals to get a proper development of his highlights.  Sounds to me like he’s doing what we digital photographers do with HDR – adjusting the process to capture the full dynamic range (Read “How Ansel Adams did HDR”).

If you’re a digital photographer you can use the HDR technique – capture two or more images with bracketed exposures that span the dynamic range and then blend them together using software like PhotoMatix Pro.  So where’s the problem?  I mean, doesn’t that sound like a good thing, taking photographs we weren’t able to do at all with color film or with great difficulty with black and white?

But somehow HDR has become a four letter word in some circles.  It’s become synonymous with that word that is so offensive to some – MANIPULATION.  HDR images are manipulated images.  Never mind that HDR can be used to create photographs that are a lot more like what our eyes see than what our cameras are even remotely capable of capturing.

Many of these same people that think that HDR is a four letter word are also prone to look down their noses and ask, “Did you PHOTOSHOP that picture.”  Yes, with Photoshop we can easily drop in moons that weren’t there.  And our photographs are cheap because of that.  But it was OK in the days of film when the masters that we so admire did it.  What’s the difference?  Is it that it was hard when you did it with film and therefore to be admired but it’s easy with Photoshop?  Don’t know.  Could be.

And with HDR a similar thing might be happening.  With the software tools that are available you don’t have to settle for recreating what our eyes saw, you can take your images over the top, give them that grunge look.  Or that painterly look.  It’s up to you and your vision.

Now, for the record (not that it’s important) I choose not to go for the grunge or painterly look in PhotoMatix Pro.  I prefer to control the dynamic range, remove highlight clipping and return an image to Lightroom that I can continue to work on.  And when it comes to moons in my  photographs I prefer to be there when the full moon comes up behind my  favorite bristlecone pine.  It’s a lot more fun that way.

But I have no argument with those that drop moons or cloudy skies or whatnot in their photographs.  And I have no argument with those that choose to express themselves with grunge HDR images.  I readily confess that some of them are extremely effective with the grunge look.  That’s just not my style, not my personality.

The only thing I think we all owe our viewers is to be honest about it.  When people come into my booth at an art festival and ask if I manipulate or Photoshop my photographs I  answer, “Of course.”  I often go on to say, “Let me put it this way.  I approach photography from the mindset of a painter.  I want to have all the creative freedom a painter would have.’”  And more than once, they have responded, “Oh, I get it.  You’re an artist.”

Smile

Love it when that happens.


What do you think of HDR?  What do you think of manipulation in Photoshop?  Leave a comment.  We’d love to hear your opinion.

If you found this post interesting or relevant please feel free to share it on Facebook, Twitter or the like.

Join me on an upcoming workshop.  Click here for more details.

To see more of my photographs click here.

WordPress Tags: Four,Letter,Word,Many,images,photography,MANIPULATION,exposure,judges,image,category,High,Dynamic,Range,situation,difference,sensor,highlights,shadows,Move,Ansel,Adams,development,Read,technique,PhotoMatix,PHOTOSHOP,Could,tools,grunge,vision,Lightroom,argument,viewers,booth,festival,mindset,painter,freedom,artist,Love,competitions,chemicals,exposures,digital,camera,black,software,were,moons

(1995)

Mastering Composition – Working the Shot

How can you create a strong composition? Here’s one method that really works.

There’s no doubt that composition is one of the key elements of a successful image.  You can have all the other factors of a great shot – fantastic light, optimum exposure and appropriate sharpness – but with a weak composition you have a weak photograph. 

I know photographers that work slowly enough to work out the strongest composition before they press the shutter.  I admire these people immensely.  But I don’t work that way, especially in an area I’m unfamiliar with.

A short while ago I was driving south through Utah on beautiful highway 89 traveling between Bryce Canyon and Zion National Parks after wrapping up a successful photography workshop.  I came upon a stand of cottonwood trees that were in full autumn splendor.  I had to pull over.

I grabbed my point and shoot (Canon G11) and started scouting for photographs.  I like to use the G11 for that, scouting for compositions that are worth the effort of setting up my big Canon.  I found two compositions that were promising.

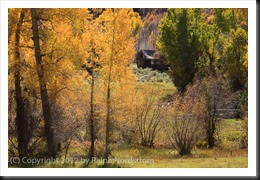
The second proved to be the most interesting, at least in terms of how the final composition evolved.  Behind the cottonwoods was a meadow with a dilapidated shack.  It was so Utah!  I set up what I thought would be an interesting composition.

bryce_121019__SM33931

(Click on the images to enlarge them.)

I positioned my camera so that there would be a narrow opening to the meadow and the shack.  It is a tight composition that draws the viewers eye to the shack which is placed in a very strong position within the frame.  It has a feeling of depth with a strong foreground opening up to the shack in the background.

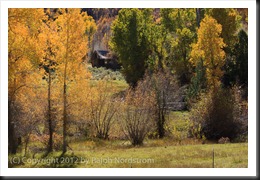
I was feeling good about this composition and then I noticed a glowing cottonwood just outside the frame to the right so I moved the camera a couple of feet to the right and created this image.

bryce_121019__SM33935

The golden cottonwoods on the left are balanced by the single, smaller cottonwood to the right.  This arrangement has the effect of placing more emphasis on the autumnal trees.  The eye makes three stops, first at the cottonwoods on the left, then to the right and finally works its way back to the shack in the back.

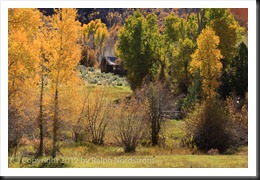
I was pretty  pleased with these two compositions and thought I had something to work with when I got home.  So I disassembled everything and put  it back in my camera bag, collapsed the tripod and started back toward the car.  I hadn’t gone 5 steps when I looked back up toward the shack and saw there was another blaze of cottonwoods right next to it.  So I swung my backpack back down to the ground and set up again for this shot.

bryce_121019__SM33939

Now there are three sources of golden light for the eye to explore – the cottonwoods to the left, the one a little further back on the right and the ones way in the back by the shack.  (Odd numbers of things are always good.)  The image is well balanced and every element in it contributes to the entire impression.

There’s a story here, a story of living in this beautiful valley during a time that is gone and will probably never return.  It must not have been an easy life but one of honest, hard work and the satisfaction of living in a place of such splendid beauty.  We would do it differently today with more conveniences and comforts.  And maybe, just maybe, miss out on the more intimate connection with Mother Earth that living in such a simple shack must have provided.


I’d be interested to hear which of the three compositions you like the most.  Please leave a comment saying which one you like and why.  It will make for a very interesting dialog.

If you enjoyed this post please feel free to Like it and share it with your friends.  You can use the links at the top.

Join me on an upcoming workshop.  Click here for more details.

To see more of my photographs click here.

WordPress Tags: Composition,Shot,image,exposure,area,Utah,highway,Bryce,Canyon,Zion,National,Parks,photography,workshop,trees,splendor,Canon,worth,effort,Behind,shack,Click,images,viewers,depth,foreground,background,arrangement,emphasis,tripod,steps,backpack,numbers,element,valley,life,satisfaction,conveniences,connection,Mother,Earth,factors,compositions,feet,cottonwood,cottonwoods,camera,three

(1276)

Ansel Adams – The Making of 40 Photographs: El Capitan, Winter Sunrise

A continueing series in which I reflect on Ansel Adams’ book, “Examples – The Making of 40 Photographs.” In this post I talk about “El Capitan, Winter Sunrise.”

I’ve heard it said that many photographers believe there are no more photographs in Yosemite, that all the great ones have been taken.  And it’s true that the prime locations have been photographed again and again, sometimes with 50 or even 100 photographers all vying for their three square feet of ground in which to set up their tripods. 

It would appear the assumption is that if a particular location is photographed too many times, becomes too popular, it becomes a cliché.  I’ve succumbed to that point of view in the past.  There seems to be the faintest whiff of, “I’m too good to photograph something so common.  I’m able to find what no one else has never seen.”  I know; I kind of felt that way.

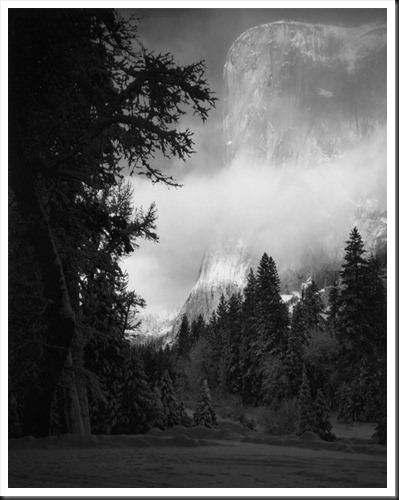
El Capitan, Winter Sunrise
Ansel Adams

Ansel Adams had something to say about that in connection with this photograph.

“A viewer once asked me about the values: ‘Don’t you think the trees are rather dark?’  Black and white photography gives us opportunity for value interpretation and control.  In this instance, were the trees lighter in value, the glow of the light on the cliff would, for me, be far less expressive.  Exposing for higher forest values  would have weakened the separation of the far brighter cliff and cloud values.  However, other photographers might well make quite different images.  I would not like anyone to think I believe this image to be the only one possible, but it fulfills my visualization at the time of exposure.  In an overpowering area such as Yosemite Valley it is difficult for anyone not to make photographs that appear derivative of past work.  The subjects are definite and recognizable, and the viewpoints are limited.  It is therefore all the more imperative to strive for individual and strong visualization.”

Adams’ comment gets to the heart, mind and soul of the artist.  There are two key concepts in his statement that, for me, define art.  The first is ‘interpretation. ’Black and white photography gives us opportunity for value Interpretation and control.”  I take from this that our photographs are interpretations of the subject.  After all, art is interpretation.  And, as artists, it is through interpretation that we share with our viewers our vision of the world.  We don’t document reality; we interpret or possibly even create reality.

The other concept that catches my attention is ‘individual … visualization.’  Adams speaks of his ‘visualization’ all the time.  And the reason we enjoy his photographs so much is because of his strong visualizations.  When he tripped the shutter he knew what effect he wanted to create with the image.  He knew what he wanted to convey in terms of what he was feeling and he knew how to do it, especially when he developed and refined the Zone System.

And it was his interpretations and visualizations that took a location that had been photographed time after time by many other photographers and turned it into something uniquely and identifiably his.

So stand on the bridge in Zion or line up to photograph Delicate Arch in Arches or join the throng at tunnel view in Yosemite.  You can make your photograph unique through your own strong vision and interpretation.


This is a continuing series based on my reading of Ansel Adams’ wonderful book, “Examples – The Making of 40 Photographs.”  It is exciting to read of his attitudes towards making photographs, the decisions he made and the techniques he employed and apply them to the issues that confront us today as digital landscape photographers.  I think those of us who ‘Photoshop’ our images for the sake of achieving our visualization can feel a comradeship with the master.  The question, “Did you manipulate that photograph?” will never go away as long as our medium is the camera.  Adams was also confronted with the same question.  For those of use that believe that the purpose of making a landscape photograph is to share with our audience our response to and our connection with the subject, the work is not done when we press the shutter, it’s just beginning.  And we can delight in photographing the cliché locations, time and time again, because we are creating our own individual statement, not creating ‘derivatives’ of others’ works.


If you enjoy these posts please feel free to share them on Facebook or Twitter, or email them to your friends.  And we would really enjoy hearing from you.  Join the conversation –  leave a comment.

Join me on an upcoming workshop.  Click here for more details.

To see more of my photographs click here.

WordPress Tags: Ansel,Adams,Capitan,Winter,Sunrise,Yosemite,assumption,location,times,cliché,whiff,connection,viewer,trees,Black,photography,interpretation,instance,cliff,separation,images,image,visualization,exposure,area,Valley,heart,soul,artist,statement,subject,viewers,vision,world,concept,attention,System,bridge,Zion,Delicate,Arch,series,Photoshop,comradeship,purpose,audience,response,locations,feet,tripods,subjects,viewpoints,concepts,interpretations,artists,Examples,attitudes,decisions,techniques,photographers,visualizations

(3039)

Lightroom Tutorial – Diamonds in the Haystack

So you’ve come back from a shoot with hundreds of not thousands of files. How do you find the diamonds in such a large haystack?

I got a comment on a recent post on workflow.  (Lightroom Tutorial – Workflow)

The question was if there was a way in Lightroom to sort through a large number of photographs to select the ones you want to work on.

Here’s the situation.  You’ve just returned from a five day workshop.  And you have a thousand or so photographs.  Now we know that not everyone of these images is a keeper.  Personally, I’m delighted if I get four or five keepers from a five day workshop.  Hey, given the vagaries of weather and light, I’m happy if I get one.

But the prospect of sifting through hundreds and even thousands of images can be a bit overwhelming.  So here’s what I do.

Continue reading “Lightroom Tutorial – Diamonds in the Haystack”

(2003)