An important part of post processing is importing your photographs into Lightroom. The goal is to copy the files from your camera or laptop and store them on your desktop computer. At the same time you also want to make a backup of all of your files.
You might be interested in the configuration of my desktop computer. It has about 5 terabytes of storage. This is where the image files will be stored. I also have several terabytes of external storage – external hard drives. This is where the backup copies go.
In this example I’ll be copying files directly from the camera. The plan is to copy the files as they are to the backup storage. But the files I store on the desktop storage will be converted to DNG format. More on that in another post.
So with the big picture in mind, let’s get into the details.
Import
Lightroom offers several key benefits that are not found in Adobe Camera Raw (ACR) or Adobe Bridge. All these benefits revolve around the Lightroom catalog. The catalog is nothing more than a database. Every file that is imported into Lightroom is recorded in the catalog. That in itself separates Lightroom from ACR and Bridge. But the catalog offers several important capabilities.
All of the adjustments you perform on the image in Lightroom are recorded in the catalog. This makes the adjustments non-destructive. You also get a complete history of adjustments so you can undo them back to a certain point.
You can also create virtual copies of an image and apply adjustments to them. These are also stored in the catalog. This gives you the ability to dry different approaches with an image.
Next, you can tag your files with keywords. You can provide descriptions. You can rate your files with stars, flags and colors.
And the last thing I want to mention is collections. You can create collections based on, oh, at least 30 different properties so that you can quickly pull up related photographs no mater where they are stored on your hard drive.
So these are just some of the advantages the catalog provides.
But let’s get on with importing.
Before You Import
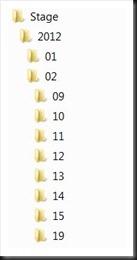
Before you import your image files it’s very important to decide on how you’re going to organize your files on your hard drive. I’m referring to the folder structure. There are many different ways of organizing your folders. I prefer a structure that is organized by year, month and day. Here’s an example of the folder structure I use.
I use this structure when I import files. I have a different folder structure for my portfolio photographs. But since we’re talking about importing, this is the structure we’ll go with.
The Import Dialog
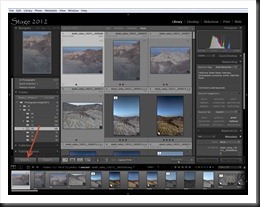
The Import function is accessed from the Library module.
Clicking the Import… button at the bottom left brings up the Import dialog.
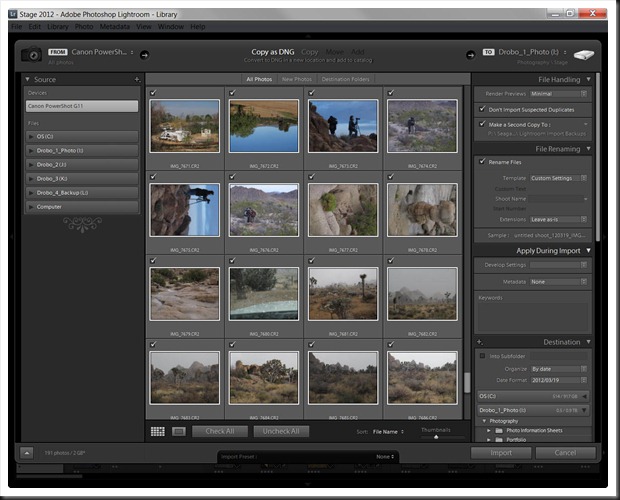
The Import dialog is organized into three areas and works from left to right. On the left you specify where the image files are coming from. In the middle you specify what you want to do with the files. On the right you identify where you want them to be saved. Let’s start with the left.
Select a source
In the figure above you can see that under Source on the left there is a list of sources including the camera, in this case the Canon PowerShot G11 and the drives on the computer. Since I’m importing from the camera the G11 is selected. When you select a source the images on that source are displayed in the middle area.
Next we need to specify what we want to do with the files we import.
What to do with the files
When it comes to telling Import what to do with your files, it will give you certain options depending on the source. In the case of importing from a camera the two options are Copy as DNG or Copy.
If you choose Copy as DNG then Lightroom will convert your raw file from the camera manufacturer’s proprietary RAW file format to DNG, the open RAW file format. There are many advantages to DNG files, one being that they are smaller than the proprietary RAW files. But I won’t get into all of them here. Suffice it to say I’m converting all my RAW files to DNG format. (Note that if your files are JPEG they cannot be converted to DNG files.)
If you don’t want to convert your files to DNG then select Copy.
Also in the center section is a display of all the image files on the camera with check marks by each one. If you don’t want to import a file you can uncheck them.
Select a target
Now let’s turn our attention to the left side of the screen. This is the most complex part of the process in that it offers the most options.
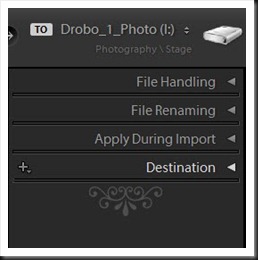
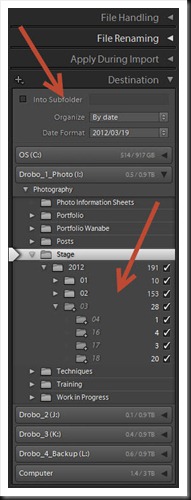
Let’s begin with Destination. This is where we specify how we want the files to be organized and what folders we want them to be copied to.
At the top you specify how you want your files organized. Recall that I organize mine by year, month and day. That is where I set this up. In Organize I select By date. In Date Format I specify 2012/03/19. That causes all the files with a certain capture date to be placed in the same folder and the folders are organized by year, month and day.
You will notice that there are numbers and checkmarks by the various folders. For example,there is the number 10 next to the 01 (January) folder. That means the camera has 10 files with January capture dates. Likewise there are 153 files with February capture dates. I don’t want to import these photographs; I just want to import the photographs from March. So I’ll uncheck them.
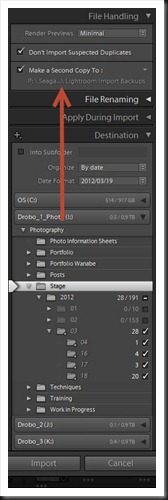
Now that I’ve specified where I want the files to land let’s turn to File Handling.
There are two things you can control – whether the program will import suspected duplicate files and if you want to back them up. Both are checked. When you check Make a Second Copy to: you must specify the folder where you want to put them. As you can see, I’m putting them on my P: drive, the external drives I mentioned above.
Next we come to the File Renaming section.
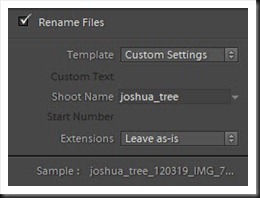
I like to rename my files. I like to include the shoot name and capture date in the file name along with the original file name assigned by the camera. Lightroom provides several file renaming templates but none do exactly what I want. So I created my own custom template. All I need to do is supply the shoot name. In this case the shoot name is joshua_tree.
You can see what the file name will look like in the sample at the bottom.
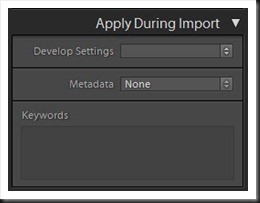
The final section is Apply During Import.
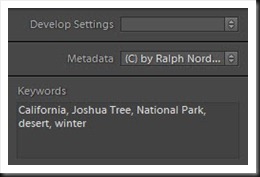
The first option, Development Settings, lets you apply a preset to all the files you import. I do apply certain adjustments to each file when I import them but I use a different technique. For information on this see Lightroom Tutorial – Camera Specific Presets. So I leave this blank.
But I use the next two options. Metadata allows me to tag each of the photos with a copyright notice. Keywords lets me add keywords.
Now everything is ready. All that remains is to click Import at the bottom of the screen.
Import the files
When you click Import, the Import dialog disappears and Lightroom imports the files you specified. And it does a lot. It creates a thumbnail JPEG, copies the files to the backup location without changing the name and copies files to the working location while converting them to DNG and changing the name in the process. Because Lightroom is doing so much it may take a while. So just be patient.
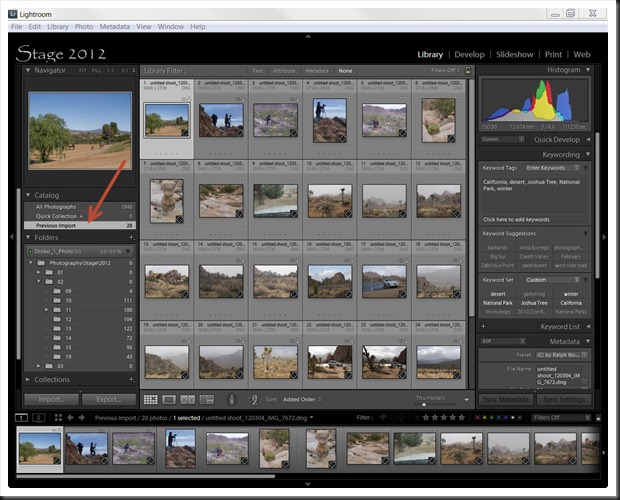
You can track the progress in Lightroom. The photographs are displayed under Current Import in the Catalog section to the right.
And you’re done.
Once your images are imported you will probably want to review them and select the ones you want to work on. Well, as luck would have it, I have a blog post for that too – Lightroom Tutorial – Diamonds in the Haystack.
If you find this post helpful please LIKE it. And if you know of someone who might enjoy it don’t hesitate to share it. Both buttons are at the top. And as always, we encourage you to join the conversation and leave a comment.
We do photography workshops. Come on out and join us. Click here to check us out.
You can also check out our photography. Click here.
Technorati Tags: Lightroom,Tutorial,Photographs,laptop,computer,configuration,storage,Import,Adobe,Camera,Bridge,database,adjustments,history,descriptions,collections,properties,folder,folders,portfolio,Dialog,Library,module,Source,Canon,PowerShot,options,Copy,manufacturer,JPEG,Destination,Organize,Date,Format,January,February,March,File,templates,custom,template,option,Development,Settings,technique,information,Presets,Metadata,photos,Keywords,location,Catalog,Diamonds,Haystack,conversation,photography,workshops,desktop,terabytes
WordPress Tags: Lightroom,Tutorial,Photographs,laptop,computer,configuration,storage,Import,Adobe,Camera,Bridge,database,adjustments,history,descriptions,collections,properties,folder,folders,portfolio,Dialog,Library,module,Source,Canon,PowerShot,options,Copy,manufacturer,JPEG,Destination,Organize,Date,Format,January,February,March,File,templates,custom,template,option,Development,Settings,technique,information,Presets,Metadata,photos,Keywords,location,Catalog,Diamonds,Haystack,conversation,photography,workshops,desktop,terabytes
(3451)

