Photoshop Tutorial – Atmospheric Haze

Haze is an integral part of landscape photography.  Distant mountains are not as clear as close up objects.  They lack contrast, are often lighter and may even appear blue or even purple (purple mountain majesty).  It’s interesting that in the history of Western art, painters didn’t incorporate atmosphere into their paintings with landscapes until the Renaissance.

Continue reading “Photoshop Tutorial – Atmospheric Haze”

(5986)

Lightroom Tutorial – Expose to the Right

For a followup post read

http://ralphnordstromphotography.com/wordpress/articles/how-to-articles/expose-revisited/

The light meters in our digital cameras don’t always give us the best exposure.  That’s not to say that they give us the wrong exposure.  But the ‘correct’ exposure doesn’t necessarily produce the best image file as far as post processing is concerned, especially if we’re shooting RAW.

If you expose an image at the exposure selected by your light meter and check the histogram, chances are it’s skewed a little to the left, toward the shadows.  This is especially apparent in low contrast scenes.  The image might look great on the camera’s LCD and in Lightroom.  But a slightly overexposed image will capture more information and is therefore better to work with later – given of course that it’s not so overexposed that you have highlight clipping.  An ideal histogram is one that is just to the right of center.  This technique is called ‘Expose to the Right,’ and is practiced by many of digital photographers.

Continue reading “Lightroom Tutorial – Expose to the Right”

(7852)

Principles of Composition – Chaos

“… nature – unadulterated and unimproved by man – is simply chaos.” Edward Weston.

There’s no argument that Edward Weston was one of the finest photographers that ever tripped a shutter.  And one of the aspects of his photography that he is most revered for is his compositions.  He was the absolute master in his studio but when it came to photographing nature he admitted that it was the most difficult of all.  Why?  Because nature is chaos.

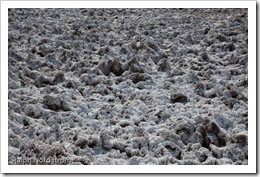
Nature is Chaos - Death Valley National Park Nature is Chaos

Continue reading “Principles of Composition – Chaos”

(1843)

Photo Foundations – Exposure

When I’m asked how I get such intense landscape photographs I respond that it all begins with the fundamentals, the photographic foundation.  Given that you have the other elements of a great photograph – a terrific subject and fantastic light – you are still not guaranteed a compelling image if it doesn’t have a solid foundation.

What is the photographic foundation?  It’s two things – a proper exposure and the correct focus.  These are so basic we never talk about them very much but, if you’re like me, you’ve had to walk away from a potentially great image because one or both of these were not carefully attended to in the field.

So let’s talk about exposure.

Continue reading “Photo Foundations – Exposure”

(1815)

Color Temperature

I spend a lot of time looking out our kitchen window at dawn, watching the way the light changes (usually sipping a cup of Dragonwell green tea).  It’s fascinating to see how one morning changes from the next.  And the best time of the year to see clear, colorful sunrises (and sunsets) is now – December and January.  The air is the clearest and freshest.

One of the things I really enjoy watching is how the color temperature changes from the time the outside just begins to lighten up until the sun is well overhead.  I’ve discussed this in other posts (Dawn).  What I want to do here is very briefly illustrate the point.

So this evening I grabbed this quick shot with my trusty Canon G11.
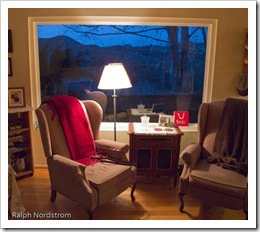
IMG_1030 This is looking out our back window after the sun has gone down (yes, I photograph twilight too).

You might say it doesn’t look real.  How could the outside be so blue?  But in fact, this is one of those cases where the camera doesn’t lie.  Given that the sun is way below the horizon and the source of illumination outside is the sky, then the light outside is in fact blue.  Inside we have incandescent lights, the color of which is definitely yellow.  The contrast of standing on the inside with warm light and looking out into cool light is both apparent and striking.

Suffice it to say that color temperature is a quantitative measure of the blueness or redness of the ambient light.  Color temperature is measured in degrees Kelvin and the scale goes opposite of what you would expect.  Low temperatures are red and high temperatures are blue (even though we think of reds as warm and blues as cool).  So the color temperature inside the room may be about 4500 degrees and outside it may be 9000 degrees or more.  We’ll get into this in more detail some other time.

As photographers we can use this understanding of color temperature to our advantage.  As digital photographers we always have the option of setting our white balance to compensate for the color temperature – daylight, cloudy, shade, tungsten, etc.

But we can also use this creatively.  We routinely use the warm light of the ‘golden hour,’ the hour after sunrise and before sunset, to give our images a warm glow.  But we can also use the cool light of dusk.

We don’t usually see the colors because our minds are stronger than our eyes and tell us what the color really should be.  But we can train ourselves to pay attention to what our eyes are telling us and actually see the color.

Give it a try.  With a little practice you’ll be able to see the blue in the shadows.  And you just might decide you like it and leave it in your images instead of correcting it out  because it doesn’t look real.

To see more of my photographs click here.

Join me on an upcoming workshop.

Become a fan on Facebook and follow along.

(1190)

Ten Tips for Exciting Nighttime Photography

There is a growing interest in a new kind of nighttime photography.  Photographers have been taking photographs of the nighttime sky ever since film was invented.  These photographs were generally long exposures that show beautiful star trails.  But now they are taking clear, sharp images of the stars and planets literally stopped in their tracks.

Astronomers have always been taking photographs of the nighttime sky and their goal has always been to get sharp images of the stars.  To do that they rigged their powerful telescopes with very precise motor drives that slowly turned the telescopes at the same rate as the stars move overhead, effectively holding the stars motionless in the field of view.

But with the advent of digital cameras the notion of photographing the night sky as part of a broader landscape has become increasingly popular.  And it’s not just star trail images that photographers are capturing.  They are capturing spectacular images of the planets, constellations and even the Milky Way over well known features on earth.  Wally Pacholka is one of the best of this new breed of photographers and his work is an outstanding example of this genre of fine art photography.  Check out Wally’s incredible Top Ten Night Sky Images to see what I’m talking about.

Continue reading “Ten Tips for Exciting Nighttime Photography”

(9926)

HDR Tip #3

On exporting images from Lightroom to PhotoMatix.

In the previous tip we discussed adjustments you want to make to your images in Lightroom to prepare them for the HDR process to come.

This next tips covers the step where we get the images out of Lightroom.

Lightroom is a RAW image converter (among other things).  It does RAW image conversions extremely well.  Other great RAW image converters are available to us – Capture One, Aperture, and DxO to name a just few.  These are all highly sophisticated products that do an extraordinary job.

Continue reading “HDR Tip #3”

(861)

Creative Use of Exposure

On using f/stop and shutter speed to achieve creative results.

In the first article (All You Ever Wanted to Know about Exposure) we identified the four variables of exposure – ISO, aperture, shutter speed and light intensity and compared exposure to filling a glass of water. We can control the first three in order to respond to the fourth. In the second article (Mastering Exposure – Next Steps) we discussed how to use the histogram on a digital camera to help us get the best exposure. We looked at examples of overexposed and underexposed images. We also introduced the concept of dynamic range and took a look at some of the challenges and opportunities we enjoy when we have images that have a very low dynamic range (low contrast) and a very high dynamic range (high contrast).

You may have thought we said all there was to be said in the first two article.  Well, believe it or not there’s more  – how to use exposure creatively. We can start by talking about the four variables. Let’s not get into the last variable, light intensity, just now. Rather let’s start with aperture and shutter speed.

Continue reading “Creative Use of Exposure”

(1678)

Mastering Exposure – Next Steps

On using the histogram to judge the quality of the exposure. Also discusses shadow and highlight clipping, the problems the create and how to avoid them.

In the first article on exposure (All You Ever Wanted to Know about Exposure) we discussed the exposure basics, the four variables you have to work with – the intensity of the light, the ISO setting, the f-stop and the shutter speed. We made the comparison of light with water. With this analogy, getting the proper exposure is the same as filling a glass of water (or whatever).  In this article we’ll take a closer look at the kinds of challenges we face getting the best exposure.  But first let’s take a quick review.

So, to quickly review, the sensor in a digital camera or the film in a traditional camera requires a specific amount of light to produce a proper exposure. The amount of light that is required depends on the sensitivity of the digital camera sensor or the film. Sensors or film with lesser sensitivity to light requires more light while those with greater sensitivity require less light. Sensitivity is measured by the ISO number regardless of whether we are dealing with film or a sensor. Lower numbers mean lower sensitivity The numbers start at 100, possibly even 50, and increase to 400, 800, 1600 and even higher. Each time the number doubles it requires exactly half the amount of light to make a proper exposure.

Aperture, or f/stop, is the amount of light that is let through the lens. This is controlled by a diaphragm similar to the pupils of our eyes. It can open to allow more light in or close to allow less light. Apertures are measured with a strange set of numbers like f/22, f/16, f/11, f/8, f/5.6, f/4, f/2.8. The numbering system goes backwards so that higher numbers admit less light. Adjacent numbers either double of half the amount of light coming admitted through the lens. In other words, f/4 admits twice the light as f/5.6.

The only other variable then is shutter speed, or the length of time light is allowed to pass though the shutter. Shutter speed is measured in fractions of a second such as 1/30, 1/60, 1/125, 1/250, 1/500, 1/000.

We have control of three of the four variable – ISO setting, f-stop and shutter speed. These are all adjusted to respond to the fourth variable – the intensity of the light. Success as a photographer starts with getting the correct exposure and these are the three things we can manipulate to do so.

Continue reading “Mastering Exposure – Next Steps”

(2488)

All You Ever Wanted to Know about Exposure

On the fundamentals of exposure – the four variables that must be taken into account to achieve a well exposed image.

The most fundamental skill you need in photography is the ability to make the correct exposure. You can have the greatest ‘eye’ but if your images are not correctly exposed you will never be able to make a fine art print. In addition you will take some great photographs only to be frustrated when you try to render them as prints.

There are two exposure gremlins – over exposure overexpose_1.5and under exposure. It doesn’t matter if you’re shooting a digital or a film camera, they both are subject to the same problems. But underexpose_1.5what is constitutes an over exposed or under exposed photograph and more importantly, how can you ensure you’re getting the proper exposure?

Photography is all about light. A camera is simply a device that controls the amount of light that is allowed to shine on the sensor or the frame of film. Exposure is all about letting the right amount of light into your camera. Sounds simple? Well, there are a number of things that make this a bit more complicated, not the least of which is the terminology – f-stop, ISO settings and shutter speed.

Continue reading “All You Ever Wanted to Know about Exposure”

(2036)