Preparing Photographs–Printing, Matting and Framing

Here’s an outline of how I prepare photographs to display and sell.

I’ve been printing, matting and framing for the past several days ,getting ready for the first shows of 2011.  I have a lot of new photographs so this is both a busy and an exciting time.

It occurred to me that I went through a lot of trial and error  when I first started this process of preparing photographs to display and sell, and that it just might be helpful to some if I shared the system I finally worked out.

Continue reading “Preparing Photographs–Printing, Matting and Framing”

(1658)

The Backup Saga Continues

The backup strategy I’ve been developing over the past year got put to the test. And it worked.

Backing up our photos is something we put off doing because it can be a lot of work and expensive.  And we think it’s something we’ll never need.

I got motivated to come up with a backup scheme about a year ago when I thought I had lost all my photograph files from 2010.  I had several days of panic and was able to recover most of them from a hodgepodge of backups scattered randomly here and there.  I didn’t have anything systematic in place and fortunately they weren’t my portfolio files, the ones I sell. (After it was all over I discovered all the files had inadvertently been moved to another folder. They hadn’t been deleted after all.)

It took a while to come up with the backup strategy that I shared with you in a post last month.  Here’s a link to that post.  Check it out.  I received some valuable comments with some good ideas from others.

Link to Backup Your Photos

It Happened – Duh Duh Duh Duuuuuuuuh

Continue reading “The Backup Saga Continues”

(617)

Art is Communication

Art is communication and slowing down can help us communicate more effectively.

I love flickr.  It’s arguably the best photo sharing site for photographers.  I get to see some really good, inspiring work from the other photographers I follow.

And, like most photo sharing sites, you can add comments.  When I post photographs I always look forward to receiving feedback and encourage anyone who visits my page on flickr to leave copious comments, both complements and criticisms.   If you haven’t visited yet, here’s the link.

http://www.flickr.com/photos/ralphnordstromphotography/

Continue reading “Art is Communication”

(898)

The Making of a Photograph–Watchman Tower

An example of how to process a difficult capture.

I was working on a photograph last night that turned out rather well. It was taken during a recent photography workshop in Zion National Park in Utah. I took the group to the famous bridge to photograph the Virgin River and the Watchman Tower at sunset. It’s a must photograph. It seems every photographer in Zion with a tripod is there. But we also returned for sunrise and had the bridge to ourselves.

There is a time of day when exposure becomes very tricky. This is during twilight when the sun is a little below the horizon so the earth is dark but the sky is very bright. You end up with what I call the “Grand Canyon” histogram – there’s a huge spike at the shadow end and a similar spike at the highlight end with a large gap in between. This is a challenging situation that, if you master, can provide some spectacular images. In this blog I’d like to walk you through the process.

Continue reading “The Making of a Photograph–Watchman Tower”

(1803)

Mastering Exposure

With the advent of digital cameras people don’t understand exposure so well any more.  It’s not like in the early SLR days where the cameras didn’t have built in light meters.  You had to use a hand held light meter or, lacking that, just guess.  There was no way you could get along without knowing ISO (ASA at the time), shutter speeds and f/stops.  But that’s all changed now and probably not for the better, at least if you want to take photographs that make an impact.

Continue reading “Mastering Exposure”

(924)

Epson 4800 Tip

A tip for preventing nozzles from clogging.

I have an Epson Stylus Pro 4800 printer that I basically love.  Having a high quality printer like the Epson really unleashed my creative potential by giving me the ability to fine tune my photographs.  Sending proofs off to labs and even waiting only a couple of days to get them back (like some of the better labs do) just wasn’t working out.  Realistically, I could only do a couple of proofs.  But with my own printer I can run scores of proofs if I need to.

There is one thing about the Epson that’s been bugging me though.  I have nozzle clogging problems.  It’s from two things – the relatively dry atmosphere here in Southern California and the fact that I don’t print every day.  It gets so bad that I would sometimes have to spend an hour repeating the nozzle check and head clean before I could start printing.  It wasn’t fun.

But last weekend I heard a tip from two people.  Musical instruments, especially the kind made from wood, suffer from the wood drying out in low humidity conditions.  And that affects the quality of the sound.  So musicians purchase a humidifier device to put in their instrument cases.  It maintains the humidity inside the case at an optimum level which keeps their instrument sounding its best.

The suggestion was to purchase one of these and place it inside the 4800.  Well, the advice made total sense but I took a different tack.  We had a Starbuck’s shot glass sitting around.  I took a kitchen sponge and cut it into four strips.  Two of these fit perfectly in the shot glass.  Moisten the sponges, insert them in the glass, add a little extra water (not too much), set it inside the printer way out of the way where the print head wont hit it, and cross fingers.  After one day I  ran a nozzle check.  Wow, it was almost perfect, good enough to try a print.  I printed a proof and it was just great.

Since then I’ve printed more and it’s working perfectly.  I check the water level every other day or so and am amazed at how quickly it goes down.

So, while time will tell, it seems the nozzle clogging problem may be solved.  And I don’t have go to through the onerous chore of unclogging nozzles before I can print.  I’m cranking out proofs and feeling productive and creative again.  I’m a happy camper.

Join me on an upcoming workshop.

To see more of my photographs click here.

Become a fan on Facebook and follow along.

(1158)

Learning to Use Your Camera

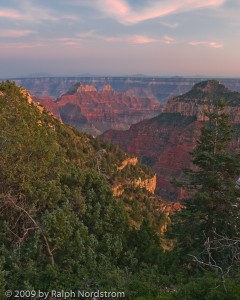
Grand Canyon North Rim

A good friend of mine who conducts workshops tells the story of one of his attendees who showed up with a top-of-the-line camera.  He proceeded to set everything on automatic – exposure, focus, white balance, everything.  When my friend questioned this, suggesting he at least use aperture priority, the person said that he bought the best camera so that the camera could make all the decisions.  He was under the false impression that a great camera would automatically take great pictures.  And, apparently he didn’t want  to have to think about all that stuff that we think about when we’re out shooting.

In my own workshops I notice that some attendees often lack the basic knowledge of the workings of their cameras.  I recall a photographer in the dark passages of Antelope Canyon asking anyone if they knew how to get the camera to take exposures longer than 30 seconds.  It’s a little late to be trying to figure that out when it’s so dark you can barely see your camera.  Or when I talk to people about exposure compensation or bracketing it’s a bit surprising how often they don’t know how to do that.

A great camera is like a great musical instrument or a great golf club.  Having one doesn’t make you a great photographer no more than a great golf club makes you a great golfer.  But, just like the right golf club can imporive the game of a competent golfer,  a great camera in the hands of an accomplished photographer extends the photographer’s range of expression.

A lot of photographers get carried away with their equipment.  They buy the best of this and the best of that.  But not always to they get their money’s worth; that is, they don’t use their equipment to the fullest.

That’s why it’s a good idea to include workshops and other training opportunities in your photography budget.  A quality camera without the knowledge to use it will not produce the images it is capable of creating.  And a workshop is more than being taken to beautiful places.  It is an excellent opportunity to learn to exploit the great features built into your camera.

Workshops are also an excellent opportunity to expand and stretch your creativity.  With an emphasis on composition, light, personal expression and more,  workshops can challenge you to focus on the way you see the world and communicate it to others.

Click here for some workshops to consider.

Click here to see more of my work.

Click here to join me on Facebook.

(723)

Ralph Nordstrom Photography now in Facebook

I just set up a page for Ralph Nordstrom Photography in Facebook.  I invite you to become a fan and join in the adventure.  Here’s the link.

http://www.facebook.com/pages/Ralph-Nordstrom-Photography/112254382772

(359)

Genuine Fractals Impressions #1

Improve your photography skills, stimulate your creativity and have a fantastic time.

I picked up Genuine Fractals by onOne software this weekend.  What does it do?  It allows you to upscale your digital images.    And just what is upscaling?  It comes down to adding pixels to your image to make it larger.  Whenever you add pixels you have a problem.  What color and intensity should the new pixels be?

Continue reading “Genuine Fractals Impressions #1”

(683)