I talked to a lot of people at the Joshua Tree Art Festival this past weekend, sharing with them a little tip about getting better photographs from their point and shoot cameras.
In fact, this tip can apply to any digital camera for those times when you don’t want to have to pay close attention to the camera settings. You may just want to shoot and have the confidence you’ll get decent photographs.
So this tip is very handy in that it will result in pictures with better colors and greater, more interesting contrast. And it can be achieved in three simple steps.
Camera Mode
 Our cameras all have different shooting modes. Many people I talk to use Auto pretty much all the time. This is the mode where the camera takes care of everything. In other words, it makes all the decisions.
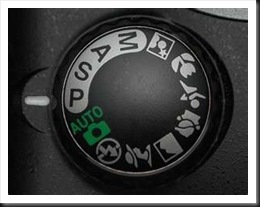
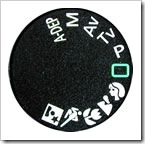
The first simple change is to switch from whatever mode you’re using to P (for Program mode) as illustrated here. This returns control of some key functions back to you, the photographer. The camera will still set the aperture and shutter speed based on the light conditions. But you gain access to some key corrections that will result in better pictures.
Exposure Compensation
The second change is exposure compensation. This is the technique of either increasing or decreasing the exposure that the camera determined without resorting to setting the exposure manually. In other words, you can still let the camera determine the exposure (as it does in P mode) but then tell it to decrease the exposure a certain amount.
![]() Not all cameras have this capability but if your camera is one that does there will be a button or dial with this symbol somewhere on the camera. Or there will be an exposure compensation menu option. It indicates that you can refine the exposure by increasing or decreasing it. In other words, it allows you to slightly over expose (or lighten) the image or underexpose (or darken) the image. Here’s how it works.
Not all cameras have this capability but if your camera is one that does there will be a button or dial with this symbol somewhere on the camera. Or there will be an exposure compensation menu option. It indicates that you can refine the exposure by increasing or decreasing it. In other words, it allows you to slightly over expose (or lighten) the image or underexpose (or darken) the image. Here’s how it works.
The camera determines the exposure using its built in light meter. It generally does a pretty good job but it has certain limitations. The exposures it determines may overexpose the image ever so slightly, resulting in pale colors. So if we slightly underexpose our photographs they will gain a richness of color that is very pleasing.
 I recommend we use –1/2 to –2/3 stop exposure compensation. That is to say, we tell the camera to decrease the exposure by 1/2 or 2/3’s of a stop. Your camera will display a scale similar to this one that will show the amount of exposure compensation. On the minus side, 1 means decreasing the exposure or darkening the image by one stop. Two means the exposure is decreased and the image is darkened by two stops. The positive side increases or brightens the image by one and two stops respectively.
If your camera is set up to adjust exposure by half stop increments there will be one dot between the numbers as in this illustration. If it is set up to adjust exposure by one third stop increments there will be two dots. I prefer to set my camera to adjust exposure by 1/3 stop increments. And then I set my exposure compensation to –2/3 stops.
You may need to check your camera’s manual to determine exactly how to set your camera’s exposure increments and how to do exposure compensation.
Auto ISO
The third change is to set your ISO setting on Automatic. ISO refers to the sensitivity of the camera’s sensor which in turn affects the amount of light required to produce a correct exposure. The greater the sensitivity, the less light is required. Increasing the ISO increases the sensor’s sensitivity. So an ISO of 100 has low sensitivity and requires more light for a correct exposure. An ISO of 400 has much higher sensitivity and therefore requires much less light for a correct exposure.
Cameras produce the highest quality images at low ISOs. And when the ISO is set on Auto the camera will automatically select the lowest possible setting to give you the highest quality image in the prevailing light conditions.
As with exposure compensation, you may need to consult your camera’s manual to determine exactly how to do this.
I use these settings myself on my Canon point and shoot (G11), the camera I take with me everywhere I go. When I’m doing casual shooting or even scouting for ‘serious’ photograph locations I’ll use the G11 configured in this way. In times like these I don’t want to be focusing on exposure settings, ISO and all the other things I think about when shooting my big Canon. I want to focus on the image and the compositional possibilities. And these settings allow me to do that and still capture high quality images.
So, try them for yourself and see if you like them. Set up your camera in this way and shoot some photographs. I think you’ll be pleased with the results.
Join me on an upcoming workshop. Click here for more details.
To see more of my photographs click here.
(1792)

