In this series of articles we’ve been exploring the histogram. In the first two articles we discussed what it is. Now we’re looking at different types of histograms and exploring how to work with them both in the field and during the post processing. If you want to review or catch up, here are the links to the preceding three posts.
Mastering Exposure – Histograms Part 1: Introduction
Mastering Exposure – Histograms Part 2: A Closer Look
Mastering Exposure – Histograms Part 3: The Rocky Mountain Histogram
In this article I want to discuss my favorite histogram, the Mole Hill histogram. I like this one because so much can be done with it in the post processing. Subtle colors and tonalities can be revealed in soft radiant light. It lends itself to some of the most creative and expressive images.
Read on and we’ll look at what it is, the conditions in which it occurs, how to photograph it and how to work with it in the post processing to reveal the scene in all of its hidden glory.
Description
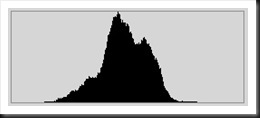 The Mole Hill histogram is narrow. It does not extend to either end of the graph area but rather is bunched up in the center. Often it will have a single peak although not always. The fact that it fits comfortably within the graph area with room to spare on either side is what actually characterizes this histogram.
Recall that the breadth of the histogram is a reflection of the dynamic range of the scene you are photographing. The broader the histogram the greater the dynamic range. Likewise, the narrower the histogram the smaller the range. So the mole hill histogram occurs in scenes with limited dynamic ranges or, in other words, low contrast. They’re flat images.
The most dramatic example of this histogram would be a photograph of a uniformly lit blank wall. There is virtually no contrast in this situation and therefore it produces a very narrow histogram with a single sharp peak.
Conditions
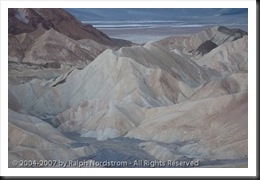 Conditions in nature that give rise to Mole Hill histograms are any low contrast situations, the most notable being a foggy day. But we also have low contrast situations when the sky is overcast, during twilight both before sunrise and after sunset and in open shade. The example here was captured at Zabriskie Point in Death Valley well before sunrise.
In each of these conditions there is no direct source of light. We think of the light as being soft because there are no hard, strong shadows. Instead, the light envelopes the subject producing diffuse shadows. Studio photographers go to a lot of trouble to get this light using large umbrellas, reflectors, soft boxes and the like. We landscape photographers just have to wait for the sun to go down.
Photographing
When photographing in these conditions the camera’s light meter will place the histogram near the center of the graph area or perhaps slightly to the left, toward the shadow side. This produces a pleasing image on the camera’s LCD screen and later on our computer monitors. But it’s not the ideal exposure for post processing.
The technique to use in this situation is called “Expose to the Right;” that is, we want the histogram to be positioned a little to the right of the center of the graph area. To do this we need to slightly overexpose the image, being careful that we don’t overexpose so much that we get highlight clipping.
This results in two things. First, by overexposing slightly we capture more information in the RAW file. Another way to say that is the numbers that represent the three colors (red, green and blue) of each pixel are higher. This pays off in the post processing because this additional information gives us more to work with.
Second, the image will look washed out. It will probably look horrible. I recall a workshop attendee who came to me after trying this technique and complained she didn’t like it because her images looked so bad. But this will be corrected in the post processing.
I like to overexpose just enough to position the center of the histogram just to the right of center of the graph area. That is usually anywhere from +1/3 to +1 stop of exposure compensation.
Now, if you’re bothered by the fact that the image looks washed out, shoot two images – one at the exposure determined by the camera and one overexposed. You can use the uncompensated exposure for reference and the ‘Expose to the Right’ exposure to work on.
Post Processing
The trick to make Expose to the Right work for you is all in the post processing. Just like in the film days, if you had an overexposed negative you would darken the final print. You do the same thing with a digital image.
With this in mind you might think that the first adjustment you’d want to make is to decrease the exposure back to what it ‘should have been.’ However our real goal here is to increase contrast; that is, to expand the dynamic range. Therefore, I often find it helpful to leave the exposure where it is and set the black point. This is the first step toward increasing the contrast which is after all what creates the magic with Mole Hill images.
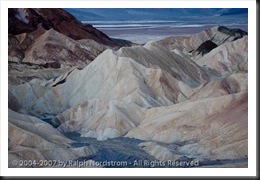 So the first adjustment I use in Lightroom or Adobe Camera Raw is Blacks. I increase the Blacks adjustment to create a small amount of black clipping but am careful not to overdo it. Most every photograph benefits from a tiny bit of black clipping. With this single adjustment the image is already beginning to come to life.
If you’re working in Photoshop you have three primary options for adjusting tonality – Brightness/Contrast, Levels and Curves. To set the black point Levels and Curves are the two best options.
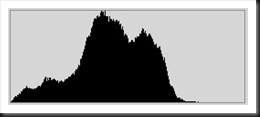 It’s helpful to see how this adjustment affected the histogram so here it is. The histogram reflects the expanded contrast in the image. The shadow area of the histogram has stretched out and now extends to he left side. This indicates there are more tonalities in the shadow area. The highlights haven’t changed at all.
There are exceptions to setting black points. If the image was one of fog then a black point is not appropriate. However, in most situations it is very powerful and provides the tonal foundation for the image. It’s generally one of the first things I do when working on an image.
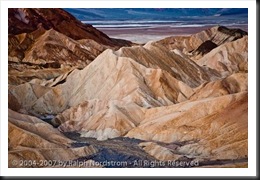 The next step might be to further increase the contrast to bring out the highlights more. You can use Contrast or Tone Curves in Lightroom or Brightness/Contrast, Levels or Curves in Photoshop.
The image also has a cool cast (because it was shot during twilight) so it can be warmed up a bit. I find the most effective way to deal with color casts is with Temperature and Tint in Lightroom. You can also use Color Balance in Photoshop but it’s not near as effective or easy to use as Temperature and Tine in Lightroom. A little saturation applied here and there brings out the colors even more.
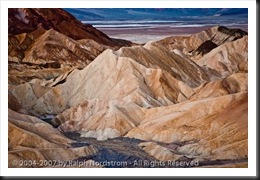
The photograph has really come alive now and is a far cry from what we started with. The difference is dramatic to say the least.
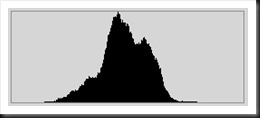
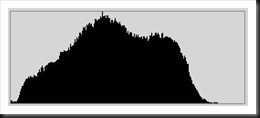
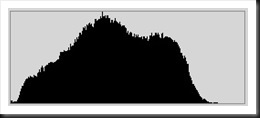 Here’s the histogram for the final image. The histogram now fills most of the graph area. We have taken advantage of most of the tonal range available to us. You can clearly see a black point. But the histogram does not extend to the right side; there is no white point. My personal experience is that there are very few situations in color landscape photography where a white point works. (However, in black and white photography white points and black points are usually both appropriate.)
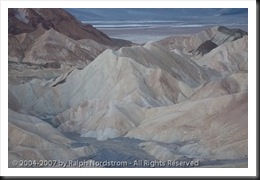
Let’s take a look at the before and after, both in terms of the images and the corresponding histograms. First, the images.
You can clearly see that there was a lot of information that we were able to pull out of the original image. Increasing the contrast has revealed a lot of rich detail in the tonalities and also uncovered colors that were not at all apparent in the original image. Adjusting hue and saturation further enriched the colors and made them more natural. And because of the soft light of dawn there are no hard shadows. The light caresses the contours of the badlands giving them a luminance you can’t capture in harsh midday light. (Click on the images to get a better look.)
And now the histograms.
Now that you’ve seen the potential of the Mole Hill histogram, maybe you agree with me that it’s a great histogram to work with.
Summary
So to sum this up, the Mole Hill histogram is characterized by a narrow histogram. It results from low contrast scenes. The best way to capture these scenes is to slightly overexpose them but not so much that you introduce highlight clipping. This gives you more information to work with. Finally, you expand the dynamic range in the post processing to produce a truly dramatic photograph.
If you want to read more on the ‘Expose to the Right’ topic here’s a post I did last year.
Lightroom Tutorial – Expose to the Right
Coming Up
In the next post I’ll discuss a truly challenging histogram, the Grand Canyon histogram. This can be difficult to work with but if you know a few tricks you can come up with some stunning images.
If your find this article interesting and helpful why not share it with your friends. It’s easy. Just click the Share button below. If you’re a Facebooker, click the Like button at the top. And we always like hearing from you so you’re welcome to leave comments and share your experiences with us. Thanks.
To see more of my photographs click here.
(4724)

Hi its me Fady from Egypt , am starting in photography world . ..
..
This is amazing series , it helps me so much
Waiting your next post about Grand Canyon histogram
Fady, Thank you for your comment and I’m glad you found the histogram post helpful. The Grand Canyon histogram article is already posted. In fact, there is an entire series on histograms. Just use the search function on the blog page to find them. I hope you enjoy them.
Ralph