I got a comment on a recent post on workflow. (Lightroom Tutorial – Workflow)
The question was if there was a way in Lightroom to sort through a large number of photographs to select the ones you want to work on.
Here’s the situation. You’ve just returned from a five day workshop. And you have a thousand or so photographs. Now we know that not everyone of these images is a keeper. Personally, I’m delighted if I get four or five keepers from a five day workshop. Hey, given the vagaries of weather and light, I’m happy if I get one.
But the prospect of sifting through hundreds and even thousands of images can be a bit overwhelming. So here’s what I do.
Import
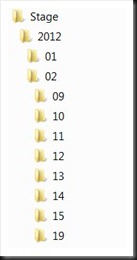
It all begins when I import the files to the computer. I won’t go into the details of the Import dialog. The important thing is how the files are organized. I import my files into folders that are organized by year/month/day. Here’s how that looks.
Note: I keep all of the folders under a “Stage” folder. When I decide on the keepers I migrate them to a Portfolio folder structure (not seen here).
Selection
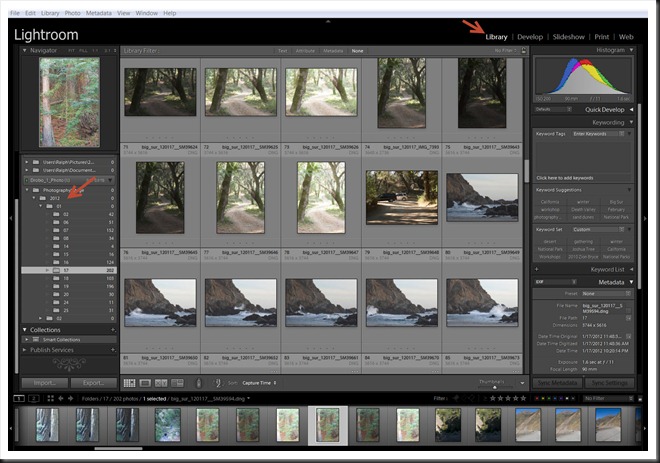
The selection process starts in the Library module of Lightroom.
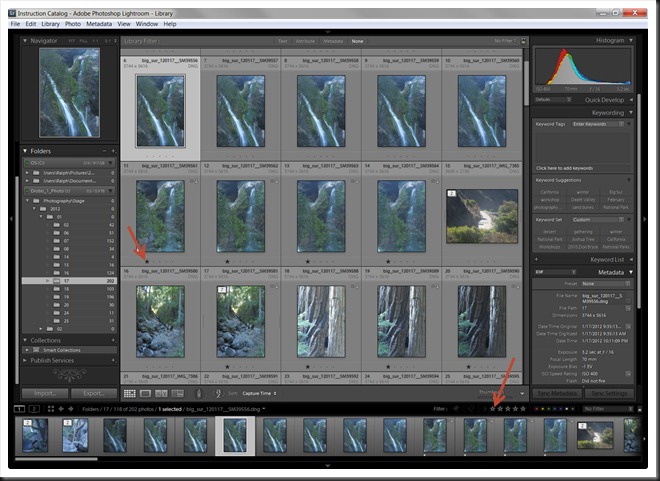
Here is a screen capture of Lightroom in Library mode. I’m displaying the Grid view (tap G). It’s like a light box. To the left you can see the date folder structure where the files reside on the hard drive.
The files in each folder are one day’s worth of a seven day workshop along the Big Sur Coast of California.
The selection process uses Lightroom’s ability to rate photos with anywhere from 0 to 5 stars. All photos begin with 0 stars. I’m going to make several passes through the photographs and give them stars. The first pass I‘ll assign one star to each photograph that is at all interesting. Each subsequent pass will become more selective.
HDR
Before getting started I need to say a word about HDR or other techniques that result in multiple files. The selection process is complicated if you have, say, five HDR files for each shot. But Lightroom has a nice automatic stacking feature.
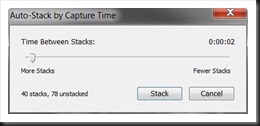
In the menu under Photo | Stacking is an option called Auto-Stack by Capture Time…. It allows you to stack files that were captured within a certain number of seconds. For example, I’m stacking all files that were captured within 2 seconds of each other. In this folder there will be 40 stacks and 78 unstacked files.
After you click Stack, return to Photo | Stacking and click Collapse All Stacks. This will display just the first file in the stack. Now you’re ready to start the selection process.
Initial Selection by Day
I’m going to make a first pass and every image that is at all interesting I’ll give it 1 star by tapping the 1 key on the keyboard. On this first pass I’ll also reject those files that I know I won’t ever use for whatever reason – out of focus, lousy exposure, bad composition whatever. You do this by tapping the X key. So I have one finger on the 1 key and another on X.
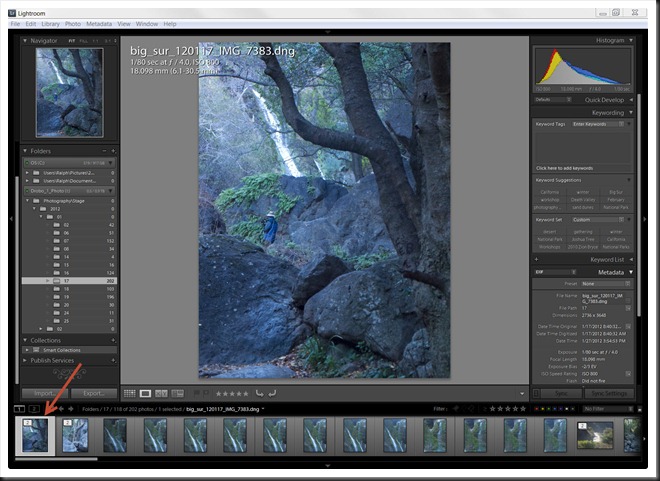
Now I switch to Loupe view by tapping E. Starting with the first image I’ll use the right arrow key to step through each of the (stacked) files. If I like it even a little I tap the 1 key. If I hate it I tap the X key. If I’m uncertain I don’t tap any key and just move on to the next. If I have several shots of the same thing I don’t obsess at this point about selecting the best one. For now I just select all that have potential.
The film strip at the bottom shows you where you are.
Oh, by the way, what about those files you rejected? In the menu go to Photo | Delete Rejected Photos…. It will give you a warning of how many files you will be deleting. Click OK and they’re gone. But be careful. They are permanently deleted from your hard drive, never to return again (unless you recover them right away from the recycle bin).
Next Pass
This completes the initial pass. Each file you gave a rating of 1 has a single asterisk under the image in the Grid view.
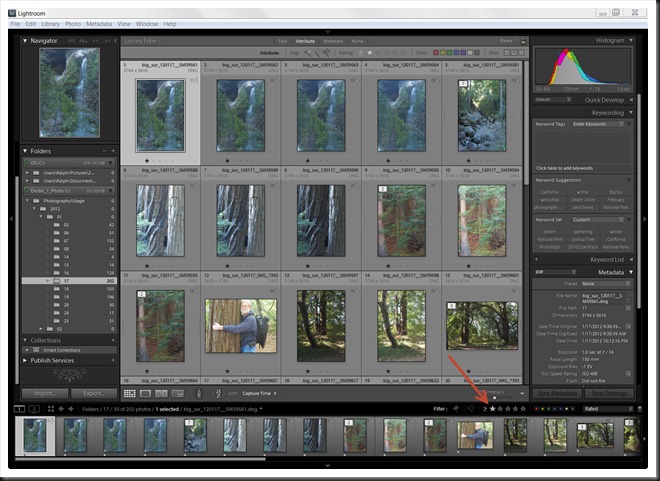
The next step is to filter the images to display just those that have one or more stars. You do that by clicking on the number of stars in the Filter area on the lower right. Now, you’re looking at just those images that made it past the first selection round.
In this round you’re going to assign 2 stars to the best of the lot. This is not the final selection but you are narrowing down the field. But where I’ve selected several slightly different shots of the same subject I now try to choose the better one (or two).
I usually make three passes for each daily folder, working up to three stars. You can narrow the field down quite a bit with three passes.
Continue with Other Days in the Shoot
Because I’m coming back from a multi-day shoot and each day’s files are organized in separate folders by date, I need to repeat this selection process for each of the other days.
There’s not any need to go beyond three stars at this stage of the game. We’ll work down to the final selection in the last step.
Final Selection
For the final selection we want to review all the photos that have been selected so far for the entire shoot. But how can this be done; they’re all in different folders? Again, Lightroom has a solution for this.
But before we get into this, remember those HDR files we stacked? When we rated one of them the only files that were rated with the first ones. The ones lower in the stack were not selected. So we need to go through, expand the stack and give the appropriate number of stars to each of the files in the stack. With that done we’re ready to continue.
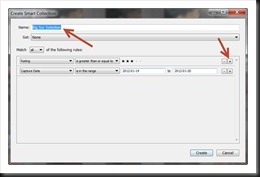
To group all of the files from the shoot together in one place we create a Smart Collection. A smart collection gathers files based on some filtering criteria. The filters I’ll use for this Smart Collection is a capture date between January 14 and 20 (the days of the shoot) and a Rating of 3 stars or greater.
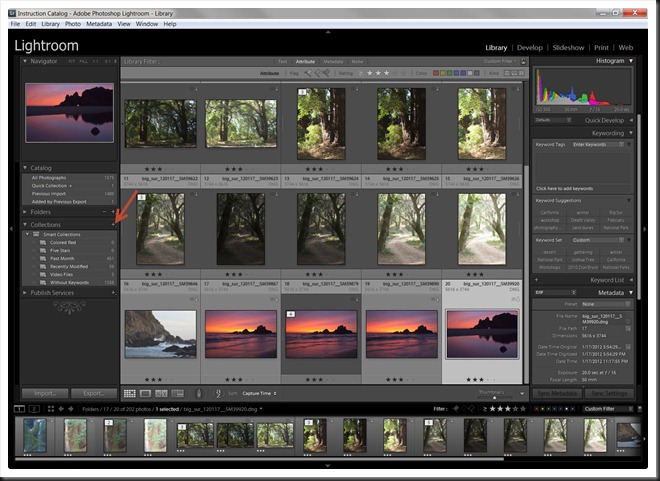
To create the Smart Collection click the + in the Collections group on the left and click Create Smart Collection….
In the Create Smart Collection dialog, give the smart collection a name and add the filters. You can add more than one filter.
I created two filters for this Smart Collection – the first looking for files with a rating of 3 stars or better and the second looking for files with a capture date between the two dates I mentioned above. Click Create when you’re done. All of the images from all of the files in the date range that have a rating of three stars or greater are added to the collection.
Now you can review all of the images from the entire shoot. Make two more passes – a 4 star pass and a final 5 star pass. By the time I get to the last pass I’ve usually narrowed the entire shoot down to the best four or five images, maybe fewer.
This process can go very quickly and can usually be completed in the course of an evening. There’s one variation on this process I should mention. I usually can’t see the full potential of an unprocessed RAW image. So if I think an image might work out but I’m not sure, I’ll take a minute or so during the selection process to apply a few simple Lightroom adjustments. It doesn’t take long. I used a lite version of my workflow. See Lightroom Tutorial – Workflow
So that’s it. Give it a try. I hope this works for you as well as it works for me.
If you find this post beneficial please LIKE it. If you know of someone who might find this post helpful please feel free to share it. Links for both are at the top of the post. Also, you are encouraged to join the conversation and leave a comment.
We do photography workshops. Come on out and join us. Click here to check us out.
You can also check out our photography. Click here.
(2008)

Ralph,
Thanks for that review of selecting. I have been using that method ever since you showed me at a workshop. It works great. I have not used the Smart Collections like that so I will have to try that. Sometime I would like to hear about your back up system for your photos. Maybe a blog post? Look forward to seeing you in the Fall.
Larry
Thanks Larry. A post on backup is a great idea. I’ll put it on the topics list.