A Polarizer filter is generally the first filter a landscape photographer buys. It is so versatile. It can darken blue skies, reduce harsh reflections and intensify colors. Many photographers put polarizers on their lenses and never take them off.
But this is a Lightroom tutorial. So why in the world am I talking about polarizer filters? Well, it’s because I have a trick I’d like to share with you, one that I’ve never seen discussed anywhere else. It’s what you can do in Lightroom to create the polarizer effect without a polarizer. In fact, it can be better than the real thing, especially if you are shooting with a wide angle lens. Because, the angle of view can be so great that part of the sky will be affected by the polarizer and the rest will not. So it looks pretty unnatural when the sky in part of your image is dark and the rest is washed out.
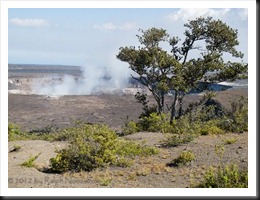
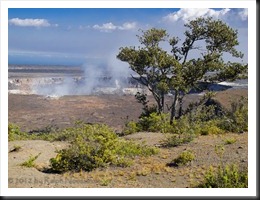
So, what’s the trick? Well, consider this image taken on a recent trip to Hawaii. I shot it with my Canon G11 and I don’t even own a polarizer filter for it. It’s a photograph of the ongoing eruption in a crater in the Kilauea caldera. In the bottom of the crater is a lake of lava. The smoke you see is a plume of noxious gas.
(Click on the image for a larger view)
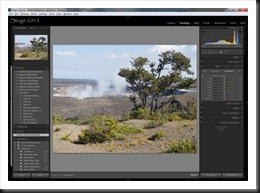
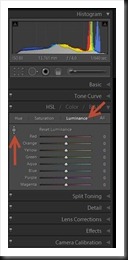
The trick to darkening the sky is to use the Luminance adjustment in the HSL group. To access it, click on Develop to go to the developer mode and expand HSL.
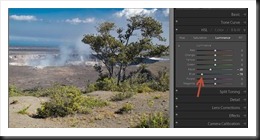
Select Luminance and then select the ‘gizmo.’ Using the gizmo, hover it over a patch of blue sky, click the left mouse button and drat it down. As you do the sky will darken. Drag it down until you get the amount of darkening you want.
Notice how the Blue slider moves to the left. But the gizmo is aware of other neighboring colors that might be part of the sample and also moves them. In this case the Aqua slider also move a little to the left.
This technique can be use for more than just the sky. The power lies in that it just works on one color. I find that I use it on practically every photograph I work on.
To finish up the image I can add a little saturation to Orange Yellow. So with two simple adjustments I was able to turn this…
into this….
Quite a difference.
If you have a comment on this technique or other techniques you like, please feel free to add a comment to this post. Also, if you know of someone who might enjoy it, I invite you to share it with them. There is a link for that purpose at the top.
We do photography workshops. Come on out and join us. Click here to check us out.
You can also check out our photography. Click here.
WordPress Tags: Lightroom,Tutorial,Polarizer,Filter,photographer,skies,reflections,Many,photographers,fact,Hawaii,Canon,eruption,crater,Kilauea,lava,plume,Click,Luminance,adjustment,Develop,developer,mode,Select,gizmo,Drag,Notice,Blue,Aqua,technique,saturation,Orange,adjustments,slider
(20072)

Hi,
I tried a new bridge camera (Canon SX60) but with the polarizer filter on the end it was too “end heavy” for me to hold still past about 300mm. So I’m delighted to learn your Lightroom technique. My question is whether there’s also a way in Lightroom to get the glare out of water or snow?
Hi Joan (?),
I have a couple of suggestions for you but let me address your question first. The article you read is how to simulate one of the functions a polarizing filter does and that’s to darken a blue sky (given you’re shooting at right angles to the sun). The other thing a polarizer is used for is to remove glare from water and other reflective surfaces. Unfortunately, there’s no trick in Lightroom for doing that other than using the Highlights and White adjustment if the glare isn’t too bad.
The other thing I wanted to mention was our comment about holding your 300mm lens. There’s a rule of thumb on getting sharp images with a long lens when hand-held. And that is to set your shutter speed to 1 divided by the focal length of the lens or faster. In your case that would b 1/300 of a second or faster. You still want to steady your body and hold as still as possible when you press the shutter but this works quite well. If you have Image Stabilization (to us Canon people) or Vibration Reduction (to the Nikonians) then you can fudge on that up to two stops; i.e, you could shoot at about 1/80 of a second. For the sharpest images, especially with a long lens like that, you can’t do any better than using a tripod. That works well for landscape photography but it depends on what you’re shooting.
All the best to you and please feel free to through any questions you have my way. I’ll be happy to answer them for you.
Ralph
An extremely helpful tech. Thanks a lot.
After a years hunting for the best tip for blue skies…this is it! Thanks!!!
I have used a circular polarizer on my wide angle lens but, as you said in your article, I don’t like how it affects only part of the sky and not all of it. After reading your tip I went right to LR to try it out. Perfect!
Thanks for the tip Ralph…it will be a tool I use all the time too now.
Chuck
Hi Chuck,
I’m glad it worked for you. It’s a good trick to know.
Good shooting to you.
Ralph
Dear Ralph,
Thank you for the good tip, I don’t shoot with a polarizer, so, I will be using this often. I shoot cultural events in Siberia. Traditional outfits are generally made from brocade, which shot in bright sunlight is very luminescent, sometimes to the point where a shot looks overexposed even though it isn’t. I have been messing with this photo trying to tone down the pink a bit, but I am not sure what to shoot for. Or if I should just leave it be. Here is the picture, take a look; http://www.flickr.com/photos/tigernewby/8909019992/ Would appreciate your thoughts. Thank you, Alex
Alex,
Thanks for your comment. Your remarks are always appreciated.
I looked at the photo and it appears you may have some clipping in one or more of your color channels such as red and blue. If you set your camera to display the RGB histogram you can check after every shot and see if you have any channel clipping or not. If so, just treat it like any other clipping and decrease your exposure until it goes away.
In Lightroom you may also try decreasing saturation for the clipped areas. Use the HSL adjustment, select the Saturation tab and, using the adjustment tool, left click on the clipped areas and drag your mouse down. Lightroom will pick the correct colors and dragging down will desaturate them.
Good luck.
What is a gizmo ?
The gizmo is what that vertical arrow points to in the illustration above. It’s proper term is the Targeted Adjustment Tool or TAT. Gizmo is much easier.