Making a Photograph – Taking Flight

Follow all the decisions and resulting adjustments that went into the making of an expressive landscape photograph using Lightroom Classic.

A Desert Scene

clip_image002

This image was taken in 20 Mule Team Canyon in Death Valley National Park. I was particularly excited about this when I saw it in the field. I was fascinated by the meandering dry stream bead that worked its way across the scene. The ever-present salt in Death Valley stood out white against the soft warm colors of the badlands behind it.

But there were several additional things that excited me. The badlands behind the stream bed also fascinated me and made the experience even richer. It is a concentration of diagonal lines, textures and forms. And the light, while the sun is fairly high in the morning sky, still crosses the badlands at an angle that accentuates its shadows. I intentionally clip_image005overexposed the image 2/3 of a stop to be sure to capture shadow detail and that’s why it looks washed out.
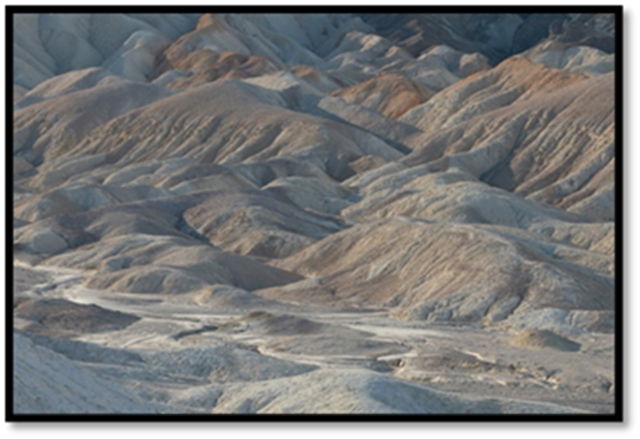
The histogram shows no particular challenges. There is no highlight or shadow clipping. You can see from the thin tail that moves towards the right edge, which was caused by the white salt, doesn’t quite touch it. If I had increased the exposure even a third of a stop more, there would have had highlight clipping on the salt.

Continue reading “Making a Photograph – Taking Flight”

(129)

Mastering Your Camera

There are only 12 skills you need to learn to master your camera. Check out what they are.

I’m not the only one that contends that mastering your camera is an important first step in mastering photography. You’ll see it in blog posts, articles and videos.

Let’s take a deeper, more detailed look at what it means to master your camera and show that it’s not an impossible task, as intimidating as it may seem when you first start.

It starts with the question, “What does a camera do?” The hundreds of pages in the camera’s user manual and a similar number of options in its menus make it look like mastering it is a massive if not impossible task.  It appears daunting, especially if you are not technically inclined.  But in reality, what you need the camera to do comes down to just two things – control the exposure and control sharpness. Let’s see what core skills are required to master these two things.

Control Exposure

The purpose of exposure control is to ensure the right amount of light enters the camera so that the sensor can record the image you are photographing.  You and the camera need to respond to both bright and dark scenes.  The exposure controls are what makes it possible to match the exposure to the kinds of lighting conditions you encounter.

Tell Me More About Exposure….

There are three variables that can be adjusted to respond to the amount of light in the scene – ISO, aperture and shutter speed. These three variables form the famous exposure triangle.

Tell Me More About the Exposure Triangle….

Continue reading “Mastering Your Camera”

(387)

Tell Me More About the Exposure Triangle

The three exposure settings come together in the exposure triangle.

What is the Exposure Triangle?

The exposure triangle is a way of visually depicting the relationship between the three variables that, together, control exposure – ISO, aperture and shutter speed. They are represented together as a triangle to illustrate that if you change one of the variables, you need to change the other if you want to keep the same exposure.

clip_image002

Here’s an Example.

Suppose a proper exposure has an ISO of 100, an f/stop of f/5.6 and a shutter speed of 1/125 of a second.

But you decide you want to increase the depth of field. So, you change the aperture by one stop from f/5.6 to f/8. This darkens the light coming through the lens and, if you don’t do anything, darkens the exposure by one stop. To keep the same exposure, you have two choices. You can change the ISO or the shutter speed.

If you changed the ISO you would have to change it from 100 to 200. That change in sensitivity would require half the amount of light to get the same exposure.

But you don’t want to compromise the quality of the image with a higher ISO. You decide to change the shutter speed. You need to make the shutter speed longer to offset the reduced brightness. So, you change the shutter speed from 1/125 of a second to 1/60 of a second and you get the same exposure

How It Works with Aperture Priority

If you take the same scenario but this time you are shooting aperture priority, the camera makes the adjustment for you. Here’s how that works…

You have set the shooting mode to aperture priority with an ISO of 100 and an aperture of f/5.6. The camera determines the shutter speed needs to be 1/125 of a second.

When you change the aperture to f/8, the camera adjusts the shutter speed to 1/60 of a second to compensate for the reduce brightness. The exposure does not change.


Join me on an exciting workshop. Click here to see what’s available.

Read more:

Tell Me More About Exposure
Tell Me More About ISO
Tell Me More About Aperture
Tell Me More About Shutter Speed

(84)

Tell Me More About Shutter Speed

Explore shutter speed in depth and see what it can do for your creativity.

What Is Shutter Speed?

Every camera has a shutter that controls how long the sensor is exposed to light when taking a picture. Shutter speed is the interval during which the shutter is expose to light. It can be as long as 30 seconds or as short as 1/1000 of a second or even shorter.

How Does a Shutter Work?

Shutters have for a long time been mechanical devices with two curtains with one of the curtains covering the sensor (or the film). When the shutter button is pressed, the curtain covering the sensor moves horizontally and snaps out of the way. The sensor is now exposed to the light coming through the lens. When the exposure is done the other curtain snaps across the sensor to cover it up again. Between exposures the shutter curtains are reset.

The interval between the time the first curtain snaps out of the way and the second curtain covers the sensor again is what determines the shutter speed. The camera has a built-in ability to determine how quickly the second shutter must snap to give the required shutter speed. With very short shutter speeds it’s possible that the second shutter snaps before the first one is finished.

Mirrorless cameras (and smart phones) do not have curtains. The sensor is always exposed to light. It has to be this way because the camera does not have a traditional view finder. The only way you can see what you’re photographing is by the LCD screen on the back of the camera or the tiny LCD screen in what used to be an optical viewfinder. And for those to work, light has to be shining on the sensor all the time.

A mirrorless camera must operate the shutter differently. It is done electronically. When the shutter button is pressed, the camera’s processor knows that the steady stream of signals that has been coming from the sensor now needs to be captured for the image. So, for the period of time that the shutter speed has been set for, that part of the stream is captured and turned into a file that is saved on the memory card. After the image is captured and saved, the camera goes back to sending the sensor data just to the displays.

What Are the Effects of Different Shutter Speeds?

Shutter speeds have an effect on the sharpness of the image. When shooting hand held, a longer shutter speed has a greater chance of the camera moving ever so slightly during the exposure. Also, action shots taken at a slower shutter speed will often be blurred.

So high shutter speeds like 1/1000 of a second are used for action shots. And the rule of thumb for getting sharp hand held images is to use a shutter speed that is 1/focal length or shorter. For example, if the focal length is 100 mm, then a shutter speed of 1/100 of a second will give a sharp image as long as you are careful to steady the camera.

Long shutter speeds, on the other hand, can produce intentional blurs, even when shooting from a tripod. If you want a waterfall to be blurred, you can use a shutter speed of 1/5 of a second or longer, depending on the amount of blur you want.

Exposure Triangle

Shutter speed is one of the sides of the Exposure Triangle. The other two sides are ISO and aperture.

All of the sides of the exposure triangle are measured in stops or EV (Exposure Value), where one stop is a doubling or halving of the amount of light.

With shutter speeds, this calculation is quite simple. An exposure of 2 seconds allows twice the amount of light to shine on the sensor as a 1 second exposure and the exposure increases by 1 EV.


Join me on a fantastic workshop.  Click here to see what I have in store for you.

Read more:

Tell Me More About Exposure
Tell Me More About ISO
Tell Me More About Aperture
Tell Me More About the Exposure Triangle

(65)

Tell Me More About ISO

Explore ISO as part of the exposure triangle and the role it plays in getting a proper exposure.

What is ISO?

To start at the beginning, ISO stands for International Organization of Standards. It sets the standard for measuring the sensitivity of camera sensors. It dates back to the film days when it referred to the film’s speed or, as it was called then, ASA which stands for American Standards Association.

Films had a fixed ISO. To change the ISO, you had to load a different film in your camera. Digital cameras can change the ISO whenever it is needed. This is a huge advantage as the digital photographer can instantly respond to changing light conditions.

What Does Changing the ISO Do?

Changing the ISO increases or decreases the sensor’s sensitivity. What that means is when the sensor is set at a low ISO it is less sensitive, requiring more light go get a proper exposure. When set at a higher ISO it is more sensitive, requiring less light to get a proper exposure.

In most cameras the lowest ISO is 100. With the advancements that have been made in recent years, it’s common to see the high ISOs around 12,800.

The ISOs are laid out in f/stops or Exposure Values (EV). These measures are based on doubles or halves. Doubling the ISO from 100 to 200 doubles the sensitivity resulting in needing half the amount of light to get a proper exposure. Increasing the ISO from 100 to 400 quadruples the sensitivity resulting in the amount of light needed for a proper is reduced by 4.

How Does ISO Work in a Digital Camera?

The technology that allows us to change ISOs has gotten very sophisticated. And different sensors (CMOS vs CCD) employ different technologies. Part of the ISO increase is by increasing the voltage to the sensor. This can occur in the sensor itself or outside the sensor. The signals coming out of the sensor need to be converted from analog to digital and in some cases additional ISO boost is done to the digital signal. The engineering that goes into this is highly sophisticated as I’m sure you can imagine.

What Are the Effects of Using High ISOs?

Lower ISOs produces higher quality images. Most landscape photography is shot at ISO 100. Higher ISOs make it possible to shoot in low light conditions, but they run the risk of increased noise, especially in the shadows. Noise manifests itself in a way that is similar to grain in high ISO films. It produces a blotchy look.

But the technology has progressed so far that ISOs in the 800 to 1600 range that were unthinkable just a few years ago now produce excellent results. And one can expect the situation to only get better. This is great news for night photographers.

Summing It Up

Most landscape photography can be shot with the lowest ISO, especially when using a tripod. However, higher ISOs are available for tricky low-light conditions and can be used with confidence.

Exposure Triangle

ISO is one of the three sides of the Exposure Triangle. It works in conjunction with aperture and shutter speed to get a proper exposure.

The sides of the exposure triangle are measured in stops. The ISO determines how much light is required to get a proper exposure. An ISO of 100 requires twice as much light as ISO 200.


Join me on an exciting workshop. Click here to see what’s available.

Read more:

Tell Me More About Exposure
Tell Me More About Aperture
Tell Me More About Shutter Speed
Tell Me More About the Exposure Triangle

(41)

Finding the Soul of a Photograph

Finding the soul of a photograph is a journey that can take many paths.

I often get asked if I manipulate my photographs.  My answer is always, “Yes, of course!”  But no one has ever asked, “Why?”  And I have an answer for that too.  “Because my camera doesn’t know what I’m feeling.”

For me, making a photograph is making art. I want to do more than capture where I’ve been and what I’ve seen.  I want to share with you what I feel when I’m out there.  And that is often more intense than what my eyes see.

I was in Long Valley last summer preparing for a photography class I was teaching for the Mount San Jacinto Natural History Association.  It was midday and I was walking around wearing my amber tinted Polaroid sun glasses.  Why do I mention my sun glasses?  Because I was getting very excited about what I was seeing.  And for those of you that know about midday light, it is anything but exciting.  But the amber tint of the glasses and the effect of the polarization on the sky and foliage got me excited.  Added to that was how good it felt to be back in these mountains after an absence of 15 years.

I want to share what I feel…. And that is often more intense than what my eyes see.

So, I asked myself if it was OK to make photographs that reflected my mental state when it contradicted the physical reality of what my eyes saw. 

Continue reading “Finding the Soul of a Photograph”

(207)

Creating Images with Impact – Dynamic Range of the Medium

The pros create dramatic photographs, images with impact. You can add impact to your images too using these simple Lightroom techniques.

We’ve all seen those photographs that stop us in our tracks, that inspire us, that speak to us. Some photographs seem to have a special power, a special presence. Often times we hear ourselves saying, “Wow.” They have qualities that make them stand apart from other photographs. These are images with impact.

The masters of landscape photography seem to have the ability to capture a special quality of light in their photographs. It doesn’t matter whether they use film or shoot digital, their images stand out.

There are certain things about these images that do more than just appeal to us – we are drawn into to them. They capture our imaginations, stir our interests and perhaps show us moments in nature we could only hope to experience. We want to linger with them, explore them, take them in, get lost in them.

Without a doubt these photographs have compositions that are very strong, are bathed in fantastic light and have technical qualities of exposure and sharpness that are perfect. These are all decisions that the artist makes in the field, decisions that are critical to a strong image.

In the days of film, a good portion of the magic was done in the darkroom. That’s where their genius really became apparent. And it hasn’t changed today. We don’t actually have dark rooms to work in, closed rooms with the strange array of mysterious orders and the soft, dim yellow lighting. Today we have powerful software running on even more powerful computers. But really, how is that different from what the film Masters did in the darkroom? I don’t believe it is. I can’t think of anything that’s been done with “Photoshopped” photographs that hasn’t already been done in the darkroom. It’s probably a lot easier to do it in Photoshop but in the end, both the chemical darkroom and the electronic darkroom serve the same end, that being creating those “Wow” images.

In this series of posts I want to spend more time considering some techniques you can apply in the darkroom that will add impact to your images.

Use the Full Dynamic Range of Your Medium

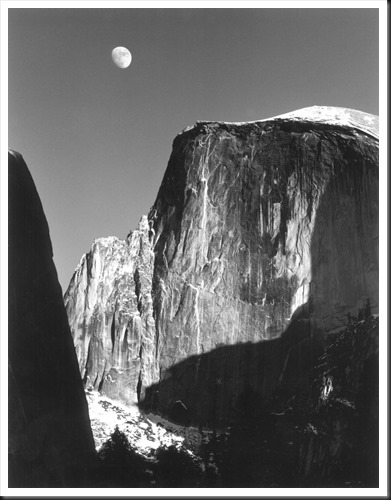
The first darkroom technique I would like to discuss is the importance of using the full dynamic range of your medium. This is not something new. When Ansel Adams developed the zone system it was precisely for this purpose – to use the full dynamic range of the black and white negative and ultimately the black and white print. But what exactly does it mean to use the full dynamic range of the medium. Let me illustrate with an Ansel Adams image I have loved for many years, one I’m privileged to be able to live with in my home – “Moon and Half Dome.”

Adams-moon-and-half-dome-1960

In this exquisite photograph if you are able to examine an original closely you will notice that the shadow on the left may look like it is totally black but actually there is subtle detail. However, there are some very small areas that are pure black. Also, the moon and the bright parts of Half Dome may look like they are pure white but a closer look will reveal detail in these areas also. This photograph takes full advantage of the full dynamic range of the paper, from the blackest black to the whitest white.

Continue reading “Creating Images with Impact – Dynamic Range of the Medium”

(4737)