Mastering Your Camera

There are only 12 skills you need to learn to master your camera. Check out what they are.

I’m not the only one that contends that mastering your camera is an important first step in mastering photography. You’ll see it in blog posts, articles and videos.

Let’s take a deeper, more detailed look at what it means to master your camera and show that it’s not an impossible task, as intimidating as it may seem when you first start.

It starts with the question, “What does a camera do?” The hundreds of pages in the camera’s user manual and a similar number of options in its menus make it look like mastering it is a massive if not impossible task.  It appears daunting, especially if you are not technically inclined.  But in reality, what you need the camera to do comes down to just two things – control the exposure and control sharpness. Let’s see what core skills are required to master these two things.

Control Exposure

The purpose of exposure control is to ensure the right amount of light enters the camera so that the sensor can record the image you are photographing.  You and the camera need to respond to both bright and dark scenes.  The exposure controls are what makes it possible to match the exposure to the kinds of lighting conditions you encounter.

Tell Me More About Exposure….

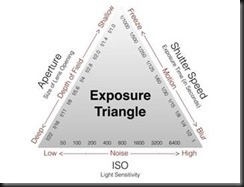
There are three variables that can be adjusted to respond to the amount of light in the scene – ISO, aperture and shutter speed. These three variables form the famous exposure triangle.

Tell Me More About the Exposure Triangle….

Continue reading “Mastering Your Camera”

(387)

Tell Me More About Auto Exposure Bracketing

Review the history of auto exposure bracketing and how it is used in the digital age.

What Is Auto Exposure Bracketing and What Is It Used For?

Auto Exposure Bracketing (or AEB) dates back to the film days. Color reversal film, or slide film, was very sensitive to exposure. If your exposure was off by even a half a stop, it would not be acceptable for critical work. So, photographers got into the habit of taking three shots – one at the exposure they calculated, one a half stop overexposed and one a half stop underexposed. This ensured that one of the frames was correctly exposed.

In the digital world, AEB plays a different role. With the power of the tools available to us in the digital darkroom, we can easily compensate for exposures that are not perfect.

But now we can photograph scenes that were not possible in the film days. These are scenes in which the dynamic range exceeds the ability of the sensor (or film) to capture. In the film days you could use a graduated neutral density (grad ND) filter if there was a clear and straight dividing line between the bright and dark parts of the image. But for scenes where no such line existed, such as dappled sunlight on a forest floor, you had to forego the photograph.

In the digital world you have the ability to capture scenes with even the most difficult dynamic range challenges. The technique is HDR and it involves taking multiple shots with enough different exposures to capture the full dynamic range and blending them together in the digital darkroom.

And this is where AEB comes in. Instead of a bracketing interval of 1/5 stop, you can set a bracketing interval of 1 stop, 2 and even more stops. The bracketing interval depends on your camera. Not all are the same. And many digital cameras will allow you to take two, three, five or even seven shots to ensure you capture the full dynamic range of the scene, again, depending on your camera.

You can use AEB by pressing the shutter once for each shot up to the number of shots you specified. Or you can put the shutter on burst mode and press and hold it until the camera takes all of the shots.

Finding the Control

Different camera manufactures have their own ways of applying auto exposure bracketing. This may even change from model to model.

Consult your camera’s manual to learn how to use it.


Join me on an exciting workshop. Click here to see what’s available.

Read more:

Tell Me More About Exposure
Tell Me More About ISO
Tell Me More About Aperture
Tell Me More About Shutter Speed
Tell Me More About the Exposure Triangle

(25)

Tell Me More About the Exposure Triangle

The three exposure settings come together in the exposure triangle.

What is the Exposure Triangle?

The exposure triangle is a way of visually depicting the relationship between the three variables that, together, control exposure – ISO, aperture and shutter speed. They are represented together as a triangle to illustrate that if you change one of the variables, you need to change the other if you want to keep the same exposure.

clip_image002

Here’s an Example.

Suppose a proper exposure has an ISO of 100, an f/stop of f/5.6 and a shutter speed of 1/125 of a second.

But you decide you want to increase the depth of field. So, you change the aperture by one stop from f/5.6 to f/8. This darkens the light coming through the lens and, if you don’t do anything, darkens the exposure by one stop. To keep the same exposure, you have two choices. You can change the ISO or the shutter speed.

If you changed the ISO you would have to change it from 100 to 200. That change in sensitivity would require half the amount of light to get the same exposure.

But you don’t want to compromise the quality of the image with a higher ISO. You decide to change the shutter speed. You need to make the shutter speed longer to offset the reduced brightness. So, you change the shutter speed from 1/125 of a second to 1/60 of a second and you get the same exposure

How It Works with Aperture Priority

If you take the same scenario but this time you are shooting aperture priority, the camera makes the adjustment for you. Here’s how that works…

You have set the shooting mode to aperture priority with an ISO of 100 and an aperture of f/5.6. The camera determines the shutter speed needs to be 1/125 of a second.

When you change the aperture to f/8, the camera adjusts the shutter speed to 1/60 of a second to compensate for the reduce brightness. The exposure does not change.


Join me on an exciting workshop. Click here to see what’s available.

Read more:

Tell Me More About Exposure
Tell Me More About ISO
Tell Me More About Aperture
Tell Me More About Shutter Speed

(84)

Tell Me More About Shutter Speed

Explore shutter speed in depth and see what it can do for your creativity.

What Is Shutter Speed?

Every camera has a shutter that controls how long the sensor is exposed to light when taking a picture. Shutter speed is the interval during which the shutter is expose to light. It can be as long as 30 seconds or as short as 1/1000 of a second or even shorter.

How Does a Shutter Work?

Shutters have for a long time been mechanical devices with two curtains with one of the curtains covering the sensor (or the film). When the shutter button is pressed, the curtain covering the sensor moves horizontally and snaps out of the way. The sensor is now exposed to the light coming through the lens. When the exposure is done the other curtain snaps across the sensor to cover it up again. Between exposures the shutter curtains are reset.

The interval between the time the first curtain snaps out of the way and the second curtain covers the sensor again is what determines the shutter speed. The camera has a built-in ability to determine how quickly the second shutter must snap to give the required shutter speed. With very short shutter speeds it’s possible that the second shutter snaps before the first one is finished.

Mirrorless cameras (and smart phones) do not have curtains. The sensor is always exposed to light. It has to be this way because the camera does not have a traditional view finder. The only way you can see what you’re photographing is by the LCD screen on the back of the camera or the tiny LCD screen in what used to be an optical viewfinder. And for those to work, light has to be shining on the sensor all the time.

A mirrorless camera must operate the shutter differently. It is done electronically. When the shutter button is pressed, the camera’s processor knows that the steady stream of signals that has been coming from the sensor now needs to be captured for the image. So, for the period of time that the shutter speed has been set for, that part of the stream is captured and turned into a file that is saved on the memory card. After the image is captured and saved, the camera goes back to sending the sensor data just to the displays.

What Are the Effects of Different Shutter Speeds?

Shutter speeds have an effect on the sharpness of the image. When shooting hand held, a longer shutter speed has a greater chance of the camera moving ever so slightly during the exposure. Also, action shots taken at a slower shutter speed will often be blurred.

So high shutter speeds like 1/1000 of a second are used for action shots. And the rule of thumb for getting sharp hand held images is to use a shutter speed that is 1/focal length or shorter. For example, if the focal length is 100 mm, then a shutter speed of 1/100 of a second will give a sharp image as long as you are careful to steady the camera.

Long shutter speeds, on the other hand, can produce intentional blurs, even when shooting from a tripod. If you want a waterfall to be blurred, you can use a shutter speed of 1/5 of a second or longer, depending on the amount of blur you want.

Exposure Triangle

Shutter speed is one of the sides of the Exposure Triangle. The other two sides are ISO and aperture.

All of the sides of the exposure triangle are measured in stops or EV (Exposure Value), where one stop is a doubling or halving of the amount of light.

With shutter speeds, this calculation is quite simple. An exposure of 2 seconds allows twice the amount of light to shine on the sensor as a 1 second exposure and the exposure increases by 1 EV.


Join me on a fantastic workshop.  Click here to see what I have in store for you.

Read more:

Tell Me More About Exposure
Tell Me More About ISO
Tell Me More About Aperture
Tell Me More About the Exposure Triangle

(65)

Tell Me More About ISO

Explore ISO as part of the exposure triangle and the role it plays in getting a proper exposure.

What is ISO?

To start at the beginning, ISO stands for International Organization of Standards. It sets the standard for measuring the sensitivity of camera sensors. It dates back to the film days when it referred to the film’s speed or, as it was called then, ASA which stands for American Standards Association.

Films had a fixed ISO. To change the ISO, you had to load a different film in your camera. Digital cameras can change the ISO whenever it is needed. This is a huge advantage as the digital photographer can instantly respond to changing light conditions.

What Does Changing the ISO Do?

Changing the ISO increases or decreases the sensor’s sensitivity. What that means is when the sensor is set at a low ISO it is less sensitive, requiring more light go get a proper exposure. When set at a higher ISO it is more sensitive, requiring less light to get a proper exposure.

In most cameras the lowest ISO is 100. With the advancements that have been made in recent years, it’s common to see the high ISOs around 12,800.

The ISOs are laid out in f/stops or Exposure Values (EV). These measures are based on doubles or halves. Doubling the ISO from 100 to 200 doubles the sensitivity resulting in needing half the amount of light to get a proper exposure. Increasing the ISO from 100 to 400 quadruples the sensitivity resulting in the amount of light needed for a proper is reduced by 4.

How Does ISO Work in a Digital Camera?

The technology that allows us to change ISOs has gotten very sophisticated. And different sensors (CMOS vs CCD) employ different technologies. Part of the ISO increase is by increasing the voltage to the sensor. This can occur in the sensor itself or outside the sensor. The signals coming out of the sensor need to be converted from analog to digital and in some cases additional ISO boost is done to the digital signal. The engineering that goes into this is highly sophisticated as I’m sure you can imagine.

What Are the Effects of Using High ISOs?

Lower ISOs produces higher quality images. Most landscape photography is shot at ISO 100. Higher ISOs make it possible to shoot in low light conditions, but they run the risk of increased noise, especially in the shadows. Noise manifests itself in a way that is similar to grain in high ISO films. It produces a blotchy look.

But the technology has progressed so far that ISOs in the 800 to 1600 range that were unthinkable just a few years ago now produce excellent results. And one can expect the situation to only get better. This is great news for night photographers.

Summing It Up

Most landscape photography can be shot with the lowest ISO, especially when using a tripod. However, higher ISOs are available for tricky low-light conditions and can be used with confidence.

Exposure Triangle

ISO is one of the three sides of the Exposure Triangle. It works in conjunction with aperture and shutter speed to get a proper exposure.

The sides of the exposure triangle are measured in stops. The ISO determines how much light is required to get a proper exposure. An ISO of 100 requires twice as much light as ISO 200.


Join me on an exciting workshop. Click here to see what’s available.

Read more:

Tell Me More About Exposure
Tell Me More About Aperture
Tell Me More About Shutter Speed
Tell Me More About the Exposure Triangle

(41)

Tell Me More about Exposure

Dig into the mysteries of exposure and explore how it works and how it is controlled.

What is Exposure?

When we photograph nature, some scenes are very bright like sand dunes in the middle of a sunny day. Others are very dark like the deep shade of a forest. Other scenes are both bright and dark like a blazing sun that just rose above the horizon on a brilliant morning.

There are many unique situations with different amounts or intensities of light.

Exposure is basically dealing with these different levels of light and making sure the sensor gets enough light to make a good photograph without getting too much light.

How Much Light Does the Sensor Need?

One way to think of it is that in low light situations (dark) the camera needs more light. In bright light situations it needs less. But that’s not true. The camera needs the same amount of light in either situation. A more accurate way of looking at it is in low light situations, it will take longer for the camera to get enough light than in a bright situation.

But there’s another aspect to this so let’s take a deeper look.

The image that passes through the lens is captured by the sensor and eventually stored as a file on a memory card. (There’s a lot that goes on between these two steps, but they are not important for this discussion.) The sensor, as you know, is made up of millions of pixels, microscopic elements that are sensitive to light. Actually, a pixel is three light-sensitive elements, one for red, another for green and a third for blue. But let’s keep it simple and speak of it as just one element that captures tones of gray.

When a picture is taken a different amount of light falls on each pixel depending on the subject photographed and the nature of the composition. In the shadow area there may not be enough light to even register on the sensor. This is called ‘shadow clipping’ and will produce a black dot.

In the bright areas there may be so much light, more than the sensor can measure. You can think of this as a glass filled to overflowing. There’s a limit to how much water a glass can hold and light a sensor can capture. This is called ‘highlight clipping’ and results in a white spot.

If a moderate amount of light falls on a pixel, it will capture the light and that pixel will render a gray spot that falls somewhere between black and white, depending on the amount of light.

Now, if the difference in the amount of light between black clipping and white clipping is ten stops, then the sensor has a dynamic range of ten stops. That is fixed and cannot be changed.

Back to the question – how much light does the camera need to make a proper exposure? If you took the amounts of light recorder by all of the millions of pixels and average them, the camera considers it a proper exposure when they average out to a neutral gray, a gray that is perceived as being neither dark or light but right in the middle. The definition of neutral gray is very precise. It is a gray that reflects 18% of the light.

There are different metering modes that go beyond just taking a simple average of all the pixels. There is center weighted which pays more attention to the pixels in the center of the frame, spot which only looks at the pixels covering about 5 degrees in the exact center of the frame and matrix which attempts to analyze the image and make a smarter determination.

But whichever metering mode you choose, the basic goal is to have the result produce a neutral gray.

The processor in the camera (all digital cameras are computers after all) has the logic to make this calculation. With the results, the computer can set the exposure settings.

The Exposure Triangle

The camera has three exposure settings that can be adjusted to get a proper exposure. They are ISO, aperture and shutter speed.

ISO controls the sensitivity of the sensor. The higher the ISO, the greater the sensitivity and less light will be needed.

Aperture controls how much light comes through the lens. You can think of it as adjusting the brightness of the image falling on the sensor.

Shutter speed controls how long the sensor is exposed to the image.

Shooting Modes

Most cameras have at lest four shooting modes – Auto, Aperture priority, Shutter priority and Manual. The setting you choose determines how many of the exposure settings the camera sets and how many you control.

Auto – The camera decides all three exposure settings.

Aperture priority – You decide the ISO and aperture and the camera decides the shutter speed.

Shutter priority – You decide the ISO and shutter speed and the camera decides the aperture.

Manual – You decide all three exposure settings.

In Summary

To sum it up, an exposure is the amount of light falling on a sensor, taking into account the sensor’s sensitivity. A proper exposure from the camera’s perspective is one where the amounts of light captured by all of the pixels being monitored average out to a neutral gray.

In a bright snow scene where most of the pixels are registering the bright white of the snow, the camera will make the snow a neutral gray.

In a dark scene with most of the pixels registering deep shadows, the camera will make the shadows a neutral gray.

But in a scene with a balance of bright and dark areas the exposure will be more like what we see.


Join me for a great workshop.  Click here to see what’s possible.

Read more:

Tell Me More About ISO
Tell Me More About Aperture
Tell Me More About Shutter Speed
Tell Me More About the Exposure Triangle

(52)

Mastering Night Photography – Focusing

Solve your focusing challenges in nighttime photography.

A lot of people are doing nighttime photography these days including yours truly. There are many good sources of information on nighttime photography. I’ve written a few blog posts myself (Exciting Nighttime Photography in 10 Easy Steps). Nighttime photography falls into two categories – star trails and night sky. In this post I want to elaborate on something I’ve discovered recently with regards to night sky photography.

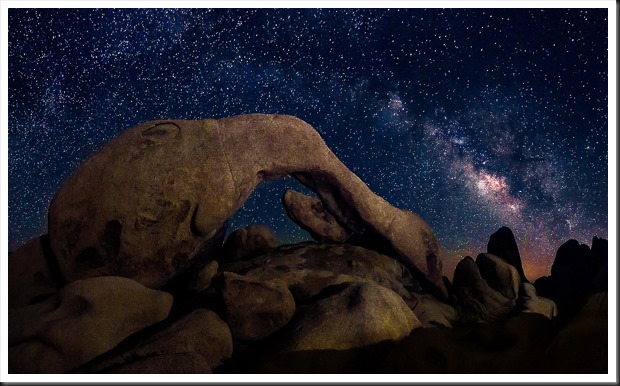
double-arch-joshua-tree-140628Nighttime photography is pretty much like daytime photography. The biggest difference is you can’t see what you’re doing. Let’s run through a quick comparison of camera settings in daytime and nighttime photography.

Continue reading “Mastering Night Photography – Focusing”

(3625)

Photo Tips – Getting Great Exposures the Easy Way

Always shooting in Automatic mode? Here’s an easy way to improve your photographs without having to bother with all the technical details.

If you’re a person who’s interested in just taking pictures and don’t want to be bothered with all the technical details, you are probably photographing with your camera set to automatic mode. Often times automatic mode is indicated by a green box. Probably the handiest feature of automatic mode is that the camera makes all the decisions for you. All you have to think about is getting the people you’re photographing in the frame and pressing the shutter. The camera does everything else.

But the problem is that the camera doesn’t always get it right. Often times it will overexpose parts of the image making them look washed out. But there’s a simple way to avoid this without mastering all the complicated technical details of shooting in manual mode. And that is P mode.

Using P Mode

The P and P mode stands for Programmed Automatic. In P mode the camera allows you to make some of the decisions while it makes the rest. You get to choose whether or not to use flash, and set the ISO, exposure compensation and white balance. The camera sets the f-stop and shutter speed.

Let’s take these controls one by one. Let’s start with flash. You can decide whether you want to use flash or not. If you’re shooting in bright daylight or even on a cloudy day you probably don’t need flash. But if it’s a little darker you can always choose to turn the flash on. If you don’t know how to turn your flash on or off you’ll need to consult your camera’s manual.

home_140907_IMG_9704-6 Continue reading “Photo Tips – Getting Great Exposures the Easy Way”

(1997)

Mastering Sharpness – Fuzzy Photos

How many things can go wrong that can render an image fuzzy.

How many times have you returned from a shoot with some photographs you are really excited about only to find out they are out of focus.  That’s always very disappointing and often frustrating.  And it happens all too often to me.  At the Joshua Tree Gathering this past March someone asked the question, ”How many ways can a photograph be out of focus,” and that got me thinking.  This would be a fun article to write.

But let’s get something straight from the start.  Not all ‘out of focus’ photographs are out of focus.  They may not be sharp but that can come from two causes.  They can actually be out of focus or they can be blurry.  This may seem like a subtle distinction but it’s an important one.  So let’s take them one by one and explore their causes and solutions.

But before we do, I want to make another very important point.  A photograph that is out of focus or blurry is not always a bad thing.  Often times the artist does it intentionally because that is his or her artistic vision.  When it’s done intentionally to create an expressive photograph then it’s not only OK, it’s necessary.  It’s when it’s unintentional that we get frustrated and loose great moments.

But now, let’s get into the details.  We’ll talk about blurs first.

Continue reading “Mastering Sharpness – Fuzzy Photos”

(1073)