In this series of blog posts were talking about how to create Images with Impact. You know what I’m talking about. These are those images that really grab our attention, that capture our imaginations. There’s something special about them and it doesn’t have to be a mystery how they are created. There are a few simple techniques that you can use in Lightroom and Photoshop to add impact to your images. Now if you don’t use Photoshop, you can still do everything were talking about in Lightroom.
In the first article we talked about utilizing the full dynamic range of your medium. This is something Ansel Adams taught in his books and classes that was an essential element of his stunning landscape photographs. As he developed his technique which became known as the Zone System, the primary goal was to use the full dynamic range of his medium which, in his case, was the black and white print.
So we talked about that technique first because it is the most appropriate place to start. I do want to add that in color photography or color prints not every print benefits from a white point but virtually all prints benefit from a black point – which is what we want to talk about in this article.
What exactly is a black point? It is small portions of the print that are pure black. If you’re printing on paper than these are small portions that are the blackest black that the combination of paper and ink can achieve. As a side note, different combinations of paper and ink achieve different levels of blackness. But regardless of the combination you use, the blackest black that can be achieved is your black point.
You want to keep the black point areas very, very small because they have no detail. And generally speaking we like to see detail in our shadows, another guideline that I picked up from studying Ansel Adams. But you don’t want to eliminate black points, that is, in most cases. There are a few exceptions to this rule that I will talk about later.
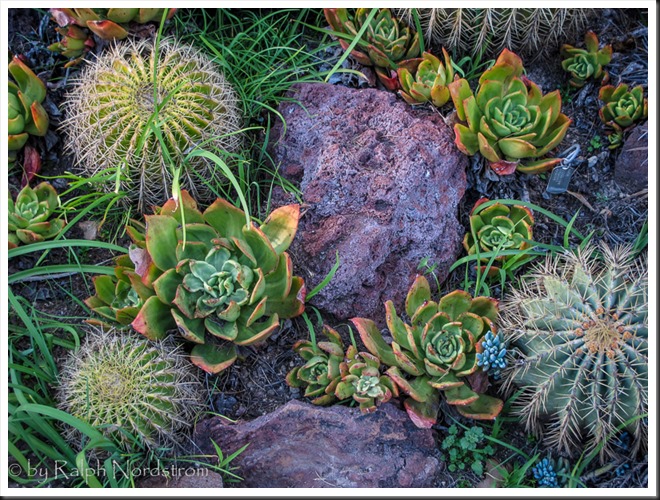
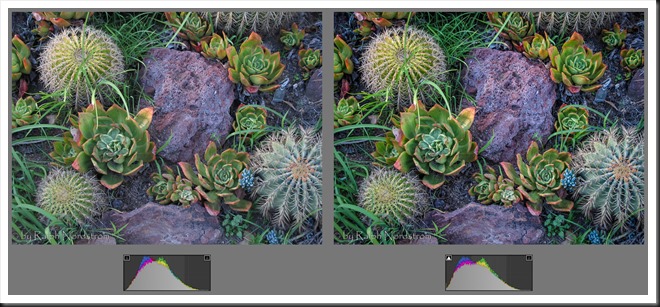
Let’s take a look at the before and after images of our photograph. I shot this at the Huntington Library in South Pasadena a few weeks ago. It’s in their incredible cactus garden – endlessly fascinating.
If you look closely you can see some subtle differences between the before and after images. The differences are most apparent in the shadows which you will notice are richer in the after image. While I did a few other adjustments, the major contribution to the after image are the black points. I’ve included histograms below each image to illustrate the changes in tonality that resulted from setting the black point. And actually, when I set a black point I pretty much rely on the histogram and don’t pay much attention to the image. That’s not true of all the adjustments I make but I do watch the histogram very closely when I’m setting a black point. Why? Because it’s difficult to visually see the black points without the help of something more precise like a histogram. And you’ll notice the white triangle in the upper left-hand corner of the after histogram. That turns white when some areas of your image turn pure black. More on that later.
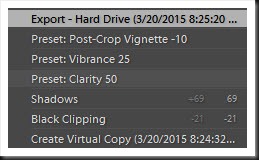
Oh, by the way, here are the other adjustments I applied.
The benefit of setting a black point is that, for one thing, it’s the first thing you do in utilizing the full dynamic range of your medium. But in addition to that it forms a tonal foundation for the rest of your image. It’s hard to put in words the change that a black point brings to your image. Words like “structure” come to mind. Black points also create shadows that are clear and crisp rather than mushy. I think when you try this technique yourself you’ll find out how beneficial it is.
So how do we set a black point? Let’s start with Lightroom.
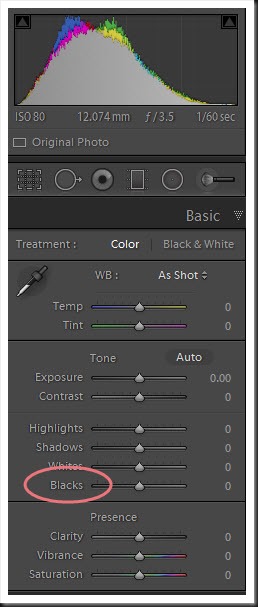
In Lightroom’s Develop module there are sets of adjustments to the right of the image. The first set is called Basic. This is a starting point for working on an image. And the adjustment to set a black point is appropriately named Blacks. Sliding the Blacks slider to the left darkens just the dark areas of the image without affecting the mid tones or the highlights. It’s magical. Sliding it to the right lightens the dark areas of the image, again without affecting the mid tones or the highlights.
In the illustration above I’ve shown the histogram in addition to the Basic adjustments because, like I said, I watch the histogram when I’m setting the black point. And as I slide the black slider to the left, the histogram stretches towards the left coming closer and closer to the left edge until it finally touches it. And when that happens, the little white triangle in the upper left-hand corner turns white and the parts of the image that are now pure black turn a dark blue. (You can turn this feature on by clicking on the triangle and a little box will appear around it when it’s activated.) When the triangle turns white, you know you have a black point.
So you can do this manually or you can let Lightroom figure out the black point for you. This is a very cool feature. If you hold down the Shift key and double-click the Blacks slider, Lightroom will automatically set the black point for you. This is a great feature and can get you a black point with virtually no effort at all.
So setting a black point in Lightroom is really easy. Next let’s turn to Photoshop.
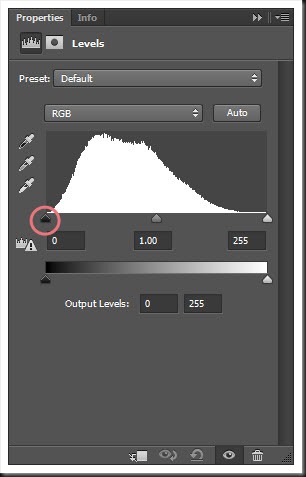
In Photoshop we use adjustment layers to make nondestructive adjustments to our image. And the adjustment layer for black point is Levels.
The Levels adjustment shows a histogram with three sliders underneath it – the black slider, the mid tone slider and the white slider. I circled the black slider although I’m sure you had no trouble figuring that out. To set a black point using Levels, hold down the Alt key (or the Option key on the Mac) and slide the black slider to the right. Your image will turn white and as black points appear, those areas will turn black. Pretty easy, isn’t it?
You also notice on the Levels adjustment that there are three eye droppers to the left to the histogram, again, black, mid tone and white. You can also use the black eye dropper to set a black point. The way to do this is to hold down the Alt key and slide the black slider to the right. Again, the image turns white and as you slide the slider black specks will appear. These are the darkest shadows of the image and where you will want to set your black point. Note where the black areas are and release the Alt key. Then slide the slider back to zero and with the black eye dropper click on one of those areas that you identified.
Now the advantage of doing it this way is that the black point is set in a slightly different way. The first method I described sets a black point by adjusting the overall luminance of the image. But the second method adjusts each of the three color channels separately. That is to say, it independently adjusts the red, green and blue channels to produce the black point. You can see how much each color channel was adjusted by clicking on the RGB drop-down above the histogram and selecting the red, green and blue channels. You’ll see that for each channel the black slider has been moved by a different amount. (You may also notice that this is had an effect on the overall color of your image. This effect is usually positive but if you don’t like it then undo the black points by setting the three channel sliders back to zero and use the first method.)
Now why is this such a good thing? Well, because oftentimes shadows have a color cast. A shadow under a rock on a clear sunny day will have a blue cast. A shadow under a rock in a lush green forest will have a yellow-green cast. In other words, the shadow takes on the ambient color of the surroundings which, in the case of a clear day, comes from the blue sky, hence the blue color. In the lush forest the ambient color comes from the green foliage, hence the yellow-green color. The technique of setting a black point using the black eye dropper neutralizes that color and gives you a black shadow without any color cast. This can be highly desirable in many instances.
When should you set a black point? As I indicated above, black points benefit practically every landscape photograph. There are exceptions however. Usually, when you’re photographing fog, a black point is not appropriate and not desirable. It adds too much contrast to that soft, delicate scene you’re creating. So usually you’ll want to stay away from black points in those lovely soft fog images.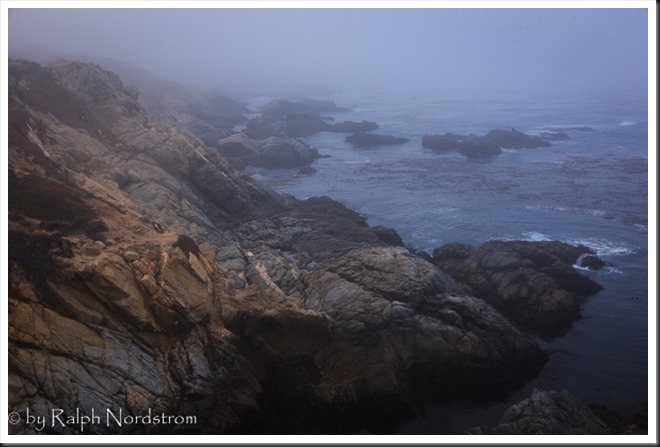
There are however exceptions to the exceptions. This is a photograph I took in Garrapata State Beach along the Big Sur coast one incredible foggy morning. And as the fog was beginning to lift I captured this image. When I was working on it in Lightroom I was fully intending to avoid setting a black point. But, like so many of my photographs, I was curious what would happen. Curiosity is a good thing. And it turned out that the black point was also a good thing. It added a little bit of interest to the rocks in the foreground but didn’t have any effect on the fog. So in this instance it worked out rather nicely.
Okay then, let’s do this. If you haven’t tried setting a black point before, fire up Lightroom and pick an image that you haven’t made any adjustments to. Preferably this will be a raw file (because with JPEG images the camera has already applied some adjustments). And then do what I’ve outlined here. Use the black slider and go ahead and use the shortcut method by holding down the Shift key and double-clicking the slider. You’ll see it immediately jump to the left (unless you already have black clipping). Note that if you’ve activated the triangle in the upper left corner it may not turn white. It seems that Lightroom stops just shy of creating any areas with black clipping. That’s Okay. Don’t worry about it. Try that on a couple of your images and decide for yourself how you like it. I think you’ll be pleased.
So that’s it. Setting a black point is a very simple technique that gets a photograph started on the right foot with solid, crisp shadows.
In the next blog post I’m going to talk about adding contrast. This is a fascinating subject where a very small adjustment can add a huge amount of impact to your image.
If you like this article, do me a favor and shared it on Facebook. I would really appreciate that. Who knows, you may have some friends that appreciate this tip as well. Thanks.
We do photography workshops. Come on out and join us. Click here to check us out.
You can also check out our photography. Click here.
(8397)

