Lightroom is good for basic HDR but for full creative control, HDR applications have an important role to play.
I was recently in the redwoods of Northern California. One of the groves I love is the Lady Bird Johnson Grove in Prairie Creek State Park. In it is a Western hemlock growing next to a massive redwood. The hemlock’s roots spread out across the ground, making an interesting and photo-worthy pattern. I’ve photographed it a number of times in the past but never liked what I got.
This year was different. I finally saw a composition that excited me. The sky was overcast and a bright mist hung in the forest. I knew I was going to have a dynamic range problem so I shot HDR – 5 shots bracketed 1 1/3 stops.
I knew I was going to have a dynamic range problem so I shot HDR….
I was eager to see what it looked like so when I got back to my hotel room I ran it through the Lightroom HDR. One thing about the Lightroom HDR feature is that it is convenient, quick and creates a DNG file. But its drawback is that you don’t have a lot of control. Besides alignment and de-ghosting, you have the Auto function, the same Auto found in the Basic group in Lightroom. That’s it.
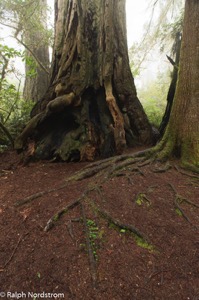
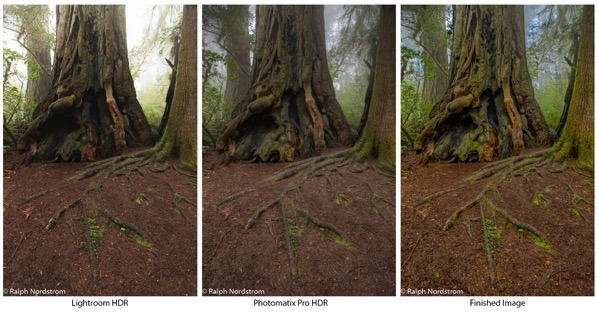
I ran my five files through Lightroom HDR, but the results were disappointing. The foreground was rendered well but the forest in the background was blown out. I tried my best to recover what I could, but it was too far gone. Another year gone by and I still don’t have this photograph.

It wasn’t until sometime later that I was browsing my redwood images and came across this shot. I decided to have another go at it but this time using my tried and true Photomatix Pro 6.0. I’ve been using Photomatix Pro since version 1 and it has always produced for me. Photomatix Pro is extremely versatile, giving the photographer a wide range of expressions from natural to surreal. And with over 40 presets, it’s easy to find one that is very close to what you’re looking for. I always prefer the more natural look.
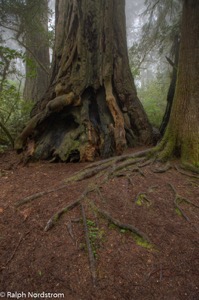
An image that I thought was lost came back to life with Photomatix Pro.
I imported the five files, selected one of the more natural presents and what a difference. An image that I thought was lost came back to life with Photomatix Pro. Not only was the foreground beautifully rendered but so was the background. A few small tweaks and the photograph was ready for the rest of the workflow.

I finished my normal workflow by completing the Lightroom adjustments once Photomatix Pro had imported the TIFF file back into the Lightroom catalog. That was followed by the fine tuning I always do in Photoshop.
I thought you might like to see the HDR outputs from Lightroom and Photomatix Pro along with the finished photograph side-by-side.

Lightroom HDR still has a role to play for me. When I’ve just uploaded my files from a shoot and am browsing through them to select the ones I want to work on, I find the Lightroom HDR very handy to get a sense of if I’ve captured the dynamic range or not. But if I later decide I want to print the image and add it to my portfolio I’ll redo the HDR blending in Photomatix Pro where I have so much more control. Lightroom HDR doesn’t come close to providing the artistic control that I need. Photomatix Pro continues to fill that gap and remains an essential tool in my HDR workflow.
You can see for yourself and give Photomatix Pro a spin by downloading a trial version from their website.
(45)
Like this:
Like Loading...
