Ten Reasons to Take a Photography Workshop

Ten good reasons to take a photogrpahy workshop.

We all love photography.  Perhaps you are a casual photographer, using your smart phone or point-and-shoot camera to capture the precious moments in life you cherish and want to remember.  Perhaps you admire the work of others and would like to be able to capture scenes or moments like they do.  Or maybe you are skilled and have been passionate about your own photography for quite some time now.

For those that seek to develop themselves as photographers there are a couple of approaches you can take.  You can learn on your own by reading and photographing.  And if you are able to devote the time and energy to this process you will surely be successful.  However, it is more of a trial-and-error approach to learning photography and, let’s face it, we don’t all have the time or energy to adequately feed our passion.

Or, you can learn from someone who has already mastered the challenges you encounter along the way.  And one of the most effective and affordable ways of accomplishing this is through a workshop.

So I would like to share with you my top ten reasons for attending a workshop.

1.     Inspiration

Photography workshops give you the opportunity to focus just on photography and capturing the beauty that surrounds you.  The complications of your busy life are left at home or at work and for several stimulating days your existence is focused on one thing – capturing the beauty that surrounds you.

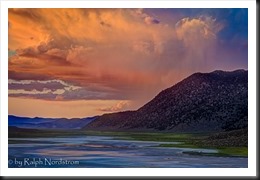
eastern_sierra_130712__SM36935_6_7_8-Edit

Continue reading “Ten Reasons to Take a Photography Workshop”

(973)

12 Tips on Nighttime Photography

Nighttime photography poses its own challenges. Here are some helpful tips on preparing for and getting the most out of your hours spent in the dark.

Here are some tips on nighttime photography from an informative article by Dan Richards in a recent issue Popular Photography.  Credit for these tips goes to three great photographers – Matt Walker, Darren White and Mashahiro Miyasaka.  Here is the heart of what they shared…

  • Use a fast, wide lens.  Wide lenses slow the apparent motion of the stars.  Fast lenses gather more of the faint light.
  • Use a tripod.  The shortest practical exposure is 30 seconds.  Star trails require anything from tens of minutes to an hour or more.
  • Use an intervalometer.  This is essential for exposures greater than 30 seconds or if you plan to take a sequence of 30 second exposures.
  • Be aware of the weather.  An overcast sky will foil nighttime photography plans and a wind will wreak havoc with long exposures.
  • Be careful.  Scout the location ahead of time.  Use a headlamp, especially  one that has a red light so as not to destroy your night vision.
  • Include interesting foregrounds.  They can be silhouettes or you can light paint them.  You also have the option of creating a composite image by capturing a well exposed image of the foreground at low ISO and a high ISO image of the sky and then blending the two.
  • Focusing is really difficult.  Autofocus doesn’t work so you must use manual focus.  Pick the brightest star in the sky and use live view to focus on it (don’t change your focal length to focus; use the focal length you’ll be using for your image).  Another alternative is to focus on an object at infinity during the day and then marking the focus point with fluorescent tape so you can reset the same focus at night.  Again, use the focal length you will be shooting with as the infinity focus point changes as you zoom in and out.
  • Exposure is critical.  If you’re going to shoot starry  night photographs your exposure length will be 30 seconds (with a 24 mm lens or wider).  Shoot wide open and run tests with different ISO settings.  If  you’re going to use a long exposure to get star trails determine the ISO setting your 30 second exposure and then adjust ISO and f/stop to compensate for the length of exposure.  If your ISO is 6400 at f/2.8 and 30 seconds, if you want a 60 second exposure reduce your ISO to 3200.  A two-minute exposure requires an ISO of 1600.
  • Take a workshop.  That’s always good advice, no matter how experienced you are.  There’s always more to learn.
  • Don’t get disheartened.  This is not easy stuff but practice pays off.
  • Get in shape.  Good locations for night photography are going to be where there’s minimal light pollution and that’s a long ways away from city lights.
  • When the temperature is cold wrap a hand warmer around your lens to keep it from fogging over on those long half hour to hour exposures.

Well, that’s it.  Yea, and I confess; I threw in a couple of my tips too.

Hey, here are a couple of blog posts I’ve done on nighttime photography a while back there.

Exciting Nighttime Photography in 10 Easy steps

Nighttime Photography

So, go on out there and give it a try.  Have fun and be careful.


We always enjoy hearing from you so please feel free to leave a comment and share your experiences with us.

Also sharing this post on Google+, Facebook, Twitter and the like is also appreciated.

Join me on an upcoming workshop.  Click here for more details.

To see more of my photographs click here.

(914)

Ansel Adams – The Making of 40 Photographs: El Capitan, Winter Sunrise

A continueing series in which I reflect on Ansel Adams’ book, “Examples – The Making of 40 Photographs.” In this post I talk about “El Capitan, Winter Sunrise.”

I’ve heard it said that many photographers believe there are no more photographs in Yosemite, that all the great ones have been taken.  And it’s true that the prime locations have been photographed again and again, sometimes with 50 or even 100 photographers all vying for their three square feet of ground in which to set up their tripods. 

It would appear the assumption is that if a particular location is photographed too many times, becomes too popular, it becomes a cliché.  I’ve succumbed to that point of view in the past.  There seems to be the faintest whiff of, “I’m too good to photograph something so common.  I’m able to find what no one else has never seen.”  I know; I kind of felt that way.
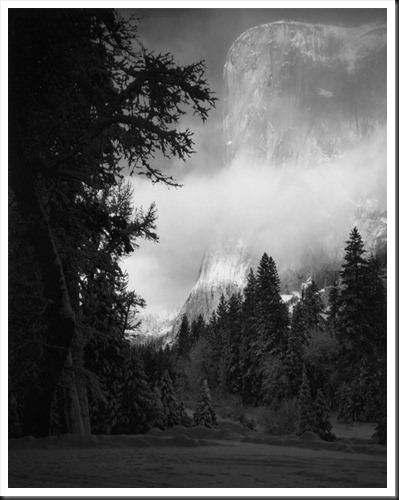
El Capitan, Winter Sunrise
Ansel Adams

Ansel Adams had something to say about that in connection with this photograph.

“A viewer once asked me about the values: ‘Don’t you think the trees are rather dark?’  Black and white photography gives us opportunity for value interpretation and control.  In this instance, were the trees lighter in value, the glow of the light on the cliff would, for me, be far less expressive.  Exposing for higher forest values  would have weakened the separation of the far brighter cliff and cloud values.  However, other photographers might well make quite different images.  I would not like anyone to think I believe this image to be the only one possible, but it fulfills my visualization at the time of exposure.  In an overpowering area such as Yosemite Valley it is difficult for anyone not to make photographs that appear derivative of past work.  The subjects are definite and recognizable, and the viewpoints are limited.  It is therefore all the more imperative to strive for individual and strong visualization.”

Adams’ comment gets to the heart, mind and soul of the artist.  There are two key concepts in his statement that, for me, define art.  The first is ‘interpretation. ’Black and white photography gives us opportunity for value Interpretation and control.”  I take from this that our photographs are interpretations of the subject.  After all, art is interpretation.  And, as artists, it is through interpretation that we share with our viewers our vision of the world.  We don’t document reality; we interpret or possibly even create reality.

The other concept that catches my attention is ‘individual … visualization.’  Adams speaks of his ‘visualization’ all the time.  And the reason we enjoy his photographs so much is because of his strong visualizations.  When he tripped the shutter he knew what effect he wanted to create with the image.  He knew what he wanted to convey in terms of what he was feeling and he knew how to do it, especially when he developed and refined the Zone System.

And it was his interpretations and visualizations that took a location that had been photographed time after time by many other photographers and turned it into something uniquely and identifiably his.

So stand on the bridge in Zion or line up to photograph Delicate Arch in Arches or join the throng at tunnel view in Yosemite.  You can make your photograph unique through your own strong vision and interpretation.


This is a continuing series based on my reading of Ansel Adams’ wonderful book, “Examples – The Making of 40 Photographs.”  It is exciting to read of his attitudes towards making photographs, the decisions he made and the techniques he employed and apply them to the issues that confront us today as digital landscape photographers.  I think those of us who ‘Photoshop’ our images for the sake of achieving our visualization can feel a comradeship with the master.  The question, “Did you manipulate that photograph?” will never go away as long as our medium is the camera.  Adams was also confronted with the same question.  For those of use that believe that the purpose of making a landscape photograph is to share with our audience our response to and our connection with the subject, the work is not done when we press the shutter, it’s just beginning.  And we can delight in photographing the cliché locations, time and time again, because we are creating our own individual statement, not creating ‘derivatives’ of others’ works.


If you enjoy these posts please feel free to share them on Facebook or Twitter, or email them to your friends.  And we would really enjoy hearing from you.  Join the conversation –  leave a comment.

Join me on an upcoming workshop.  Click here for more details.

To see more of my photographs click here.

WordPress Tags: Ansel,Adams,Capitan,Winter,Sunrise,Yosemite,assumption,location,times,cliché,whiff,connection,viewer,trees,Black,photography,interpretation,instance,cliff,separation,images,image,visualization,exposure,area,Valley,heart,soul,artist,statement,subject,viewers,vision,world,concept,attention,System,bridge,Zion,Delicate,Arch,series,Photoshop,comradeship,purpose,audience,response,locations,feet,tripods,subjects,viewpoints,concepts,interpretations,artists,Examples,attitudes,decisions,techniques,photographers,visualizations

(3110)

Ansel Adams – The Making of 40 Photographs: Rock and Surf

Insight into the way Ansel Adams made the photograph “Rock and Surf” and some thoughts on photographing the surf.

I was fortunate to be in Big Sur last week photographing that magnificent coast with the members of our workshop.  Ansel Adams made some beautiful photographs here as did, of course, Edward Weston.  An increasingly common technique used by photographers is to employ a neutral density filter to get very long exposures that turn the ocean into a sea of ethereal mist.  Many of these photographs are incredibly beautiful.  Personally, I connect with the power and energy of the ocean, something these beautiful photographs do not capture.

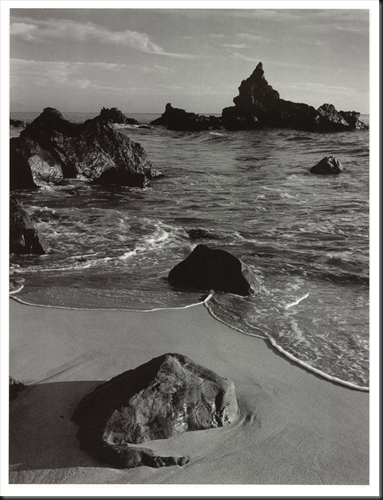
Adams’ technique was to stop the motion in of the surf as in this photograph titled “Rock and Surf.”  Freezing the water was essential to the effectiveness of the composition.

rock and surf

Rock and Surf (1951)
Ansel Adams

Continue reading “Ansel Adams – The Making of 40 Photographs: Rock and Surf”

(3728)