Photo Tips – Getting Great Exposures the Easy Way

Always shooting in Automatic mode? Here’s an easy way to improve your photographs without having to bother with all the technical details.

If you’re a person who’s interested in just taking pictures and don’t want to be bothered with all the technical details, you are probably photographing with your camera set to automatic mode. Often times automatic mode is indicated by a green box. Probably the handiest feature of automatic mode is that the camera makes all the decisions for you. All you have to think about is getting the people you’re photographing in the frame and pressing the shutter. The camera does everything else.

But the problem is that the camera doesn’t always get it right. Often times it will overexpose parts of the image making them look washed out. But there’s a simple way to avoid this without mastering all the complicated technical details of shooting in manual mode. And that is P mode.

Using P Mode

The P and P mode stands for Programmed Automatic. In P mode the camera allows you to make some of the decisions while it makes the rest. You get to choose whether or not to use flash, and set the ISO, exposure compensation and white balance. The camera sets the f-stop and shutter speed.

Let’s take these controls one by one. Let’s start with flash. You can decide whether you want to use flash or not. If you’re shooting in bright daylight or even on a cloudy day you probably don’t need flash. But if it’s a little darker you can always choose to turn the flash on. If you don’t know how to turn your flash on or off you’ll need to consult your camera’s manual.
home_140907_IMG_9704-6 Continue reading “Photo Tips – Getting Great Exposures the Easy Way”

(1997)

Mastering Light – Warm and Cool

In which we explore the color of light coming from different sources.

Light has several properties that are important to landscape photographers including quality, direction and color.

It is important to understand that different times of day and weather conditions will produce light of different colors.  Also, when you add artificial light sources the range of colors expands.

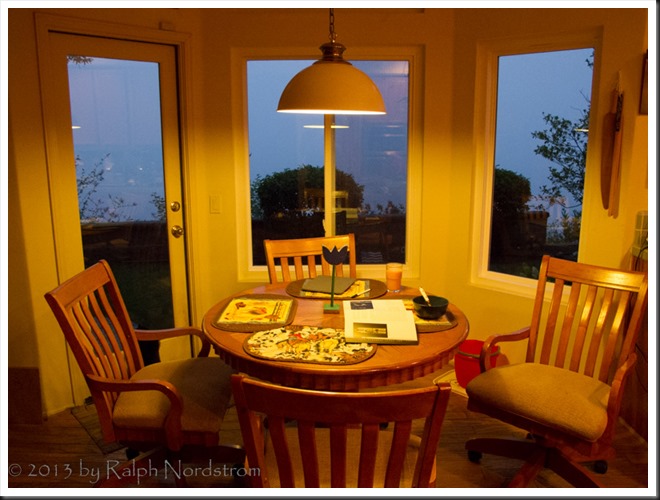
Our brains play tricks on us when it comes to color.  During twilight we don’t see that the light is a soft, delicate blue.  In fact, we don’t perceive any color cast at all.  But the camera is not fooled.  It sees what is actually there.  Take this image that I call ‘Breakfast’ as an example.

light-warm_and_cool

When drastically different light sources are set next to each other than our eyes can clearly see the difference in the colors.  In this photograph the interior of our home is illuminated by tungsten lights which give off a very warm color.  That’s why our homes feel so warm and cozy at night – because of the warm light emitted by tungsten lights.  (That will change as we replace the tungsten lights with CFLs or LED lights.)  Outside we have a foggy morning at twilight.  The sun is about 10 minutes away from rising.  And it’s clear the color of the outside light is blue.

If I was standing outside away from the warm tungsten light, my mind would trick me into thinking the light was not blue, just a neutral gray.  But the camera is not fooled.

So then why are we so easily fooled?  Because of perception.  Our brains receive input from all of our senses including our eyes.  And without us even being aware of it, this input is translated into something we are familiar with, concepts and generalizations we have learned from all the accumulated experiences of our lives.  And our brain overrides (manipulates if you will) the actual blue color of the outdoor light and we perceive it as neutral.

Our perceptions help us with everyday living.  They help to bring order to our lives from the endless bombardment of stimuli.  But perception interferes with the photographic process of seeing.  As far as day-to-day life is concerned we don’t need to see that the outdoor light is blue.  But as photographers, cultivating the ability to see beyond our perceptions opens up the world to us in ways we normally can’t even imagine.  And isn’t this what photography is all about?


Join the conversation, share your experiences, leave a comment.  We love to hear from you.  And if you know of someone else who might enjoy this article, please share it.

We do photography workshops.  Come on out and join us.  Click here to check us out.

You can also check out our photography.  Click here.

(1426)

Color Management Made Simple – From Camera to Computer

Read the second installment in a series of articles on Color Management – taking the image from the camera to your computer.

If Color Space can be described as a box of Crayons as we suggested in  Color Management Made Simple – Color Space,  what else do we need to know about Color Management?  Well, Color Management is essentially about getting the right colors – and here’s the most important word – consistently.

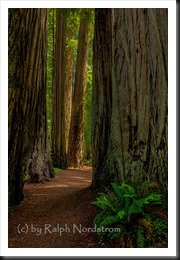
Let’s spend a few moments talking about the ‘right color.’  (I’m inclined to add, ‘whatever that is.’)  The story begins when you press the shutter.  Let’s suppose you are photographing the beautiful redwoods of Northern California.

redwoods_130528__SM36093_4_5_6_7-Edit

The scene is full of rich browns and oranges and vibrant greens.  We can say that these are the right colors, these are the colors you want.  You set up your camera and snap a picture and your sensor captures these colors, pretty much just as they are (the sensor is playing with pretty much the full big box of 120 Crayons). The camera’s processor does its thing and the image is saved in a file to your memory card.  Eventually we’re going to view the photograph on our computer’s monitor and we just might be a bit disappointed.

Continue reading “Color Management Made Simple – From Camera to Computer”

(1681)