Ansel Adams – The Making of 40 Photographs: El Capitan, Winter Sunrise

A continueing series in which I reflect on Ansel Adams’ book, “Examples – The Making of 40 Photographs.” In this post I talk about “El Capitan, Winter Sunrise.”

I’ve heard it said that many photographers believe there are no more photographs in Yosemite, that all the great ones have been taken.  And it’s true that the prime locations have been photographed again and again, sometimes with 50 or even 100 photographers all vying for their three square feet of ground in which to set up their tripods. 

It would appear the assumption is that if a particular location is photographed too many times, becomes too popular, it becomes a cliché.  I’ve succumbed to that point of view in the past.  There seems to be the faintest whiff of, “I’m too good to photograph something so common.  I’m able to find what no one else has never seen.”  I know; I kind of felt that way.

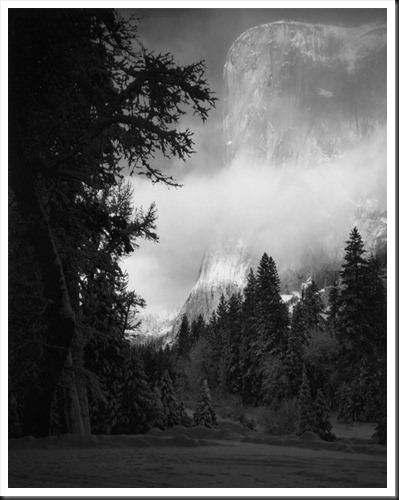
El Capitan, Winter Sunrise
Ansel Adams

Ansel Adams had something to say about that in connection with this photograph.

“A viewer once asked me about the values: ‘Don’t you think the trees are rather dark?’  Black and white photography gives us opportunity for value interpretation and control.  In this instance, were the trees lighter in value, the glow of the light on the cliff would, for me, be far less expressive.  Exposing for higher forest values  would have weakened the separation of the far brighter cliff and cloud values.  However, other photographers might well make quite different images.  I would not like anyone to think I believe this image to be the only one possible, but it fulfills my visualization at the time of exposure.  In an overpowering area such as Yosemite Valley it is difficult for anyone not to make photographs that appear derivative of past work.  The subjects are definite and recognizable, and the viewpoints are limited.  It is therefore all the more imperative to strive for individual and strong visualization.”

Adams’ comment gets to the heart, mind and soul of the artist.  There are two key concepts in his statement that, for me, define art.  The first is ‘interpretation. ’Black and white photography gives us opportunity for value Interpretation and control.”  I take from this that our photographs are interpretations of the subject.  After all, art is interpretation.  And, as artists, it is through interpretation that we share with our viewers our vision of the world.  We don’t document reality; we interpret or possibly even create reality.

The other concept that catches my attention is ‘individual … visualization.’  Adams speaks of his ‘visualization’ all the time.  And the reason we enjoy his photographs so much is because of his strong visualizations.  When he tripped the shutter he knew what effect he wanted to create with the image.  He knew what he wanted to convey in terms of what he was feeling and he knew how to do it, especially when he developed and refined the Zone System.

And it was his interpretations and visualizations that took a location that had been photographed time after time by many other photographers and turned it into something uniquely and identifiably his.

So stand on the bridge in Zion or line up to photograph Delicate Arch in Arches or join the throng at tunnel view in Yosemite.  You can make your photograph unique through your own strong vision and interpretation.


This is a continuing series based on my reading of Ansel Adams’ wonderful book, “Examples – The Making of 40 Photographs.”  It is exciting to read of his attitudes towards making photographs, the decisions he made and the techniques he employed and apply them to the issues that confront us today as digital landscape photographers.  I think those of us who ‘Photoshop’ our images for the sake of achieving our visualization can feel a comradeship with the master.  The question, “Did you manipulate that photograph?” will never go away as long as our medium is the camera.  Adams was also confronted with the same question.  For those of use that believe that the purpose of making a landscape photograph is to share with our audience our response to and our connection with the subject, the work is not done when we press the shutter, it’s just beginning.  And we can delight in photographing the cliché locations, time and time again, because we are creating our own individual statement, not creating ‘derivatives’ of others’ works.


If you enjoy these posts please feel free to share them on Facebook or Twitter, or email them to your friends.  And we would really enjoy hearing from you.  Join the conversation –  leave a comment.

Join me on an upcoming workshop.  Click here for more details.

To see more of my photographs click here.

WordPress Tags: Ansel,Adams,Capitan,Winter,Sunrise,Yosemite,assumption,location,times,cliché,whiff,connection,viewer,trees,Black,photography,interpretation,instance,cliff,separation,images,image,visualization,exposure,area,Valley,heart,soul,artist,statement,subject,viewers,vision,world,concept,attention,System,bridge,Zion,Delicate,Arch,series,Photoshop,comradeship,purpose,audience,response,locations,feet,tripods,subjects,viewpoints,concepts,interpretations,artists,Examples,attitudes,decisions,techniques,photographers,visualizations

(3110)

Ansel Adams – The Making of 40 Photographs: Lodgepole Pines

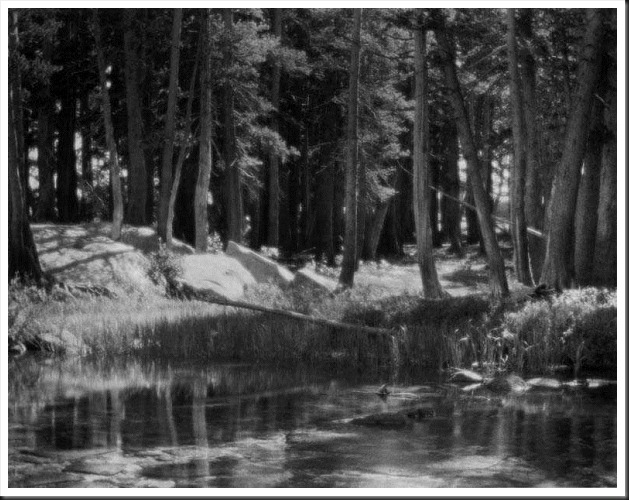
Another post in a continuing series based on Ansel Adams’ wonderful book, “Examples – The Making of 40 Photographs.” This post covers a photograph from his Pictorialist period – Lodgepole Pines.

AA24-Lodgepole_Pines

Lodgepole Pines (1921)

This Ansel Adams photograph has always stood out from the rest of his works.  It doesn’t have the usual crispness or drama that one normally expects.  Instead the focus is soft and the shadows are not full and rich.  It almost seems like it might have been created by another person.  And for that reason I find it all the more interesting.

It’s difficult to imagine the great Ansel Adams as an amateur, a novice photographer.  One normally associates him with a supremely confident master of his art, a pioneer of techniques, both technical and aesthetic, that we still use and revere today.  And this is certainly an accurate characterization.  But like all of us, he had to start somewhere.  We all go through a period where our art is in its formative stages, where we are discovering ourselves, our vision and our voice.  And this photograph was part of the process for Adams.

Continue reading “Ansel Adams – The Making of 40 Photographs: Lodgepole Pines”

(2905)

Ansel Adams – The Making of 40 Photographs: Frozen Lake and Cliffs

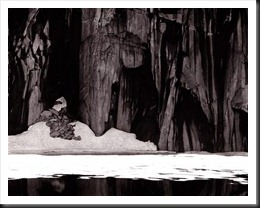
Explore with me Ansel Adam’s comments on the making of “Frozen Lake and Cliffs.”

It was in the  ‘70s when I was backpacking through the Kaweah Gap areas of the Sierra Nevada mountains.  We were two days out and came upon this lake.  I instantly recognized it from on of Ansel Adams that I particularly liked – Precipice Lake.  It was exciting and we spent the night there.

Frozen Lake and Cliffs (1932)

I’ve always been a fan of this Ansel Adams classic.   For me it has a feeling of immensity and majesty.  So it  has a special meaning to me reading about it in “Examples.”   A few things caught my attention in Adams’ narrative…

Continue reading “Ansel Adams – The Making of 40 Photographs: Frozen Lake and Cliffs”

(2135)

Ten Tips for Exciting Nighttime Photography

There is a growing interest in a new kind of nighttime photography.  Photographers have been taking photographs of the nighttime sky ever since film was invented.  These photographs were generally long exposures that show beautiful star trails.  But now they are taking clear, sharp images of the stars and planets literally stopped in their tracks.

Astronomers have always been taking photographs of the nighttime sky and their goal has always been to get sharp images of the stars.  To do that they rigged their powerful telescopes with very precise motor drives that slowly turned the telescopes at the same rate as the stars move overhead, effectively holding the stars motionless in the field of view.

But with the advent of digital cameras the notion of photographing the night sky as part of a broader landscape has become increasingly popular.  And it’s not just star trail images that photographers are capturing.  They are capturing spectacular images of the planets, constellations and even the Milky Way over well known features on earth.  Wally Pacholka is one of the best of this new breed of photographers and his work is an outstanding example of this genre of fine art photography.  Check out Wally’s incredible Top Ten Night Sky Images to see what I’m talking about.

Continue reading “Ten Tips for Exciting Nighttime Photography”

(9926)

HDR Tip #3

On exporting images from Lightroom to PhotoMatix.

In the previous tip we discussed adjustments you want to make to your images in Lightroom to prepare them for the HDR process to come.

This next tips covers the step where we get the images out of Lightroom.

Lightroom is a RAW image converter (among other things).  It does RAW image conversions extremely well.  Other great RAW image converters are available to us – Capture One, Aperture, and DxO to name a just few.  These are all highly sophisticated products that do an extraordinary job.

Continue reading “HDR Tip #3”

(861)

Mastering Exposure – Next Steps

On using the histogram to judge the quality of the exposure. Also discusses shadow and highlight clipping, the problems the create and how to avoid them.

In the first article on exposure (All You Ever Wanted to Know about Exposure) we discussed the exposure basics, the four variables you have to work with – the intensity of the light, the ISO setting, the f-stop and the shutter speed. We made the comparison of light with water. With this analogy, getting the proper exposure is the same as filling a glass of water (or whatever).  In this article we’ll take a closer look at the kinds of challenges we face getting the best exposure.  But first let’s take a quick review.

So, to quickly review, the sensor in a digital camera or the film in a traditional camera requires a specific amount of light to produce a proper exposure. The amount of light that is required depends on the sensitivity of the digital camera sensor or the film. Sensors or film with lesser sensitivity to light requires more light while those with greater sensitivity require less light. Sensitivity is measured by the ISO number regardless of whether we are dealing with film or a sensor. Lower numbers mean lower sensitivity The numbers start at 100, possibly even 50, and increase to 400, 800, 1600 and even higher. Each time the number doubles it requires exactly half the amount of light to make a proper exposure.

Aperture, or f/stop, is the amount of light that is let through the lens. This is controlled by a diaphragm similar to the pupils of our eyes. It can open to allow more light in or close to allow less light. Apertures are measured with a strange set of numbers like f/22, f/16, f/11, f/8, f/5.6, f/4, f/2.8. The numbering system goes backwards so that higher numbers admit less light. Adjacent numbers either double of half the amount of light coming admitted through the lens. In other words, f/4 admits twice the light as f/5.6.

The only other variable then is shutter speed, or the length of time light is allowed to pass though the shutter. Shutter speed is measured in fractions of a second such as 1/30, 1/60, 1/125, 1/250, 1/500, 1/000.

We have control of three of the four variable – ISO setting, f-stop and shutter speed. These are all adjusted to respond to the fourth variable – the intensity of the light. Success as a photographer starts with getting the correct exposure and these are the three things we can manipulate to do so.

Continue reading “Mastering Exposure – Next Steps”

(2488)