There’s no doubt that composition is one of the key elements of a successful image. You can have all the other factors of a great shot – fantastic light, optimum exposure and appropriate sharpness – but with a weak composition you have a weak photograph.
I know photographers that work slowly enough to work out the strongest composition before they press the shutter. I admire these people immensely. But I don’t work that way, especially in an area I’m unfamiliar with.
A short while ago I was driving south through Utah on beautiful highway 89 traveling between Bryce Canyon and Zion National Parks after wrapping up a successful photography workshop. I came upon a stand of cottonwood trees that were in full autumn splendor. I had to pull over.
I grabbed my point and shoot (Canon G11) and started scouting for photographs. I like to use the G11 for that, scouting for compositions that are worth the effort of setting up my big Canon. I found two compositions that were promising.
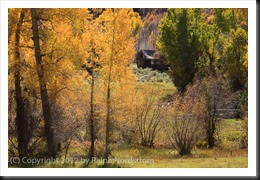
The second proved to be the most interesting, at least in terms of how the final composition evolved. Behind the cottonwoods was a meadow with a dilapidated shack. It was so Utah! I set up what I thought would be an interesting composition.
(Click on the images to enlarge them.)
I positioned my camera so that there would be a narrow opening to the meadow and the shack. It is a tight composition that draws the viewers eye to the shack which is placed in a very strong position within the frame. It has a feeling of depth with a strong foreground opening up to the shack in the background.
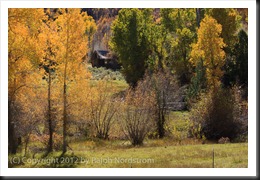
I was feeling good about this composition and then I noticed a glowing cottonwood just outside the frame to the right so I moved the camera a couple of feet to the right and created this image.
The golden cottonwoods on the left are balanced by the single, smaller cottonwood to the right. This arrangement has the effect of placing more emphasis on the autumnal trees. The eye makes three stops, first at the cottonwoods on the left, then to the right and finally works its way back to the shack in the back.
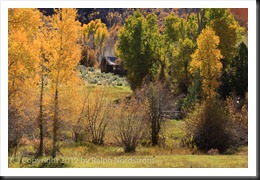
I was pretty pleased with these two compositions and thought I had something to work with when I got home. So I disassembled everything and put it back in my camera bag, collapsed the tripod and started back toward the car. I hadn’t gone 5 steps when I looked back up toward the shack and saw there was another blaze of cottonwoods right next to it. So I swung my backpack back down to the ground and set up again for this shot.
Now there are three sources of golden light for the eye to explore – the cottonwoods to the left, the one a little further back on the right and the ones way in the back by the shack. (Odd numbers of things are always good.) The image is well balanced and every element in it contributes to the entire impression.
There’s a story here, a story of living in this beautiful valley during a time that is gone and will probably never return. It must not have been an easy life but one of honest, hard work and the satisfaction of living in a place of such splendid beauty. We would do it differently today with more conveniences and comforts. And maybe, just maybe, miss out on the more intimate connection with Mother Earth that living in such a simple shack must have provided.
I’d be interested to hear which of the three compositions you like the most. Please leave a comment saying which one you like and why. It will make for a very interesting dialog.
If you enjoyed this post please feel free to Like it and share it with your friends. You can use the links at the top.
Join me on an upcoming workshop. Click here for more details.
To see more of my photographs click here.
WordPress Tags: Composition,Shot,image,exposure,area,Utah,highway,Bryce,Canyon,Zion,National,Parks,photography,workshop,trees,splendor,Canon,worth,effort,Behind,shack,Click,images,viewers,depth,foreground,background,arrangement,emphasis,tripod,steps,backpack,numbers,element,valley,life,satisfaction,conveniences,connection,Mother,Earth,factors,compositions,feet,cottonwood,cottonwoods,camera,three
(1294)

