Mastering Your Camera

There are only 12 skills you need to learn to master your camera. Check out what they are.

I’m not the only one that contends that mastering your camera is an important first step in mastering photography. You’ll see it in blog posts, articles and videos.

Let’s take a deeper, more detailed look at what it means to master your camera and show that it’s not an impossible task, as intimidating as it may seem when you first start.

It starts with the question, “What does a camera do?” The hundreds of pages in the camera’s user manual and a similar number of options in its menus make it look like mastering it is a massive if not impossible task.  It appears daunting, especially if you are not technically inclined.  But in reality, what you need the camera to do comes down to just two things – control the exposure and control sharpness. Let’s see what core skills are required to master these two things.

Control Exposure

The purpose of exposure control is to ensure the right amount of light enters the camera so that the sensor can record the image you are photographing.  You and the camera need to respond to both bright and dark scenes.  The exposure controls are what makes it possible to match the exposure to the kinds of lighting conditions you encounter.

Tell Me More About Exposure….

There are three variables that can be adjusted to respond to the amount of light in the scene – ISO, aperture and shutter speed. These three variables form the famous exposure triangle.

Tell Me More About the Exposure Triangle….

Continue reading “Mastering Your Camera”

(387)

Tell Me More About Exposure Compensation

An explanation of how exposure compensation works and when to use it.

What Is Exposure Compensation and How Does It Work?

Cameras do a pretty good job of determining a proper exposure for the scene you are about to shoot. But they don’t always get it right. Sometimes the image is overexposed and other times it is underexposed.

Tell Me More About Exposure….

When this happens, you need to override the exposure determined by the camera. If you are shooting in aperture priority or shutter priority mode, you can’t do this by adjusting the aperture or shutter speed because the camera will compensate for the change by adjusting the other setting and you get the same exposure.

For example, if you are shooting aperture priority and the aperture is set to f/5.6 (with ISO 100), the camera may set the shutter speed at 1/125 of a second. If you need to darken the image by one stop and change the aperture to f/8, the camera will compensate for the reduced brightness by changing the shutter speed to 1/60 of a second. You get the same exposure.

But you can override the camera’s exposure settings by using Exposure Compensation. You can either increase or decrease the exposure and the camera will then alter its settings to either over or underexpose the image by the amount you specified.

To use the same example as above, to darken the image by one stop you would set the Exposure Compensation to -1.0. You are shooting in aperture priority mode so the camera will adjust the shutter speed. Instead of the original shutter speed of 1/125 of a second it will reduce the shutter speed by one stop to 1/250 of a second, causing the exposure to be reduced by one stop.

Exposure compensation works well when shooting in aperture or shutter priority. When shooting in manual mode you are responsible for over or underexposing the image as needed.

Exposure compensation does not work in Auto mode.

Finding the Control

Different camera manufactures have their own ways of applying exposure compensation. This may even change from of the manufacturer’s model to another.

Consult your camera’s manual to learn how to use it.


Join me on an exciting workshop. Click here to see what’s available.

Read more:

Tell Me More About Exposure
Tell Me More About ISO
Tell Me More About Aperture
Tell Me More About Shutter Speed
Tell Me More About the Exposure Triangle

(40)

Photo Tips – Getting Great Exposures the Easy Way

Always shooting in Automatic mode? Here’s an easy way to improve your photographs without having to bother with all the technical details.

If you’re a person who’s interested in just taking pictures and don’t want to be bothered with all the technical details, you are probably photographing with your camera set to automatic mode. Often times automatic mode is indicated by a green box. Probably the handiest feature of automatic mode is that the camera makes all the decisions for you. All you have to think about is getting the people you’re photographing in the frame and pressing the shutter. The camera does everything else.

But the problem is that the camera doesn’t always get it right. Often times it will overexpose parts of the image making them look washed out. But there’s a simple way to avoid this without mastering all the complicated technical details of shooting in manual mode. And that is P mode.

Using P Mode

The P and P mode stands for Programmed Automatic. In P mode the camera allows you to make some of the decisions while it makes the rest. You get to choose whether or not to use flash, and set the ISO, exposure compensation and white balance. The camera sets the f-stop and shutter speed.

Let’s take these controls one by one. Let’s start with flash. You can decide whether you want to use flash or not. If you’re shooting in bright daylight or even on a cloudy day you probably don’t need flash. But if it’s a little darker you can always choose to turn the flash on. If you don’t know how to turn your flash on or off you’ll need to consult your camera’s manual.

home_140907_IMG_9704-6 Continue reading “Photo Tips – Getting Great Exposures the Easy Way”

(1997)

Mastering Exposure – Expose to the Right

Expose to the Right – put it to the test by creating and comparing actual images.

Over the years there has been a lot of interest in the concept of ‘Expose to the right.’  This is something that is commonly done in digital photography where you intentionally overexpose an image.  The idea is that in digital images there is more information to work with in the brighter tonalities than there is in the darker.  And this will give you more to work with in the darkroom (Lightroom and Photoshop) which will result in a better image.

I’ve written several posts on this topic and if the concept is new to you please read these.  I’m not going to go into the theory here; that is spelled out in these posts.

Lightroom Tutorial – Expose to the Right

Expose to the right – Revisited

Now, I understand the theory.  I’m a computer guy; I had better understand it.  But I’ve always wondered if the promise of a better image actually worked out in real life.  So I did a test during our recent workshop to Big Sur.

Continue reading “Mastering Exposure – Expose to the Right”

(2299)

Mastering Exposure–Everyday Photography

This tip shows an easy way to get more exciting photographs from your point and shoot camera.

I talked to a lot of people at the Joshua Tree Art Festival this past weekend, sharing with them a little tip about getting better photographs from their point and shoot cameras.

In fact, this tip can apply to any digital camera for those times when you don’t want to have to pay close attention to the camera settings.  You may just want to shoot and have the confidence you’ll get decent photographs.

So this tip is very handy in that it will result in pictures with better colors and greater, more interesting contrast.  And it can be achieved in three simple steps.

Camera Mode
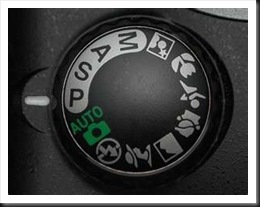
program_mode_settingOur cameras all have different shooting modes.  Many people I talk to use Auto pretty much all the time.  This is the mode where the camera takes care of everything.  In other words, it makes all the decisions.

The first simple change is to switch from whatever mode you’re using to P (for Program mode) as illustrated here.  This returns control of some key functions back to you, the photographer.    The camera will still set the aperture and shutter speed based on the light conditions.  But you gain access to some key corrections that will result in better pictures.

Exposure Compensation

The second change is exposure compensation.  This is the technique of either increasing or decreasing the exposure that the camera determined without resorting to setting the exposure manually.  In other words, you can still let the camera determine the exposure (as it does in P mode) but then tell it to decrease the exposure a certain amount.

expcompiconNot all cameras have this capability but if your camera is one that does there will be a button or dial with this symbol somewhere on the camera.  Or there will be an exposure compensation menu option.  It indicates that you can refine the exposure by increasing or decreasing it.  In other words, it allows you to slightly over expose (or lighten) the image or underexpose (or darken) the image.  Here’s how it works.

The camera determines the exposure using its built in light meter.  It generally does a pretty good job but it has certain limitations.  The exposures it determines may overexpose the image ever so slightly, resulting in pale colors.  So if we slightly underexpose our  photographs they will gain a richness of color that is very pleasing.

expscaleI recommend we use –1/2 to –2/3 stop exposure compensation.  That is to say, we tell the camera to decrease the exposure by 1/2 or 2/3’s of a stop.  Your camera will display a scale similar to this one that will show the amount of exposure compensation.  On the minus side, 1 means decreasing the exposure or darkening the image by one stop.  Two means the exposure is decreased and the image is darkened by two stops.  The positive side increases or brightens the image by one and two stops respectively.

If your camera is set up to adjust exposure by half stop increments there will be one dot between the numbers as in this illustration.  If it is set up to adjust exposure by one third stop increments there will be two dots.  I prefer to set my camera to adjust exposure by 1/3 stop increments.  And then I set my exposure compensation to –2/3 stops.

You may need to check your camera’s manual to determine exactly how to set your camera’s exposure increments and how to do exposure compensation.

Auto ISO

The third change is to set your ISO setting on Automatic.  ISO refers to the sensitivity of the camera’s sensor which in turn affects the amount of light required to produce a correct exposure.  The greater the sensitivity, the less light is required.  Increasing the ISO increases the sensor’s sensitivity.  So an ISO of 100 has low sensitivity and requires more light for a correct exposure.  An ISO of 400 has much higher sensitivity and therefore requires much less light for a correct exposure.

Cameras produce the highest quality images at low ISOs.  And when the ISO is set on Auto the camera will automatically select the lowest possible setting to give you the highest quality image in the prevailing light conditions.

As with exposure compensation, you may need to consult your camera’s manual to determine exactly how to do this.

I use these settings myself on my Canon point and shoot (G11), the camera I take with me everywhere I go.  When I’m doing casual shooting or even scouting for ‘serious’ photograph locations I’ll use the G11 configured in this way.  In times like these I don’t want to be focusing on exposure settings, ISO and all the other things I think about when shooting my big Canon.  I want to focus on the image and the compositional possibilities.  And these settings allow me to do that and still capture high quality images.

So, try them for yourself and see if you like them.  Set up your camera in this way and shoot some photographs.  I think you’ll be pleased with the results.

Join me on an upcoming workshop.  Click here for more details.

To see more of my photographs click here.

(1802)

A Ten-Step Program for Grad ND Filters

I have a couple of Lee graduated neutral density filters in my camera bag.  I don’t use them very much because I’m kind of an HDR guy.  But the past couple of mornings we’ve had some very clear sunrises and given the location of our home in the Southern California foothills this turned out to be a good opportunity to play around with my grad ND filters.

I discovered a few very interesting things.  I’m just going to provide a checklist here without any illustrations.  Hopefully it will make sense.

Continue reading “A Ten-Step Program for Grad ND Filters”

(2305)