Focus Stacking in Joshua Tree National Park

As part of the Desert Institute class I was teaching in Joshua Tree National Park, we did a sunset at the end of the second day at the trailhead parking log for Ryan Mountain.  Across the road one of the participants found a composition that I liked a lot, so we talked about the possibilities.  He ended up with a nice photograph and moved on.  I spent a little more time on it because I saw that there was a depth of field problem that needed to be resolved.

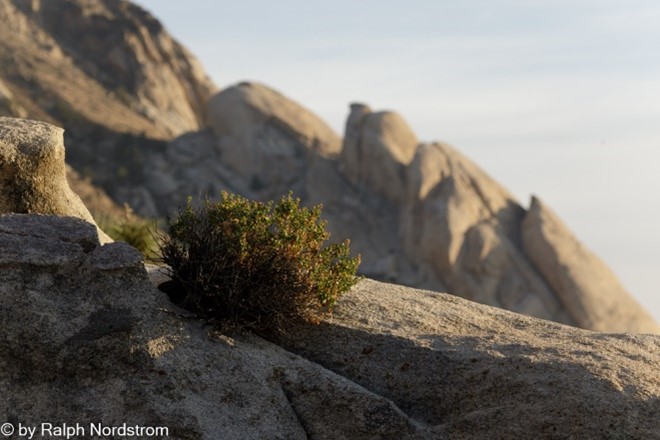
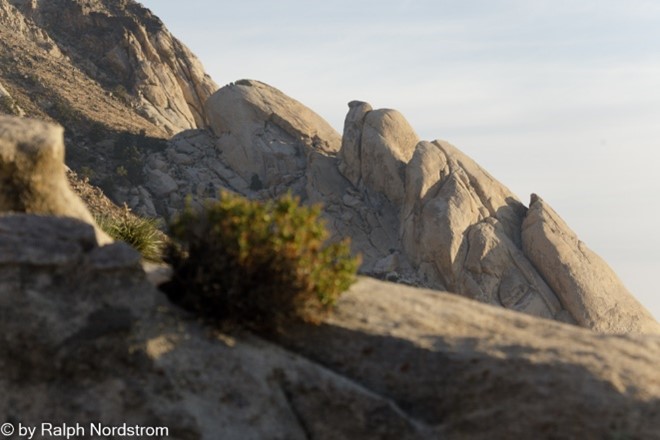
The foreground was about 20 feet from the camera and the background was a least a quarter of a mile away.  At a focal length of 190 mm there was no way I could get that depth of field even with an aperture of f/32.  So, as you can see below, I did two shots, one focused on the bush in the foreground and the second focused on the outcrops in the background.  The plan was to use focus stacking to get a sharp image throughout.

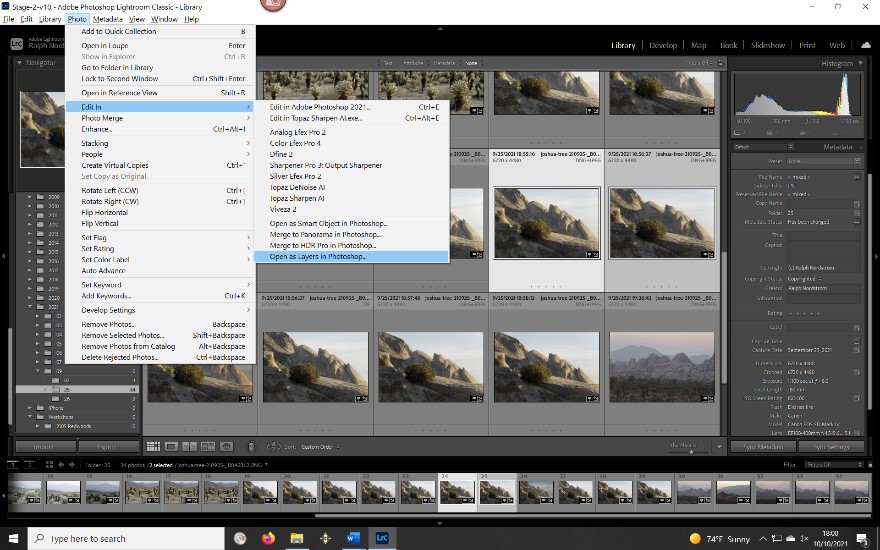
Photoshop does an excellent job of focus stacking.  To get it started, I selected the two files in Lightroom and clicked Open as Layers in Photoshop… from the Photo menu.

Lightroom converts the DNG files to Tiffs and loads them into Photoshop where they are stacked as two layers, one on top of the other.

In Photoshop, select both layers and in the Edit menu first click Auto-Align Layers… and then Auto-Blend Layers…. It’s that easy.

Continue reading “Focus Stacking in Joshua Tree National Park”

(177)

Making a Photograph – Taking Flight

Follow all the decisions and resulting adjustments that went into the making of an expressive landscape photograph using Lightroom Classic.

A Desert Scene

clip_image002

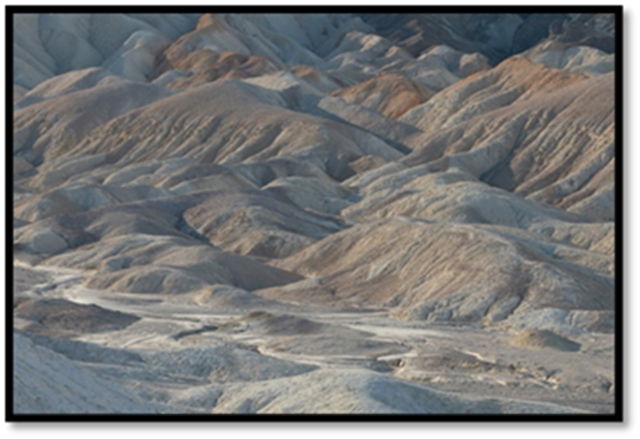
This image was taken in 20 Mule Team Canyon in Death Valley National Park. I was particularly excited about this when I saw it in the field. I was fascinated by the meandering dry stream bead that worked its way across the scene. The ever-present salt in Death Valley stood out white against the soft warm colors of the badlands behind it.

But there were several additional things that excited me. The badlands behind the stream bed also fascinated me and made the experience even richer. It is a concentration of diagonal lines, textures and forms. And the light, while the sun is fairly high in the morning sky, still crosses the badlands at an angle that accentuates its shadows. I intentionally clip_image005overexposed the image 2/3 of a stop to be sure to capture shadow detail and that’s why it looks washed out.

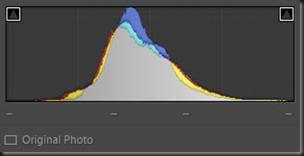
The histogram shows no particular challenges. There is no highlight or shadow clipping. You can see from the thin tail that moves towards the right edge, which was caused by the white salt, doesn’t quite touch it. If I had increased the exposure even a third of a stop more, there would have had highlight clipping on the salt.

Continue reading “Making a Photograph – Taking Flight”

(129)

“What Was He Thinking?”

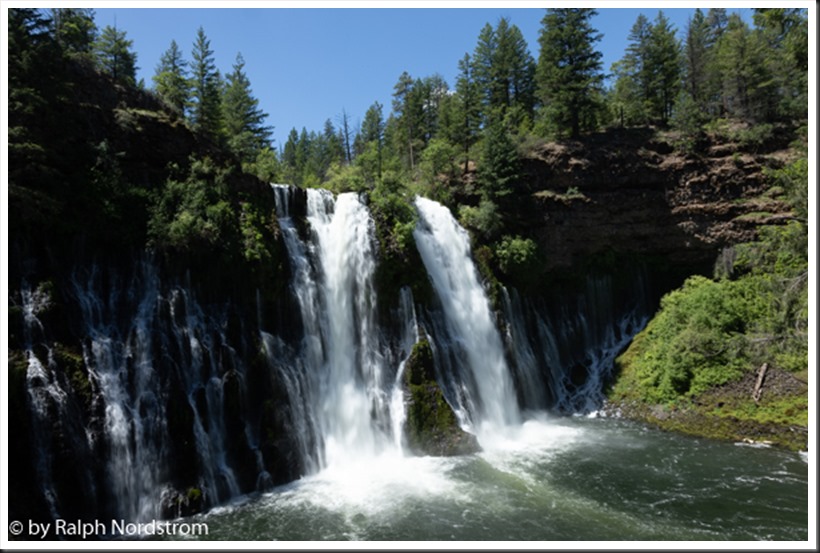
Capturing the essence of Burney Falls. Turning what the camera saw into what the photographer saw.

Burney Falls

“What was he thinking? What kind of picture is that? It’s not very good.”

I had heard about Burney Falls at MacArthur-Burney Falls Memorial State Park for some time. It sounded intriguing. Located in Shasta County in Northern California I wanted to see what Teddy Roosevelt called “the Eighth Wonder of the World.” Continue reading ““What Was He Thinking?””

(416)

Why Lightroom?

A brief rundown on the strengths and weaknesses of Lightroom

I remember when I first tried to process RAW files back in 2002.  I had been shooting JPEG up to that point and heard about RAW files, so I thought I’d give it a try.  I used the only RAW conversion program available to me at the time – Camera RAW in Photoshop 7.1.  It didn’t go well.  I couldn’t figure it out, so I continued to shoot in JPEG. 

Then I heard about a product called RawShooter from a Danish company – Pixmantec.  It had just become available and it was free.  With nothing to lose I downloaded it and checked it out.  It was fantastic.  It was so easy to use.  When the company offered the paid version, RawShooter Premium, I was all in.

Then, on June 26, 2006, Adobe announced they had purchased the ‘technology assets’ of Pixmantec for incorporation into Lightroom which was in the third round of beta testing at the time.  Version 1 was shipped in February of 2007 and us Pixmantec customers were grandfathered in.  With RawShooter Premium no longer available and a free version of Lightroom 1, I switched to it and was pleased to see some of the functionality in RawShooter Premium that I especially liked appear in Lightroom 1 that hadn’t been in any of the beta versions. 

Michael Reichman of Luminous Landscape and Jeff Shewe in the Photoshop Hall of Fame put together a video training course which I grabbed up right away.  And my experience with Lightroom was off to an excellent start.

A Brief History

Lightroom was designed from the start for digital photographers.  The core functionality was to be RAW image conversion.  But digital photographers need a lot more than just that. They needed to be able to organize their image files, edit them, categorize them, tag them, export them, print them and more.  In short, professional digital photographers needed to be able to run all aspects of the creative side of their businesses using Lightroom.  It’s tempting to think of Lightroom as a tool to adjust and enhance our images but as you can see, it’s so much more.

The Heart of Lightroom – the Catalog

With the introduction of layers in Photoshop, the notion of non-destructive enhancements was introduced.  The idea is that the original image is priceless and if adjustments change it and they don’t work out, you’re in trouble.  You can’t start over again.  So, Photoshop introduced layers.  Virtually all of the adjustments you could apply to the original file could be applied in layers stacked one on top of the other.

To give the photographer the ability to make adjustments non-destructively, Lightroom took a different approach.  The developers created a catalog that is at the heart of Lightroom.  Understanding how the catalog works is key to getting the most out of Lightroom.

Simply put, the catalog keeps track of virtually everything about the image files.  First, it knows the location of the file – the hard drive it is on and the folder it is in.  When Lightroom creates a JPEG preview file that it uses when it displays the image on your monitor, the catalog knows the name of the preview file and where it is. If you use the star method of ranking files or you flag them or assign a color to them, all that data is kept in the catalog. 

And when you make adjustments such as Exposure or Contrast or Highlights or Saturation or any of the other available adjustments, every one of them are kept in the catalog as a simple list.  This gives you a full history of all of the adjustments.  If you decide to start over, since the original RAW file hasn’t been changed, you can keep the original list and create a new list.  This gives you the ability to try different approaches for an image.  And the original RAW file remains unchanged.

Continue reading “Why Lightroom?”

(125)

The Qualities of a Powerful Landscape Photograph

When working on a photograph and wondering where to start, it’s helpful to know what is possible.

I think we all understand that serious landscape photography does not document nature but interprets it.  A well-made landscape photograph captures the photographer’s response to what was experienced and is able to convey this response to the viewer.

The Professional Photographers Association has 12 criteria by which they judge their competitions.  Granted, the PPA membership consists of very few fine art landscape photographers but still, the criteria of a great photograph are pretty much the same.

Here are the twelve criteria (the order is my own):

1.    Impact

2.    Composition

3.    Center of Interest

4.    Lighting

5.    Color Balance

6.    Technical Excellence

7.    Story Telling

8.    Creativity

9.    Style

10.  Presentation

11.  Subject Matter

12.  Technique

I mention these because there’s a lot that goes in to making a great photograph and these criteria provide a framework in knowing what to look for.  But rather that exploring these criteria in words, let’s look at a few photographs.  And let’s do it by looking at two examples of the same image – what it looked like when it came out of the camera and what it became when transformed in the digital darkroom.

Image 1

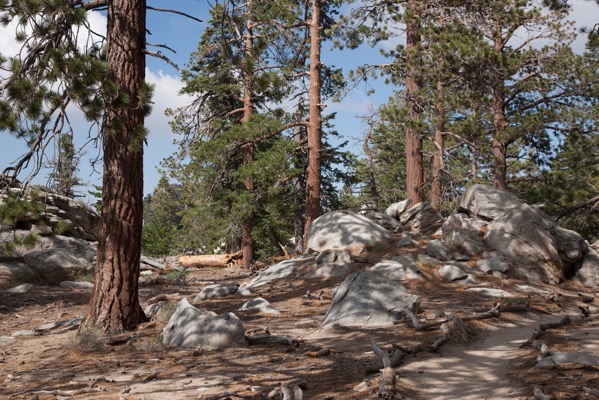
The first image is a scene in the mountains of Southern California.  I was wondering by myself along a remote trail.  The sun was sinking lower and lower in the sky and I was thrilled climbing the trails and walking among the trees and rocks.  I came upon this scene and it just felt right.  I had to capture it.

San jacinto 180720 SM37804

The mid-afternoon light is actually quite nice.  It’s not spectacular but it’s very pleasant and doesn’t pose any exposure challenges. The shadows make for interesting patterns on the forest floor.  And I tried for a composition that captured the energy and harmony I was feeling while at the same time portraying the stately strength of the trees.  And the center of interest is the rocks that form a sort of path that leads up to the trees on the right.  The trail leads out of the frame on the right, inviting the viewer to explore what lies beyond.

It’s a very nice picture but now it’s time to make it even nicer.  An effective way to add impact is to increase the contrast.  (This will be a recurring theme.) The shadows can be darkened along with the midtones.  Care is taken, however, to not lose detail in the shadows.  You also have to be careful with the clouds.  They have more detail that the RAW image doesn’t show, detail that can be coaxed out.

Continue reading “The Qualities of a Powerful Landscape Photograph”

(197)

Why Do I Need an HDR App when Lightroom Has It?

Lightroom is good for basic HDR but for full creative control, HDR applications have an important role to play.

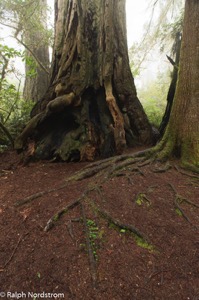
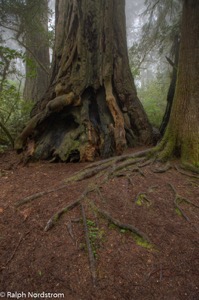
I was recently in the redwoods of Northern California.  One of the groves I love is the Lady Bird Johnson Grove in Prairie Creek State Park.  In it is a Western hemlock growing next to a massive redwood.  The hemlock’s roots spread out across the ground, making an interesting and photo-worthy pattern.  I’ve photographed it a number of times in the past but never liked what I got.

This year was different.  I finally saw a composition that excited me.  The sky was overcast and a bright mist hung in the forest.  I knew I was going to have a dynamic range problem so I shot HDR – 5 shots bracketed 1 1/3 stops.

I knew I was going to have a dynamic range problem so I shot HDR….

I was eager to see what it looked like so when I got back to my hotel room I ran it through the Lightroom HDR.  One thing about the Lightroom HDR feature is that it is convenient, quick and creates a DNG file.  But its drawback is that you don’t have a lot of control.  Besides alignment and de-ghosting, you have the Auto function, the same Auto found in the Basic group in Lightroom.  That’s it.

I ran my five files through Lightroom HDR, but the results were disappointing.  The foreground was rendered well but the forest in the background was blown out.   I tried my best to recover what I could, but it was too far gone.  Another year gone by and I still don’t have this photograph.

Redwoods 180522 SM37414 HDR

It wasn’t until sometime later that I was browsing my redwood images and came across this shot.  I decided to have another go at it but this time using my tried and true Photomatix Pro 6.0.  I’ve been using Photomatix Pro since version 1 and it has always produced for me.  Photomatix Pro is extremely versatile, giving the photographer a wide range of expressions from natural to surreal.  And with over 40 presets, it’s easy to find one that is very close to what you’re looking for.  I always prefer the more natural look.

An image that I thought was lost came back to life with Photomatix Pro.

I imported the five files, selected one of the more natural presents and what a difference.  An image that I thought was lost came back to life with Photomatix Pro.  Not only was the foreground beautifully rendered but so was the background.  A few small tweaks and the photograph was ready for the rest of the workflow.

Redwoods 180522 SM37414 5 6 7 8 Enhancer

I finished my normal workflow by completing the Lightroom adjustments once Photomatix Pro had imported the TIFF file back into the Lightroom catalog.  That was followed by the fine tuning I always do in Photoshop.

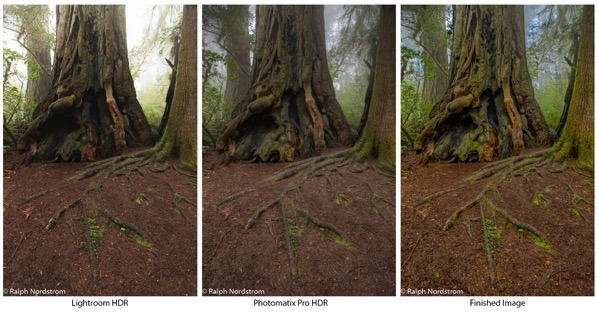
I thought you might like to see the HDR outputs from Lightroom and Photomatix Pro along with the finished photograph side-by-side.

Redwoods hdr comparison

Lightroom HDR still has a role to play for me.  When I’ve just uploaded my files from a shoot and am browsing through them to select the ones I want to work on, I find the Lightroom HDR very handy to get a sense of if I’ve captured the dynamic range or not.  But if I later decide I want to print the image and add it to my portfolio I’ll redo the HDR blending in Photomatix Pro where I have so much more control.  Lightroom HDR doesn’t come close to providing the artistic control that I need.  Photomatix Pro continues to fill that gap and remains an essential tool in my HDR workflow.

You can see for yourself and give Photomatix Pro a spin by downloading a trial version from their website.

(34)

Making a Photograph – Sheep Pass Morning (2016)

The making of a photograph of monrning in Joshua Tree National Park.

When you get up early and leave at 4:30 in the morning for a sunrise shoot there are no guarantees. You pick a location that has potential and, by getting out so early, you up the potential for great light.  It might, and then it might not happen.  But you’re out there anyway.

When you arrive, the desert is still dark. You stand by your car, talking quietly with friends, sipping hot coffee and watching the emerging light on the eastern horizon. There is a sense of eagerness balanced with patience. Often, however, just being there is its own reward and coming home with a keeper is icing on the cake.

The earth brightens quickly this time of day and soon you grab your gear and head out into the desert. For me, just wandering and not looking for anything in particular is the best approach.

I prefer to let images come to me rather than hunting them down. When something I see stops me in my tracks, these turn out to be the best photographs. It’s not because I’m searching for leading lines or applying the rule of thirds or any other of the many ‘rules’ of composition. I don’t like to think when I’m photographing; I prefer to become quiet and simply experience. And when I’m in that state of mind I stop in my tracks because it just feels right. And the stop is usually followed closely by an utterance of surprise and joy – “Oh Wow!”.

Such was the case with “Sheep Pass Morning.” The morning shoot was winding down, meaning the sunrise had come and gone and the wonderful golden hour light was quickly fading. I wandered aimlessly and “Boom,” there it was. I was excited. This just felt right.  And yes, I did say, “Oh wow!”

I set up my camera and composed the shot. I was conscious of the cluster of rocks in the lower right corner and their relationship with the Joshua trees on the right edge. I was conscious of outcrop of rocks on the left, the mountain range in the background (Queen Mountain) and the clouds. All these elements were in my mind but mostly I was seeking balance and harmony. During that time, distant Queen mountain into shadow so I waited for the light to came back, cheering it along. Then the moment came and I tripped the shutter.

Continue reading “Making a Photograph – Sheep Pass Morning (2016)”

(144)

Sleeklens Lightroom Workflow Review

Use Lightroom presets and brushes from Sleeklens to enhance your creativity and improve your images.

Sleeklens is a company with a concept that is not new in the Adobe Lightroom world – providing presets to help us in processing our photographs. I’ve always shied away from using presets, just like I rarely if ever use the Auto tone adjustment built into Lightroom. I’ve always felt that I prefer making all the decisions myself rather than letting the computer make them in the case of Lightroom Auto tone or a designer make them in the case of presets.

But I recently received an evaluation copy of one of the Sleeklens presets workflows and have been using them on several photographs I’m working on. Sleeklens has a variety of presets for different purposes. The collection I received is titled ‘Through the Woods Workflow.’

Content

Through the Woods Workflow consists of forty-seven presets and twenty-nine brushes.

Presets

The Presets are global adjustments, affecting the entire image. Once installed they are in their own folder in the Presets area of the Development module screen. The presets are applied just like any other preset – namely, clicking on them.

The presets are organized into seven groups – All in One, Base, Exposure, Color Correction, Tone/Tint, Polish and Vignette. The All in One presets can affect the Basic, Tone Curve, HSL and Split Toning adjustment groups. Base mostly affects the Basic adjustments and occasionally the Tone Curve. One Base preset affects HSL and Split Toning. Exposure sets either Basic or Tone Curve. Color Correction adjustments are applied to HSL. Tone/Tint plays with Vibrance and Split Toning. Polish mostly adjusts Basic. And Vignette sets Post-Crop Vignetting in Effects. One thing that is missing is settings that utilize the new Dehaze adjustment in Effects.

Brushes

The brushes are used with the Adjustment Brush, Graduated Filter or Radial Filter. There are five groups – Basics, Color, Effects, Haze and Light. The brushes are applied by selecting the effect and painting with the Adjustment Brush or creating the Graduated or Radial Filter. Continue reading “Sleeklens Lightroom Workflow Review”

(1146)

Making a Photograph – A New Approach to Tonality Adjustments

Watch as a photograph of an icon of Zion National Park is made.

For some time now I’ve been using and teaching a process of working on photographs in Lightroom. It consists of basically four steps: manual adjustments, tonality adjustments, hue adjustments and finally saturation adjustments. Quite some time ago I had the brilliant idea of converting the image to black and white before doing the tonality adjustments. The technique I used was the B & W tab in Lightroom’s HSL group.  Once the tonality adjustments were done, the image would be converted back to color and the process continue.

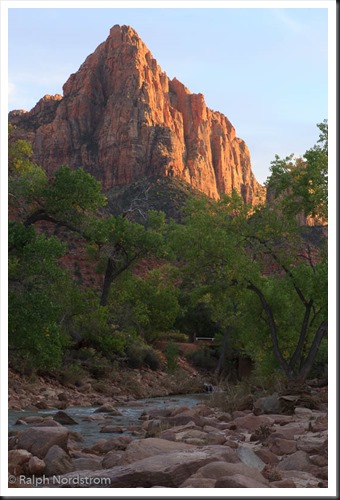
It didn’t work out because when I converted the image back to color, the colors were so oversaturated and unnatural that the image looked horrible. It was just easier to do the tonality adjustments on the color image. So I quickly gave up on that technique. But the other day I was reading an article in Popular Photography magazine that rekindled this idea. It took a different approach. It turned the image to black and white by setting the Saturation adjustment to -100. Now the author did this in the middle of the process but I thought that if I applied this to my process and did that at the start it just might work. So I was eager to give it a try. Let’s try it with this image of the Watchman in Zion National Park.

utah_141010__SM32783 This is the original raw file. I haven’t done anything to it yet. It doesn’t need any mechanical adjustments. These consist of removing spots, straightening the image, maybe some noise reduction and the final crop. But since none of these are required we can move on to the tonality adjustments.


Continue reading “Making a Photograph – A New Approach to Tonality Adjustments”

(4930)