Creating Images with Impact – Black Point

Add Impact to your Images by setting a black point. Here’s the how and why.

In this series of blog posts were talking about how to create Images with Impact. You know what I’m talking about. These are those images that really grab our attention, that capture our imaginations. There’s something special about them and it doesn’t have to be a mystery how they are created. There are a few simple techniques that you can use in Lightroom and Photoshop to add impact to your images. Now if you don’t use Photoshop, you can still do everything were talking about in Lightroom.

In the first article we talked about utilizing the full dynamic range of your medium. This is something Ansel Adams taught in his books and classes that was an essential element of his stunning landscape photographs. As he developed his technique which became known as the Zone System, the primary goal was to use the full dynamic range of his medium which, in his case, was the black and white print.

So we talked about that technique first because it is the most appropriate place to start. I do want to add that in color photography or color prints not every print benefits from a white point but virtually all prints benefit from a black point – which is what we want to talk about in this article.

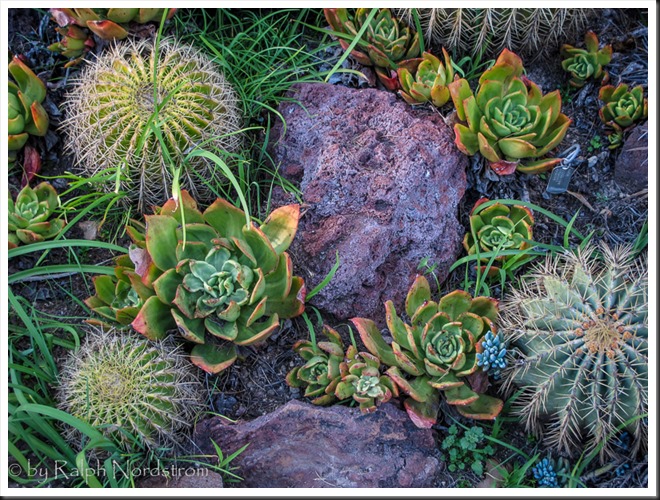
IMG_0012-2

What exactly is a black point? It is small portions of the print that are pure black. If you’re printing on paper than these are small portions that are the blackest black that the combination of paper and ink can achieve. As a side note, different combinations of paper and ink achieve different levels of blackness. But regardless of the combination you use, the blackest black that can be achieved is your black point.

You want to keep the black point areas very, very small because they have no detail. And generally speaking we like to see detail in our shadows, another guideline that I picked up from studying Ansel Adams. But you don’t want to eliminate black points, that is, in most cases. There are a few exceptions to this rule that I will talk about later.

Let’s take a look at the before and after images of our photograph. I shot this at the Huntington Library in South Pasadena a few weeks ago. It’s in their incredible cactus garden – endlessly fascinating.

Continue reading “Creating Images with Impact – Black Point”

(8353)

Creating Images with Impact – Dynamic Range of the Medium

The pros create dramatic photographs, images with impact. You can add impact to your images too using these simple Lightroom techniques.

We’ve all seen those photographs that stop us in our tracks, that inspire us, that speak to us. Some photographs seem to have a special power, a special presence. Often times we hear ourselves saying, “Wow.” They have qualities that make them stand apart from other photographs. These are images with impact.

The masters of landscape photography seem to have the ability to capture a special quality of light in their photographs. It doesn’t matter whether they use film or shoot digital, their images stand out.

There are certain things about these images that do more than just appeal to us – we are drawn into to them. They capture our imaginations, stir our interests and perhaps show us moments in nature we could only hope to experience. We want to linger with them, explore them, take them in, get lost in them.

Without a doubt these photographs have compositions that are very strong, are bathed in fantastic light and have technical qualities of exposure and sharpness that are perfect. These are all decisions that the artist makes in the field, decisions that are critical to a strong image.

In the days of film, a good portion of the magic was done in the darkroom. That’s where their genius really became apparent. And it hasn’t changed today. We don’t actually have dark rooms to work in, closed rooms with the strange array of mysterious orders and the soft, dim yellow lighting. Today we have powerful software running on even more powerful computers. But really, how is that different from what the film Masters did in the darkroom? I don’t believe it is. I can’t think of anything that’s been done with “Photoshopped” photographs that hasn’t already been done in the darkroom. It’s probably a lot easier to do it in Photoshop but in the end, both the chemical darkroom and the electronic darkroom serve the same end, that being creating those “Wow” images.

In this series of posts I want to spend more time considering some techniques you can apply in the darkroom that will add impact to your images.

Use the Full Dynamic Range of Your Medium

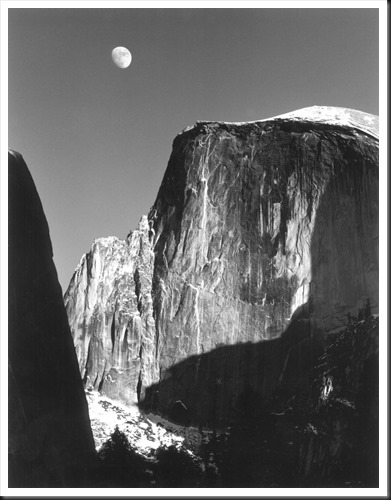
The first darkroom technique I would like to discuss is the importance of using the full dynamic range of your medium. This is not something new. When Ansel Adams developed the zone system it was precisely for this purpose – to use the full dynamic range of the black and white negative and ultimately the black and white print. But what exactly does it mean to use the full dynamic range of the medium. Let me illustrate with an Ansel Adams image I have loved for many years, one I’m privileged to be able to live with in my home – “Moon and Half Dome.”

Adams-moon-and-half-dome-1960

In this exquisite photograph if you are able to examine an original closely you will notice that the shadow on the left may look like it is totally black but actually there is subtle detail. However, there are some very small areas that are pure black. Also, the moon and the bright parts of Half Dome may look like they are pure white but a closer look will reveal detail in these areas also. This photograph takes full advantage of the full dynamic range of the paper, from the blackest black to the whitest white.

Continue reading “Creating Images with Impact – Dynamic Range of the Medium”

(4737)

How to Photograph the Coastal Redwoods

The Coastal Redwoods of Northern California have a beauty that is inspiring. But capturing them in a photograph is much harder than it may seem. Come with me to explore ways to capture their grandeur.

California is blessed with two species of redwoods, the Giant Sequoia (Sequoia giganteum) of the Sierra Nevada Mountains and the Coastal Redwoods (Sequoia semperverins) along the California coast from the Oregon border to 150 miles south of San Francisco.  These awe-inspiring trees are both a joy and a challenge to photograph.  I recently spent a week in Crescent City in Northern California photographing the Coastal Redwoods and leading a photography workshop there.  I’d like to pass along some of the techniques we employed to capture photographs that do these majestic trees justice in breathtaking but often very difficult light.

Continue reading “How to Photograph the Coastal Redwoods”

(7864)

The Making of a Photograph – Clearing Storm, West Temple 2012

A clearing storm in beautiful Zion Naitonal Park contributes to an exciting photogrpah of the West Temple. Read how this photograph was created.

As I drive across the Mojave Desert late one Thursday night not long ago, heading north on I-15, I have a sense of harmony, of unity with the night, the highway, my car.  The pavement ahead eases into the beam of my headlights, grows brighter as it draws closer and then slips back into darkness as it slides underneath.  Nights like this are a joy.  I’m in a groove, a state of calm serenity and anticipation.  Tomorrow I’ll be returning to Zion National Park, something I always look forward to.  I didn’t notice the faint flashes of light.

Powerful thunderstorms were roiling over eastern California and southern Nevada that night, The dark clouds glowed with flickers of light and precious water dropped on the parched desert.  it was a huge storm and I was chasing it.  Approaching the state line the casino lights of Prim were reflected, bright and shimmering, on what is normally a dry lake bed.  A half hour later as Las Vegas finally came into view, the glitz and glamor of the gaudy hotels was dwarfed by the grandeur of bolts of lightning streaking for miles across the turbulent sky.

The following morning workers were cleaning up after the storm but it hadn’t fully passed.  Storm clouds still blanketed the sky for the remainder of the journey to Zion.  A detour to Kolob Terrace to check the aspens was, I suppose, inevitable.  The falling snow up in the high country was a surprise.  And a delight.  Sunrise the next morning was looking promising.

The best location in Zion that gets the full sunrise treatment is West Temple.  I’ve photographed it many times but never got anything that I was excited about.  The most popular location to shoot from is the ‘patio’ behind the museum but on this morning I chose a less visited one – the 2nd switchback on Tunnel Road.  The expectation of clearing storm clouds, the choice of shooting locations – everything worked out just right.

west_temple_clearing_storm_121013

Continue reading “The Making of a Photograph – Clearing Storm, West Temple 2012”

(1881)

Making a Photograph – Black and White Points

Add snap to your photographs by adding contrast. This step-by-step shows you how to set black and white points in Lightroom.

There are a lot of instructional books on how to use Lightroom, Photoshop, Photoshop Elements and the like.  They provide a comprehensive and in-depth review of the various adjustments and filters available in these powerful tools.  And as such they serve as excellent references.  I own many of these fine books.

Now, a lot of workflows are built around the concept of seeing what needs to be fixed next and fixing it.  I advocate a more structured approach; namely, fix the tonality first, then the hue and finally the saturation.  See my recent post on Workflow.  But I often hear the statement, “I look at my photograph and just don’t know what to do.”  Many people often don’t know where to begin.

So I want to take a different approach.  I want to look at an image and identify what it needs and then talk about the various techniques for achieving it.  In other words, I want to start with the question, “What makes a compelling photograph?” and go from there.  It doesn’t help to know all of the tools and tricks available in Lightroom and Photoshop if you don’t know when to use them.

We’ll start with this image.  It is photographed in the Mesquite Flats Dunes of Death Valley.  The dunes provide an inspiring variety of compositions and ligh.  (You can click on this and all other images in this post to enlarge it.)

BP WP Dunes-1

Let’s start by examining the images tonality and see what improvements can be made.


Continue reading “Making a Photograph – Black and White Points”

(11828)

The Making of a Photograph – Pond, Owens Valley 2011

Follow along in the making of a photograph as we go from kneeling in the mud to the final print on paper.

It all started with kneeling in the mud.

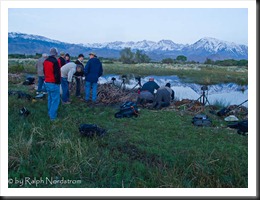
I was with David Muench, Jerry Dodrill and twelve other eager photographers on a Mountain Light Gallery workshop in May.  We lined up along the bank of the pond just outside Bishop, California and aimed our cameras at magnificent Mt Tom, the dominant peak in the Eastern Sierra crest in this area.

eastern_sierra_110506_IMG_6143

I’d like to take you through the process of making a photograph from the images I captured that morning.

Continue reading “The Making of a Photograph – Pond, Owens Valley 2011”

(1749)

Mastering Exposure–Histograms Part 4

Learn more about histograms. We explore the histogram that results from low contrast scenes – how to capture it and what can be done with it in post processing.

In this series of articles we’ve been exploring the histogram.  In the first two articles we discussed what it is.  Now we’re looking at different types of histograms and exploring how to work with them both in the field and during the post processing.  If you want to review or catch up, here are the links to the preceding three posts.

Mastering Exposure – Histograms Part 1: Introduction

Mastering Exposure – Histograms Part 2:  A Closer Look

Mastering Exposure – Histograms Part 3: The Rocky Mountain Histogram

In this article I want to discuss my favorite histogram, the Mole Hill histogram.  I like this one because so much can be done with it in the post processing.  Subtle colors and tonalities can be revealed in soft radiant light.  It lends itself to some of the most creative and expressive images.

Read on and we’ll look at what it is, the conditions in which it occurs, how to photograph it and how to work with it in the post processing to reveal the scene in all of its hidden glory.

Continue reading “Mastering Exposure–Histograms Part 4”

(4699)

The Making of a Photograph–Watchman Tower

An example of how to process a difficult capture.

I was working on a photograph last night that turned out rather well. It was taken during a recent photography workshop in Zion National Park in Utah. I took the group to the famous bridge to photograph the Virgin River and the Watchman Tower at sunset. It’s a must photograph. It seems every photographer in Zion with a tripod is there. But we also returned for sunrise and had the bridge to ourselves.

There is a time of day when exposure becomes very tricky. This is during twilight when the sun is a little below the horizon so the earth is dark but the sky is very bright. You end up with what I call the “Grand Canyon” histogram – there’s a huge spike at the shadow end and a similar spike at the highlight end with a large gap in between. This is a challenging situation that, if you master, can provide some spectacular images. In this blog I’d like to walk you through the process.

Continue reading “The Making of a Photograph–Watchman Tower”

(1804)

Photoshop Tutorial – Neutral Grays

On how to adjust an area of a photograph to a neutral shade of black, gray or white.

I got a Photoshop question from Lynne in Iowa, a dear friend for many years.  She asked how you could adjust an area of an image to make it pure white.  I gave her a quick email response that outlined a technique but the question really deserves a more detailed and complete answer.  So, Lynne, this is for you and anyone else who encounters this situation in Photoshop.

In this Photoshop tutorial I am going to show you how to make this correction using an adjustment layer.  This technique actually applies to two situations that are encountered quite often – getting neutral blacks and neutral whites.

Continue reading “Photoshop Tutorial – Neutral Grays”

(1334)