Mastering Composition – Rule of Thirds

Use the Rule of Thirds to create visual tension in your images and stimulate the viewer’s interest.

The Rule of Thirds is a compositional principle that is widely used. And for good reason because, well, it works.  At least, it works in a lot of situations.

What is the Rule of Thirds? You superimpose a tic-tac-toe grid on your image, two vertical lines equally spaced and two horizontal lines equally spaced. Then you place the key elements of your image on or near those lines, or at one of their intersections.  They don’t have to be exactly on the lines or intersections, just near them.  This is art, not engineering, so it’s important that it feels right.  But the Rule of Thirds gives us positions that are visually very strong and command the viewer’s attention.  That’s why you want to use this principle for the key elements of your composition, the elements you want to draw the viewer’s eye to.

clip_image002

One should be cautious in overusing the Rule of Thirds. It should not be applied mechanically and certainly not universally.  It does not apply to all compositions.  After all, aren’t our ‘Rules’ of composition made to be broken?  But on the other hand, sometimes a composition gets just a little bit stronger when you move the key element just a tiny bit to place it closer to or right on a 1/3rd line.

The fact is it works so well in so many situations that the camera manufacturers give us the ability to display the grid on our camera’s LCD screens and viewfinders. Also, software publishers like Adobe display the grid when we use the crop tool. This is true of Elements, Lightroom and Photoshop. And these aids can be very helpful in achieving strong compositions.

Why does the Rule of Thirds work so well? To answer that let’s talk about Visual Tension.

Continue reading “Mastering Composition – Rule of Thirds”

(2804)

Mastering Composition–More Border Patrol

Small tweaks around the borders of your photograph can have a powerful effect on the overall strength of your composition.

It may not be obvious at first but a photograph’s border is a critical element of a successful composition.  All too often we get so focused on the subject that the borders get  ignored.   Because it’s so important I’m writing a second post on the subject.  To read the first post you can click on this link  – Mastering Composition – Border Patrol.

For this post take a look at this photograph.

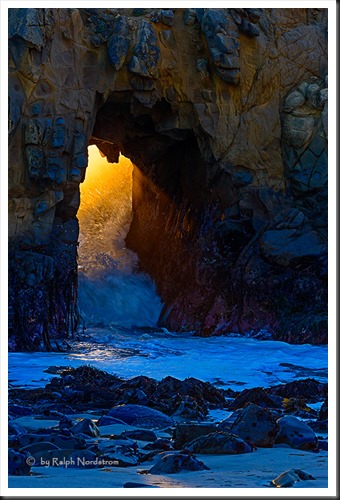
big_sur_131105__SM38613-flat

The photograph is of the famous tunnel at Pfeiffer Beach in Big Sur, California.  In wintertime, as you can see, not only do the waves come crashing through but the setting sun turns the water to liquid gold.  It’s easy to get so absorbed by the spectacle that important elements of the composition get ignored.  Can you see what I missed here?

Continue reading “Mastering Composition–More Border Patrol”

(2292)

Mastering Composition – What?

Asking yourself, ‘What am I photographing?’ can lead to stronger images that communicate the excitement and inspiration you feel.

Composition is one of the four pillars of a strong landscape photograph (See Making a Photograph – The Four Pillars).  There are many approaches to mastering composition and certainly countless excellent books on the topic.  Many books discuss the elements of design and how they relate to composition – line, shape, form, texture, pattern and color.  Others go into the various rules of composition – rule of thirds, golden rule, leading lines, near / far, layers, frames, etc.

All of these rules or principles are very analytical and, I think, are necessary and useful building blocks.  Often creating a strong composition is very much of a problem-solving endeavor.  But in the end I believe the goal of the composition is to support what the artist wants to communicate through the image.  And this comes more from compositions that just feel right, not ones that are mechanically created from the rules.  That’s not to say that one is not aware of these principles as the composition is being worked out.  Rather these principles are like words in a sentence.  They are carefully chosen so that the sentence as a whole communicates the author’s message.  There are several techniques that lead us to this goal.  And one of them is to ask yourself, ‘’”What am I photographing?”

Continue reading “Mastering Composition – What?”

(1700)

Mastering Light – Warm and Cool

In which we explore the color of light coming from different sources.

Light has several properties that are important to landscape photographers including quality, direction and color.

It is important to understand that different times of day and weather conditions will produce light of different colors.  Also, when you add artificial light sources the range of colors expands.

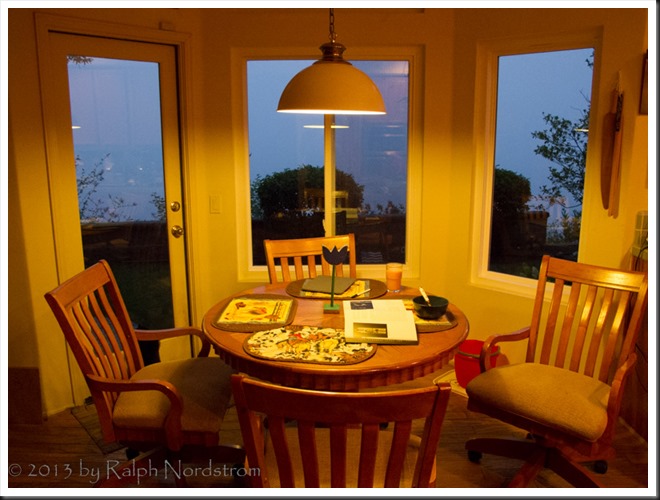
Our brains play tricks on us when it comes to color.  During twilight we don’t see that the light is a soft, delicate blue.  In fact, we don’t perceive any color cast at all.  But the camera is not fooled.  It sees what is actually there.  Take this image that I call ‘Breakfast’ as an example.

light-warm_and_cool

When drastically different light sources are set next to each other than our eyes can clearly see the difference in the colors.  In this photograph the interior of our home is illuminated by tungsten lights which give off a very warm color.  That’s why our homes feel so warm and cozy at night – because of the warm light emitted by tungsten lights.  (That will change as we replace the tungsten lights with CFLs or LED lights.)  Outside we have a foggy morning at twilight.  The sun is about 10 minutes away from rising.  And it’s clear the color of the outside light is blue.

If I was standing outside away from the warm tungsten light, my mind would trick me into thinking the light was not blue, just a neutral gray.  But the camera is not fooled.

So then why are we so easily fooled?  Because of perception.  Our brains receive input from all of our senses including our eyes.  And without us even being aware of it, this input is translated into something we are familiar with, concepts and generalizations we have learned from all the accumulated experiences of our lives.  And our brain overrides (manipulates if you will) the actual blue color of the outdoor light and we perceive it as neutral.

Our perceptions help us with everyday living.  They help to bring order to our lives from the endless bombardment of stimuli.  But perception interferes with the photographic process of seeing.  As far as day-to-day life is concerned we don’t need to see that the outdoor light is blue.  But as photographers, cultivating the ability to see beyond our perceptions opens up the world to us in ways we normally can’t even imagine.  And isn’t this what photography is all about?


Join the conversation, share your experiences, leave a comment.  We love to hear from you.  And if you know of someone else who might enjoy this article, please share it.

We do photography workshops.  Come on out and join us.  Click here to check us out.

You can also check out our photography.  Click here.

(1426)

Mastering Light – Dawn

Read about the key to capturing spectacular sunrise photographs.

Not long ago I was photographing dawn in Joshua Tree National Park.  I must confess, dawn is my favorite time of day.  And I have thrilled to more spectacular dawns in Joshua Tree than anywhere else.  There are ;often clouds that ignite as the sun approaches.  And the other morning was no exception.

I’d like to share with you three photographs taken that morning.  The alarm went off at 4:30 and we left the motel in Twentynine Palms a 5:30, an hour and a half before sunrise.  There were clouds in the morning sky, the first ingredient for a spectacular sunrise but by no means a guarantee.  I selected Sheep Pass at the west end of Queen Valley because it offered both Joshua Trees and some impressive granite outcrops for an interesting foreground.  We arrived about 45 minutes before sunrise.  It was still dark with the barest glimmer of light in the east.

Continue reading “Mastering Light – Dawn”

(2171)

Lightroom Tutorial – Workflow Made Easy

Simplify your Lightroom workflow with these easy steps.

Lightroom is a great tool. It’s quick and easy to use – once you get the hang of it. But sometimes mastering the workflow, the steps you go through to take a raw file to a ‘final’ image, can be a bit daunting.

Let me say up front that Lightroom is an important part of my workflow but it’s not the only part.  Every photograph I work on starts in Lightroom but is completed in Photoshop.  Nevertheless, Lightroom gets a photograph to about 80% of the final product.  I know many people who use Lightroom exclusively and Photoshop only in rare circumstances if at all.

So back to the workflow.  Can it really be made easy?  Yes it can.  There are four major steps (not counting import – see Lightroom Tutorial – Importing Photographs):

  1. Mechanical adjustments like dust spot removal and cropping
  2. Tonality adjustments
  3. Hue adjustments
  4. Saturation adjustments

Let’s skip the first step and start with the second.  The example will be in Lightroom 4.

Continue reading “Lightroom Tutorial – Workflow Made Easy”

(7135)

Lightroom Tutorial – Polarizer Filter

How do simulate the effect of a polarizer filter in Lightroom.

A Polarizer filter is generally the first filter a landscape photographer buys.  It is so versatile.  It can darken blue skies, reduce harsh reflections and intensify colors.  Many photographers put polarizers on their lenses and never take them off.

But this is a Lightroom tutorial.  So why in the world am I talking about polarizer filters?  Well, it’s because I have a trick I’d like to share with you, one that I’ve never seen discussed anywhere else.  It’s what you can do in Lightroom to create the polarizer effect without a polarizer.  In fact, it can be better than the real thing, especially if you are shooting with a wide angle lens.  Because, the angle of view can be so great that part of the sky will be affected by the polarizer and the rest will not.  So it looks pretty unnatural when the sky in part of your image is dark and the rest is washed out.

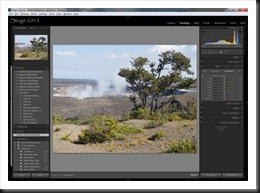
So, what’s the trick?  Well, consider this image taken on a recent trip to Hawaii.  I shot it with my Canon G11 and I don’t even own a polarizer filter for it.  It’s a photograph of the ongoing eruption in a crater in the Kilauea caldera.  In the bottom of the crater is a lake of lava.  The smoke you see is a plume of noxious gas.

polarizer_1

(Click on the image for a larger view)

Continue reading “Lightroom Tutorial – Polarizer Filter”

(19878)

Making a Photograph – Vision

Develop your vision and express yourself through your photographs.

“This photograph speaks to me.”

The photographs that have a strong impact on us speak to us.  The photographer has created an image that moves us.  Did he or she have something in mind when making the photograph?  Probably so.  Strong images just don’t happen by accident.

As one grows as a photographer one’s vision becomes clearer.  One begins to discover who they are and what they have to say.  And as one’s technical and aesthetic skills develop, skills used in both the field and the darkroom, one’s ability to express their vision becomes stronger.

The artist’s vision is an important element of their art.  The clearer an artist is on what his or her vision is the more expressive their art becomes.

If you’re not clear on what your vision is, live with your photographs.  Become aware of what you associate with them, what stories they are telling you, how they make you feel.  And as your vision emerges nurture it, strengthen it, let it speak through you and your art.  And then your photographs will also speak to others.

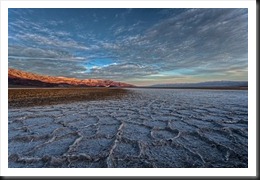
death_valley_sunrise_2012

We do photography workshops.  Come on out and join us.  Click here to check us out.

You can also check out our photography.  Click here.

Technorati Tags: ,,,,,,,
WordPress Tags: technical,aesthetic,Photograph,Vision,impact,photographer,skills,artist

(3286)