Making a Photograph – A New Approach to Tonality Adjustments

Watch as a photograph of an icon of Zion National Park is made.

For some time now I’ve been using and teaching a process of working on photographs in Lightroom. It consists of basically four steps: manual adjustments, tonality adjustments, hue adjustments and finally saturation adjustments. Quite some time ago I had the brilliant idea of converting the image to black and white before doing the tonality adjustments. The technique I used was the B & W tab in Lightroom’s HSL group.  Once the tonality adjustments were done, the image would be converted back to color and the process continue.

It didn’t work out because when I converted the image back to color, the colors were so oversaturated and unnatural that the image looked horrible. It was just easier to do the tonality adjustments on the color image. So I quickly gave up on that technique. But the other day I was reading an article in Popular Photography magazine that rekindled this idea. It took a different approach. It turned the image to black and white by setting the Saturation adjustment to -100. Now the author did this in the middle of the process but I thought that if I applied this to my process and did that at the start it just might work. So I was eager to give it a try. Let’s try it with this image of the Watchman in Zion National Park.
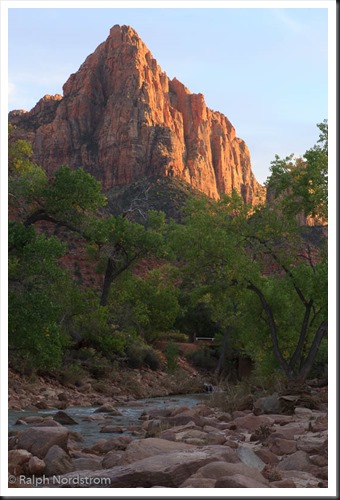
utah_141010__SM32783 This is the original raw file. I haven’t done anything to it yet. It doesn’t need any mechanical adjustments. These consist of removing spots, straightening the image, maybe some noise reduction and the final crop. But since none of these are required we can move on to the tonality adjustments.


Continue reading “Making a Photograph – A New Approach to Tonality Adjustments”

(4930)

Is That What Your Camera Saw?

Should photographic art be what the camera sees? Or something else…?

Occasionally at art festivals a visitor to my booth will point to one of my photographs and ask, “Is that what your camera saw?”  This question points out a common misunderstanding about the physics and art of photography.

Those of us who are serious about our photography capture our digital images in RAW file format.  That’s a format that does a minimal amount of processing on the image before it saves it to the memory card.  It is more like what the camera sees.

The other format is  JPEG and is not what the camera sees but rather a highly processed image that is controlled to a large extent by the settings the photographer sets in the camera – settings like sharpness, contrast and saturation.  So if the photographer likes saturation he just has to up the saturation setting in the camera.

JPEG is much closer to the photographs that were captured in the wonderful days of film.  Each different type of file had its own unique way of responding to the scene.  Kodachrome film was great for reds while Ektachrome was perfect for blues.  Fujichrome was prized for its treatment of greens and its high contrast.

So what did the film camera see?  The question is really, “What did the film see?”  Was it a faithful documentation of reality?  Not in the least.  The same can be said for JPEG digital files.  They are no more a faithful documentation of reality than film was.

The fact is, RAW files are closer to what the camera saw than film or JPEG files ever were or will be.  And, as one workshop participant put it to me, “I don’t like shooting in RAW because the photographs are so plain and uninteresting.”  There you go.  What the camera sees, exactly what the camera sees, is often plain and uninteresting.

So the physics of digital images captured in RAW format is that the images are the closest to what the camera sees.  But from an artistic point of view, these images generally do not speak to us.  These are documentation but that’s not art; art is interpretation.

Now, a RAW file is the perfect starting point from which to create art.  It is neutral, unbiased and open to the artist to express what she saw, what she experienced that inspired her to set up the camera and compose the image, that led to the decisive moment that the shutter was pressed.

In the days of film we relied on our selection of the type of film that would do the best job of rendering particular situations.  In the digital era we have much more powerful tools that we ever had with film – Lightroom, Photoshop, Photomatix and all the wonderful software that we have access to that allows us to express our vision, our interpretation of reality.

So, are my photographs what the camera saw?  Not at all.  They are what I saw.


We do photography workshops.  Come on out and join us.  Click here to check us out.

You can also check out our photography.  Click here.

(711)

Lightroom Tutorial – Workflow Made Easy

Simplify your Lightroom workflow with these easy steps.

Lightroom is a great tool. It’s quick and easy to use – once you get the hang of it. But sometimes mastering the workflow, the steps you go through to take a raw file to a ‘final’ image, can be a bit daunting.

Let me say up front that Lightroom is an important part of my workflow but it’s not the only part.  Every photograph I work on starts in Lightroom but is completed in Photoshop.  Nevertheless, Lightroom gets a photograph to about 80% of the final product.  I know many people who use Lightroom exclusively and Photoshop only in rare circumstances if at all.

So back to the workflow.  Can it really be made easy?  Yes it can.  There are four major steps (not counting import – see Lightroom Tutorial – Importing Photographs):

  1. Mechanical adjustments like dust spot removal and cropping
  2. Tonality adjustments
  3. Hue adjustments
  4. Saturation adjustments

Let’s skip the first step and start with the second.  The example will be in Lightroom 4.

Continue reading “Lightroom Tutorial – Workflow Made Easy”

(7135)

Lightroom Tutorial – Polarizer Filter

How do simulate the effect of a polarizer filter in Lightroom.

A Polarizer filter is generally the first filter a landscape photographer buys.  It is so versatile.  It can darken blue skies, reduce harsh reflections and intensify colors.  Many photographers put polarizers on their lenses and never take them off.

But this is a Lightroom tutorial.  So why in the world am I talking about polarizer filters?  Well, it’s because I have a trick I’d like to share with you, one that I’ve never seen discussed anywhere else.  It’s what you can do in Lightroom to create the polarizer effect without a polarizer.  In fact, it can be better than the real thing, especially if you are shooting with a wide angle lens.  Because, the angle of view can be so great that part of the sky will be affected by the polarizer and the rest will not.  So it looks pretty unnatural when the sky in part of your image is dark and the rest is washed out.

So, what’s the trick?  Well, consider this image taken on a recent trip to Hawaii.  I shot it with my Canon G11 and I don’t even own a polarizer filter for it.  It’s a photograph of the ongoing eruption in a crater in the Kilauea caldera.  In the bottom of the crater is a lake of lava.  The smoke you see is a plume of noxious gas.

polarizer_1

(Click on the image for a larger view)

Continue reading “Lightroom Tutorial – Polarizer Filter”

(19878)

Lightroom Tutorial – Workflow

An overview of a very effective Lightroom workflow.

There are about as many definitions of “fine art photography” as there are people who call themselves “fine art photographers.”  For many of us, fine art photography is an expression of our view of the world.  Much of what we see in the world is captured in the images we capture in the field.  But that’s not the whole story.  Why?  Because the true expressive quality of our photographs comes to life in the post processing – the digital darkroom if you will.

Continue reading “Lightroom Tutorial – Workflow”

(2788)