Mastering Composition – Rule of Thirds

Use the Rule of Thirds to create visual tension in your images and stimulate the viewer’s interest.

The Rule of Thirds is a compositional principle that is widely used. And for good reason because, well, it works.  At least, it works in a lot of situations.

What is the Rule of Thirds? You superimpose a tic-tac-toe grid on your image, two vertical lines equally spaced and two horizontal lines equally spaced. Then you place the key elements of your image on or near those lines, or at one of their intersections.  They don’t have to be exactly on the lines or intersections, just near them.  This is art, not engineering, so it’s important that it feels right.  But the Rule of Thirds gives us positions that are visually very strong and command the viewer’s attention.  That’s why you want to use this principle for the key elements of your composition, the elements you want to draw the viewer’s eye to.

clip_image002

One should be cautious in overusing the Rule of Thirds. It should not be applied mechanically and certainly not universally.  It does not apply to all compositions.  After all, aren’t our ‘Rules’ of composition made to be broken?  But on the other hand, sometimes a composition gets just a little bit stronger when you move the key element just a tiny bit to place it closer to or right on a 1/3rd line.

The fact is it works so well in so many situations that the camera manufacturers give us the ability to display the grid on our camera’s LCD screens and viewfinders. Also, software publishers like Adobe display the grid when we use the crop tool. This is true of Elements, Lightroom and Photoshop. And these aids can be very helpful in achieving strong compositions.

Why does the Rule of Thirds work so well? To answer that let’s talk about Visual Tension.

Continue reading “Mastering Composition – Rule of Thirds”

(2825)

Mastering Composition–More Border Patrol

Small tweaks around the borders of your photograph can have a powerful effect on the overall strength of your composition.

It may not be obvious at first but a photograph’s border is a critical element of a successful composition.  All too often we get so focused on the subject that the borders get  ignored.   Because it’s so important I’m writing a second post on the subject.  To read the first post you can click on this link  – Mastering Composition – Border Patrol.

For this post take a look at this photograph.

big_sur_131105__SM38613-flat

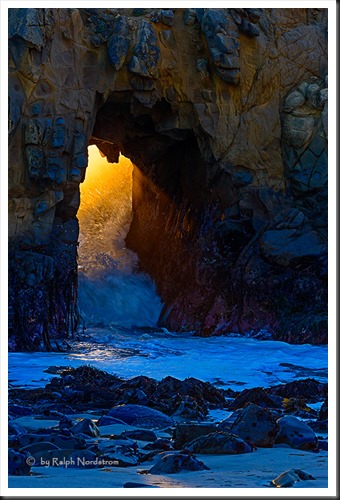
The photograph is of the famous tunnel at Pfeiffer Beach in Big Sur, California.  In wintertime, as you can see, not only do the waves come crashing through but the setting sun turns the water to liquid gold.  It’s easy to get so absorbed by the spectacle that important elements of the composition get ignored.  Can you see what I missed here?

Continue reading “Mastering Composition–More Border Patrol”

(2296)

Mastering Composition – Border Patrol

Your photograph’s borders are key elements to a strong composition. What goes on there can make or break the image. Read about just one consideration to take into account when composing your photographs.

“When I compose an image I spend more time getting the borders right than I spend on the subject.”  You think this is a surprising statement?  There are a lot of photographers that I really admire for whom this statement is true.  I know when I first started out I had no idea what was happening on the borders.  I paid no attention to them.  Until it was pointed out to me that my borders were very sloppy.  And from that point on composition got a whole lot harder because getting clean borders is not a trivial task.  But over time it became second nature to me.  Now I always check the borders and make appropriate adjustments before I press the shutter.

Well, almost always.  Take a look….

Continue reading “Mastering Composition – Border Patrol”

(1907)

Mastering Composition – Balance

Strengthen your images by considering Balance in your compositions.

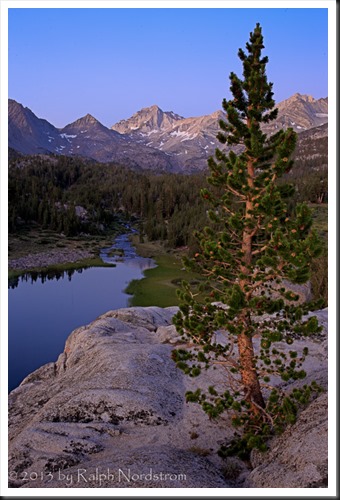
There are many rules of composition.  I know people don’t like to use the term rules and for good reason.  If you treat these rules as if they are hard and fast you can end up with compositions that are mechanical.  So I prefer to call them ‘principles of composition.’  Now I’ve said before that composition is a problem solving endeavor.  That is, you have been inspired by what lies before you, you have connected with it and you have an idea of what you want to say.  And one of the key elements in communicating your message is the composition you choose.  There is generally a point where this becomes very much of a problem solving effort, meaning it can get very analytical.  And while the analysis may be important if not essential, it can cloud aesthetic considerations.  Take for example this photograph of dawn in the Little Lakes Basin up Rock Creek in the Sierra Nevada Mountains of California.

eastern_sierra_130713__SM37004-Edit

I was drawn to this Lodgepole Pine growing from a cleft in the granite above the lake.  I gave a lot of thought to this composition and compositional principles came very much into play.  The way I saw it, the two key elements were the tree and the lake.  I didn’t think of the peaks in the distance as being a key element although I knew they were important.  And I was aware of the lake as a leading line the drew the eye to them. I placed the tree on the right 1/3 line so that it wouldn’t block the lake.  And I enjoyed the wonderful alpenglow as I captured a few images through the final minutes of civil twilight.  Then I wandered off looking for other photographs.  But later, after the sun came up I was drawn back to this tree and saw it completely differently.

Continue reading “Mastering Composition – Balance”

(1678)

Mastering Composition – What?

Asking yourself, ‘What am I photographing?’ can lead to stronger images that communicate the excitement and inspiration you feel.

Composition is one of the four pillars of a strong landscape photograph (See Making a Photograph – The Four Pillars).  There are many approaches to mastering composition and certainly countless excellent books on the topic.  Many books discuss the elements of design and how they relate to composition – line, shape, form, texture, pattern and color.  Others go into the various rules of composition – rule of thirds, golden rule, leading lines, near / far, layers, frames, etc.

All of these rules or principles are very analytical and, I think, are necessary and useful building blocks.  Often creating a strong composition is very much of a problem-solving endeavor.  But in the end I believe the goal of the composition is to support what the artist wants to communicate through the image.  And this comes more from compositions that just feel right, not ones that are mechanically created from the rules.  That’s not to say that one is not aware of these principles as the composition is being worked out.  Rather these principles are like words in a sentence.  They are carefully chosen so that the sentence as a whole communicates the author’s message.  There are several techniques that lead us to this goal.  And one of them is to ask yourself, ‘’”What am I photographing?”

Continue reading “Mastering Composition – What?”

(1707)

Mastering Exposure – Expose to the Right

Expose to the Right – put it to the test by creating and comparing actual images.

Over the years there has been a lot of interest in the concept of ‘Expose to the right.’  This is something that is commonly done in digital photography where you intentionally overexpose an image.  The idea is that in digital images there is more information to work with in the brighter tonalities than there is in the darker.  And this will give you more to work with in the darkroom (Lightroom and Photoshop) which will result in a better image.

I’ve written several posts on this topic and if the concept is new to you please read these.  I’m not going to go into the theory here; that is spelled out in these posts.

Lightroom Tutorial – Expose to the Right

Expose to the right – Revisited

Now, I understand the theory.  I’m a computer guy; I had better understand it.  But I’ve always wondered if the promise of a better image actually worked out in real life.  So I did a test during our recent workshop to Big Sur.

Continue reading “Mastering Exposure – Expose to the Right”

(2316)

Mastering Light – Warm and Cool

In which we explore the color of light coming from different sources.

Light has several properties that are important to landscape photographers including quality, direction and color.

It is important to understand that different times of day and weather conditions will produce light of different colors.  Also, when you add artificial light sources the range of colors expands.

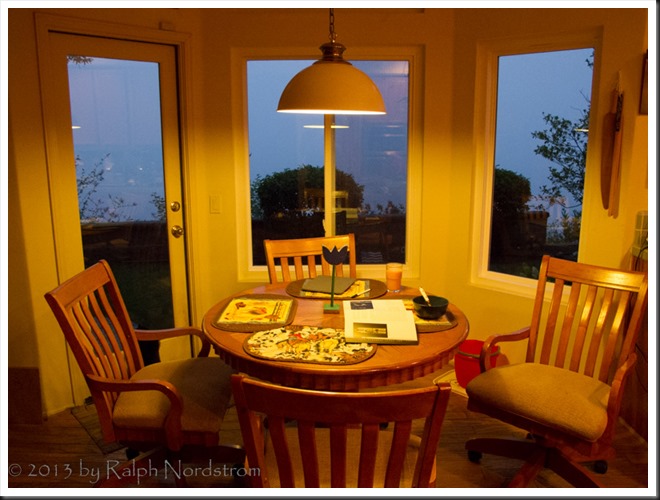
Our brains play tricks on us when it comes to color.  During twilight we don’t see that the light is a soft, delicate blue.  In fact, we don’t perceive any color cast at all.  But the camera is not fooled.  It sees what is actually there.  Take this image that I call ‘Breakfast’ as an example.

light-warm_and_cool

When drastically different light sources are set next to each other than our eyes can clearly see the difference in the colors.  In this photograph the interior of our home is illuminated by tungsten lights which give off a very warm color.  That’s why our homes feel so warm and cozy at night – because of the warm light emitted by tungsten lights.  (That will change as we replace the tungsten lights with CFLs or LED lights.)  Outside we have a foggy morning at twilight.  The sun is about 10 minutes away from rising.  And it’s clear the color of the outside light is blue.

If I was standing outside away from the warm tungsten light, my mind would trick me into thinking the light was not blue, just a neutral gray.  But the camera is not fooled.

So then why are we so easily fooled?  Because of perception.  Our brains receive input from all of our senses including our eyes.  And without us even being aware of it, this input is translated into something we are familiar with, concepts and generalizations we have learned from all the accumulated experiences of our lives.  And our brain overrides (manipulates if you will) the actual blue color of the outdoor light and we perceive it as neutral.

Our perceptions help us with everyday living.  They help to bring order to our lives from the endless bombardment of stimuli.  But perception interferes with the photographic process of seeing.  As far as day-to-day life is concerned we don’t need to see that the outdoor light is blue.  But as photographers, cultivating the ability to see beyond our perceptions opens up the world to us in ways we normally can’t even imagine.  And isn’t this what photography is all about?


Join the conversation, share your experiences, leave a comment.  We love to hear from you.  And if you know of someone else who might enjoy this article, please share it.

We do photography workshops.  Come on out and join us.  Click here to check us out.

You can also check out our photography.  Click here.

(1467)

Color Management Made Simple – Gamut Errors

In the forth article in our series on Color Management we talk about gamut errors and rendering intents – perceptual and relative colorimetric.

“Why don’t my prints look the same as the image on my monitor?”  This is a frequent question in my workshops.  It’s not the fault of the printer as is often suspected.  My response is always, “It’s a color management issue.”

This is fourth in a series of articles that are shedding light on the complex subject of Color Management.  So far we’ve covered Color Space in Color Management Made Simple – Color Space, the importance of profiling your monitor in Color Management Made Simple – From Camera to Computer and printing basics in Color Management Made Simple – From Computer to Print.  These three articles give us a pretty complete picture of color management.  But there’s still one very important concept to discuss – Gamut Errors.

In the Color Space article we introduced the color spaces that are commonly used when we work on our photographs – proPhoto RGB (the most complete), AdobeRGB and sRGB (the most limited).  Each of these color spaces was compared to a box of Crayons with proPhoto RGB being represented by the 92 count box, AdobeRGB by the 64 count box and sRGB by the 48 count box. crayons_96cnt In the Computer to Print article we talked about the different types of print paper and inks and how each has its own unique color properties.  That is to say, each paper / ink combination has its own color space.  And the size of the color space (number and colors of Crayons) varies from one combination to the next.  The size of the print’s color space depends on the type of paper.  Glossy papers are at one end with the largest color spaces and matte papers are at the other.  Luster papers are very close to the color spaces of glossy papers.
The color of the paper itself also affects its color space.   Some papers are pure white and to achieve this they very often contain chemical brighteners.  These papers will have a larger color space.  Papers without brighteners may still appear white but they won’t have as large of a color space.  And some papers are not even white but have a pale yellow cast.  Not only will this affect the color but it also reduces the color space.

Now comes the big question.  What happens when the colors in your photograph cannot be reproduced in the paper’s color space?  Or stated another way, what happens when there aren’t as many Crayons in your paper / ink’s color space as there are in your photograph’s color space?  Well, it’s not  a problem if you only use Crayons in your photograph’s color space that are also in the paper / ink color space.  But that’s no good.  You may want to print the same photograph on a different paper with a larger color space.

When you have colors in your photograph that cannot be reproduced in your paper / ink color space you have Gamut Errors.  Boy these can be annoying.  And they can be puzzling too.  You may have areas of your photograph that don’t have any apparent highlight clipping (they’re not pure white) but they still don’t have any detail.  This is because colors outside the paper / ink color space are printed at the outer limits of that color space.  For example, if you have a really intense blue Crayon in your photograph’s color space but a less intense blue in your paper / ink color space, the image will be printed with the less intense blue.  And not only the photographs intense blues but also the its less intense blues.

Remember the CMM (Color Matching Module)?  That’s the software on your computer that basically translates colors in your photograph’s color space to the same colors (but a different set of RGB numbers) in your paper / ink color space.  When the colors in your print fall outside of the paper / ink color space the CMM is responsible for dealing with that.  You can specify how you want it to handle this by specifying the Rendering Intent.  And that’s what rendering intent does – tells the CMM how to render colors that fall outside the color space of the medium you’re printing on.  Therefore,  rendering intent is part of the print dialog.

There are four rendering intents, two of which we use in photography.  Here are the four but I’m only talk about the two we use – Saturation, Absolute Colorimetric, Relative Colorimetric and Perceptual.  It’s the last two – Relative Colorimetric and Perceptual – that we use.

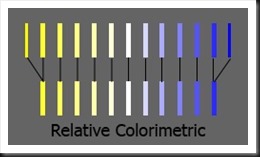
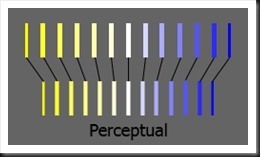
We’ll do Relative Colorimetric first because this is what was described in the example of the blue colors above.  The blue that was out of gamut was translated to the nearest blue at the edge of the paper / ink color space.  None of the colors that are in gamut are changed.  Which is the way relative colorimetric works – colors in gamut are not touched (other than the translation of their RGB numbers from one color space to the other).  But colors that are out of gamut are translated to the nearest color at the edge of the color space.  Theoretically, relative colorimetric preserves the color at the expense of saturation.  As a practical matter, I find that relative colorimetric produces images with sharper contrast and often a little darker than the alternative, Perceptual. rendering intent rc With perceptual the colors that are out of gamut are mapped back to the color space just like relative colorimetric.  The difference is that the colors within the color space are also altered, they all get moved closer to the center of the color space.  I think of it as being very similar to what I used to do as a kid with a rubber band.  I’d stretch it out and write my name on it with a ball point pen. Then let the rubber band return back to it’s regular size and all the letters would get very narrow scrunched together.  It was cool.  Perceptual preserves saturation but may result in some color and tonality changes.  And my experience is that the image tonalities are softened. rendering intent p I routinely use both rendering intents and it would be hard to say which one I use the most.  I like relative colorimetric for it’s more dramatic look due to the contrast.  But often times the shadows become blocked so I switch to perceptual which does a better job of preserving shadow detail or when I want a softer look.  It can be a nightmare to keep track of which rendering intent I use.  So once I find the rendering intent that I like, I change the file name by appending the rendering intent to the end.  The file name may end up looking like big_sur_pfeiffer_beach_130804_rrpm_rc.tiff for a photograph that works best with relative colorimetric (rc) rendering intent printed on Red River Polar Matte (rrpm) paper.  See File Naming Strategies for more details.  I find that I routinely print two, three, four or even more proofs, tweaking this and that including rendering intent until I finally get the results I’m looking for.
Let’s put it all together.  First, calibrate your monitor.  Next, use a large color space for your images in post processing such as proPhoto RGB or AdobeRGB.  Do not use sRGB for your photos.  Finally, when you print use the CMM of the print program, not the operating system, specify the ICC profile for your paper / ink combination, disable color management in the printer and select the rendering intent that gives you the best results.


Do you have experiences and thoughts on color management?  We’d like to hear from you; add your comments.  And if you know someone who might find these articles useful, please feel free to share it with them, Like us on Facebook, repost it on your website or blog.

Join me on an upcoming workshop.  Click here for more details.

To see more of my photographs click here.

(6113)

Color Management Made Simple – From Computer to Print

Color Management can be a difficult topic. But we’re breaking it down for you. This is the third in a series of articles on the topic – from the Computer to the Print. For a full understanding, read all three.

Color Management is the science of getting the colors you want in your photographs – consistently.  And in my workshops I hear all too often that people are disappointed because the colors they get in their prints are not what they saw on their monitors.  They often go to a lot of work preparing an image and when they print it it’s as if all that work was a waste of time.

Color Management is indeed a science and can be very complicated and technical.  But getting the same colors on the print that you see on your monitor is essential if you are to have control over the creative process.  For that, color management is the key and in these series of articles I’m trying to break it down to make it more understandable and accessible for all of us.

plaskette_rock_setting_sun_110808

In the previous two articles I presented the concept of a color space and what happens behind the scenes when you move the image from the camera to your computer.  See Color Management Made Simple – Color Space and Color Management Made Simple – From Camera to Computer.  In this article I’ll be covering the all important aspect of getting your prints to look like what you see on your monitor; that is, from Computer to Print.

Continue reading “Color Management Made Simple – From Computer to Print”

(3290)

Color Management Made Simple – From Camera to Computer

Read the second installment in a series of articles on Color Management – taking the image from the camera to your computer.

If Color Space can be described as a box of Crayons as we suggested in  Color Management Made Simple – Color Space,  what else do we need to know about Color Management?  Well, Color Management is essentially about getting the right colors – and here’s the most important word – consistently.

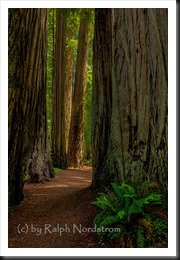
Let’s spend a few moments talking about the ‘right color.’  (I’m inclined to add, ‘whatever that is.’)  The story begins when you press the shutter.  Let’s suppose you are photographing the beautiful redwoods of Northern California.

redwoods_130528__SM36093_4_5_6_7-Edit

The scene is full of rich browns and oranges and vibrant greens.  We can say that these are the right colors, these are the colors you want.  You set up your camera and snap a picture and your sensor captures these colors, pretty much just as they are (the sensor is playing with pretty much the full big box of 120 Crayons). The camera’s processor does its thing and the image is saved in a file to your memory card.  Eventually we’re going to view the photograph on our computer’s monitor and we just might be a bit disappointed.

Continue reading “Color Management Made Simple – From Camera to Computer”

(1690)