Mastering Composition – Working the Shot

How can you create a strong composition? Here’s one method that really works.

There’s no doubt that composition is one of the key elements of a successful image.  You can have all the other factors of a great shot – fantastic light, optimum exposure and appropriate sharpness – but with a weak composition you have a weak photograph. 

I know photographers that work slowly enough to work out the strongest composition before they press the shutter.  I admire these people immensely.  But I don’t work that way, especially in an area I’m unfamiliar with.

A short while ago I was driving south through Utah on beautiful highway 89 traveling between Bryce Canyon and Zion National Parks after wrapping up a successful photography workshop.  I came upon a stand of cottonwood trees that were in full autumn splendor.  I had to pull over.

I grabbed my point and shoot (Canon G11) and started scouting for photographs.  I like to use the G11 for that, scouting for compositions that are worth the effort of setting up my big Canon.  I found two compositions that were promising.

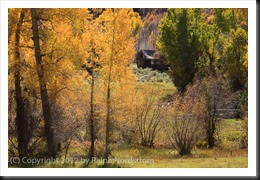
The second proved to be the most interesting, at least in terms of how the final composition evolved.  Behind the cottonwoods was a meadow with a dilapidated shack.  It was so Utah!  I set up what I thought would be an interesting composition.

bryce_121019__SM33931

(Click on the images to enlarge them.)

I positioned my camera so that there would be a narrow opening to the meadow and the shack.  It is a tight composition that draws the viewers eye to the shack which is placed in a very strong position within the frame.  It has a feeling of depth with a strong foreground opening up to the shack in the background.

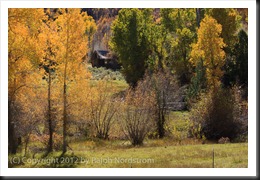
I was feeling good about this composition and then I noticed a glowing cottonwood just outside the frame to the right so I moved the camera a couple of feet to the right and created this image.

bryce_121019__SM33935

The golden cottonwoods on the left are balanced by the single, smaller cottonwood to the right.  This arrangement has the effect of placing more emphasis on the autumnal trees.  The eye makes three stops, first at the cottonwoods on the left, then to the right and finally works its way back to the shack in the back.

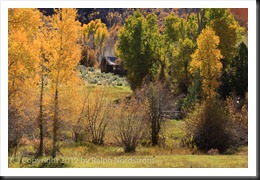
I was pretty  pleased with these two compositions and thought I had something to work with when I got home.  So I disassembled everything and put  it back in my camera bag, collapsed the tripod and started back toward the car.  I hadn’t gone 5 steps when I looked back up toward the shack and saw there was another blaze of cottonwoods right next to it.  So I swung my backpack back down to the ground and set up again for this shot.

bryce_121019__SM33939

Now there are three sources of golden light for the eye to explore – the cottonwoods to the left, the one a little further back on the right and the ones way in the back by the shack.  (Odd numbers of things are always good.)  The image is well balanced and every element in it contributes to the entire impression.

There’s a story here, a story of living in this beautiful valley during a time that is gone and will probably never return.  It must not have been an easy life but one of honest, hard work and the satisfaction of living in a place of such splendid beauty.  We would do it differently today with more conveniences and comforts.  And maybe, just maybe, miss out on the more intimate connection with Mother Earth that living in such a simple shack must have provided.


I’d be interested to hear which of the three compositions you like the most.  Please leave a comment saying which one you like and why.  It will make for a very interesting dialog.

If you enjoyed this post please feel free to Like it and share it with your friends.  You can use the links at the top.

Join me on an upcoming workshop.  Click here for more details.

To see more of my photographs click here.

WordPress Tags: Composition,Shot,image,exposure,area,Utah,highway,Bryce,Canyon,Zion,National,Parks,photography,workshop,trees,splendor,Canon,worth,effort,Behind,shack,Click,images,viewers,depth,foreground,background,arrangement,emphasis,tripod,steps,backpack,numbers,element,valley,life,satisfaction,conveniences,connection,Mother,Earth,factors,compositions,feet,cottonwood,cottonwoods,camera,three

(1287)

Ansel Adams – The Making of 40 Photographs: El Capitan, Winter Sunrise

A continueing series in which I reflect on Ansel Adams’ book, “Examples – The Making of 40 Photographs.” In this post I talk about “El Capitan, Winter Sunrise.”

I’ve heard it said that many photographers believe there are no more photographs in Yosemite, that all the great ones have been taken.  And it’s true that the prime locations have been photographed again and again, sometimes with 50 or even 100 photographers all vying for their three square feet of ground in which to set up their tripods. 

It would appear the assumption is that if a particular location is photographed too many times, becomes too popular, it becomes a cliché.  I’ve succumbed to that point of view in the past.  There seems to be the faintest whiff of, “I’m too good to photograph something so common.  I’m able to find what no one else has never seen.”  I know; I kind of felt that way.

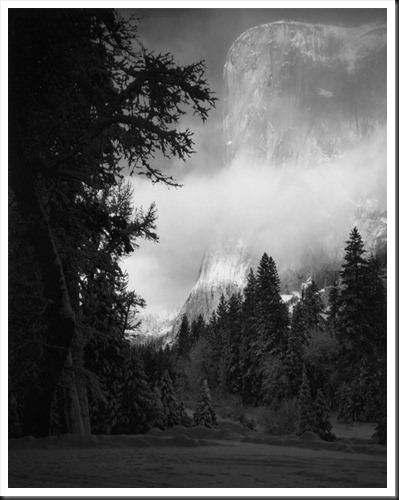
El Capitan, Winter Sunrise
Ansel Adams

Ansel Adams had something to say about that in connection with this photograph.

“A viewer once asked me about the values: ‘Don’t you think the trees are rather dark?’  Black and white photography gives us opportunity for value interpretation and control.  In this instance, were the trees lighter in value, the glow of the light on the cliff would, for me, be far less expressive.  Exposing for higher forest values  would have weakened the separation of the far brighter cliff and cloud values.  However, other photographers might well make quite different images.  I would not like anyone to think I believe this image to be the only one possible, but it fulfills my visualization at the time of exposure.  In an overpowering area such as Yosemite Valley it is difficult for anyone not to make photographs that appear derivative of past work.  The subjects are definite and recognizable, and the viewpoints are limited.  It is therefore all the more imperative to strive for individual and strong visualization.”

Adams’ comment gets to the heart, mind and soul of the artist.  There are two key concepts in his statement that, for me, define art.  The first is ‘interpretation. ’Black and white photography gives us opportunity for value Interpretation and control.”  I take from this that our photographs are interpretations of the subject.  After all, art is interpretation.  And, as artists, it is through interpretation that we share with our viewers our vision of the world.  We don’t document reality; we interpret or possibly even create reality.

The other concept that catches my attention is ‘individual … visualization.’  Adams speaks of his ‘visualization’ all the time.  And the reason we enjoy his photographs so much is because of his strong visualizations.  When he tripped the shutter he knew what effect he wanted to create with the image.  He knew what he wanted to convey in terms of what he was feeling and he knew how to do it, especially when he developed and refined the Zone System.

And it was his interpretations and visualizations that took a location that had been photographed time after time by many other photographers and turned it into something uniquely and identifiably his.

So stand on the bridge in Zion or line up to photograph Delicate Arch in Arches or join the throng at tunnel view in Yosemite.  You can make your photograph unique through your own strong vision and interpretation.


This is a continuing series based on my reading of Ansel Adams’ wonderful book, “Examples – The Making of 40 Photographs.”  It is exciting to read of his attitudes towards making photographs, the decisions he made and the techniques he employed and apply them to the issues that confront us today as digital landscape photographers.  I think those of us who ‘Photoshop’ our images for the sake of achieving our visualization can feel a comradeship with the master.  The question, “Did you manipulate that photograph?” will never go away as long as our medium is the camera.  Adams was also confronted with the same question.  For those of use that believe that the purpose of making a landscape photograph is to share with our audience our response to and our connection with the subject, the work is not done when we press the shutter, it’s just beginning.  And we can delight in photographing the cliché locations, time and time again, because we are creating our own individual statement, not creating ‘derivatives’ of others’ works.


If you enjoy these posts please feel free to share them on Facebook or Twitter, or email them to your friends.  And we would really enjoy hearing from you.  Join the conversation –  leave a comment.

Join me on an upcoming workshop.  Click here for more details.

To see more of my photographs click here.

WordPress Tags: Ansel,Adams,Capitan,Winter,Sunrise,Yosemite,assumption,location,times,cliché,whiff,connection,viewer,trees,Black,photography,interpretation,instance,cliff,separation,images,image,visualization,exposure,area,Valley,heart,soul,artist,statement,subject,viewers,vision,world,concept,attention,System,bridge,Zion,Delicate,Arch,series,Photoshop,comradeship,purpose,audience,response,locations,feet,tripods,subjects,viewpoints,concepts,interpretations,artists,Examples,attitudes,decisions,techniques,photographers,visualizations

(3110)

How Ansel Adams Did HDR

How did Ansel Adams and other black and white film photographers deal with high dynamic range?

High dynamic range (or HDR) is a condition frequently encountered by landscape photographers where the digital camera’s sensor cannot handle the dynamic range of the scene.  In other words, the scene has very bright highlights with areas of deep shadow.  The resulting image will have clipped highlights (highlights that are pure white with no detail), clipped shadows (shadows that are pure black with no detail or at best, muddy) or both.

In digital photography we have several options including HDR, the techniques whereby we take multiple shots at varying exposures.  The most underexposed image will capture the highlights and the most overexposed image will capture the shadows.  Then we blend them all together with software like PhotoMatix Pro.  The result is an image with bright highlights that still have detail and dark, crisp shadows, also with detail.

But what do film photographers do when they face this same situation?  After all, film may not be able to capture the dynamic range of the scene any better than digital can.  And with film there is not the option of taking multiple shots at different exposures and blending the negatives together.

Continue reading “How Ansel Adams Did HDR”

(7683)

Ansel Adams – The Making of 40 Photographs: Frozen Lake and Cliffs

Explore with me Ansel Adam’s comments on the making of “Frozen Lake and Cliffs.”

It was in the  ‘70s when I was backpacking through the Kaweah Gap areas of the Sierra Nevada mountains.  We were two days out and came upon this lake.  I instantly recognized it from on of Ansel Adams that I particularly liked – Precipice Lake.  It was exciting and we spent the night there.

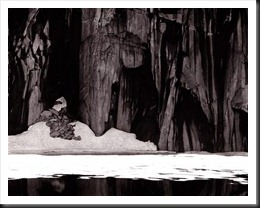
Frozen Lake and Cliffs (1932)

I’ve always been a fan of this Ansel Adams classic.   For me it has a feeling of immensity and majesty.  So it  has a special meaning to me reading about it in “Examples.”   A few things caught my attention in Adams’ narrative…

Continue reading “Ansel Adams – The Making of 40 Photographs: Frozen Lake and Cliffs”

(2135)

Making a Photograph – Black and White Points

Add snap to your photographs by adding contrast. This step-by-step shows you how to set black and white points in Lightroom.

There are a lot of instructional books on how to use Lightroom, Photoshop, Photoshop Elements and the like.  They provide a comprehensive and in-depth review of the various adjustments and filters available in these powerful tools.  And as such they serve as excellent references.  I own many of these fine books.

Now, a lot of workflows are built around the concept of seeing what needs to be fixed next and fixing it.  I advocate a more structured approach; namely, fix the tonality first, then the hue and finally the saturation.  See my recent post on Workflow.  But I often hear the statement, “I look at my photograph and just don’t know what to do.”  Many people often don’t know where to begin.

So I want to take a different approach.  I want to look at an image and identify what it needs and then talk about the various techniques for achieving it.  In other words, I want to start with the question, “What makes a compelling photograph?” and go from there.  It doesn’t help to know all of the tools and tricks available in Lightroom and Photoshop if you don’t know when to use them.

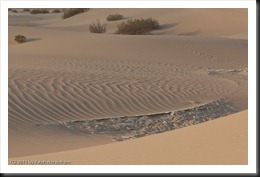
We’ll start with this image.  It is photographed in the Mesquite Flats Dunes of Death Valley.  The dunes provide an inspiring variety of compositions and ligh.  (You can click on this and all other images in this post to enlarge it.)

BP WP Dunes-1

Let’s start by examining the images tonality and see what improvements can be made.


Continue reading “Making a Photograph – Black and White Points”

(11828)

Lightroom Tutorial – Workflow

An overview of a very effective Lightroom workflow.

There are about as many definitions of “fine art photography” as there are people who call themselves “fine art photographers.”  For many of us, fine art photography is an expression of our view of the world.  Much of what we see in the world is captured in the images we capture in the field.  But that’s not the whole story.  Why?  Because the true expressive quality of our photographs comes to life in the post processing – the digital darkroom if you will.

Continue reading “Lightroom Tutorial – Workflow”

(2788)

Expose to the Right – Revisited

Expose to the right is a powerful technique for capturing the most information in your raw files. But processing these images can be a bit daunting at first.

The post I wrote on Expose to the Right about a year ago is one of the most popular on this blog.  I wrote it after a workshop when I suggested this technique and one of the participants complained the photographs looked horrible.  I still use this technique but my workflow in Lightroom continues to evolve.

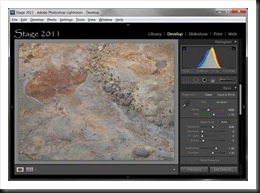
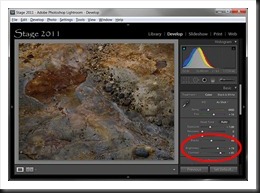
expose to the right 1Recall that Expose to the Right means to overexpose your image so that the histogram shifts toward the right edge.  It is important not to overexpose so much that you introduce highlight clipping.  I like to have a histogram that is positioned a little to the right of center as seen here.  When you expose to the right you can end up with an image that is overexposed by anywhere from 1/3 to a stop or two, depending on the situation.


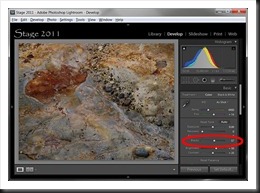
expose to the right 2In the first post I suggested that you can ‘normalize’ the exposure in Lightroom with the Exposure adjustment.  If you overexposed by a stop you can start by decreasing Exposure adjustment in Lightroom by one stop.  This will have the effect of moving the histogram back toward the center or even to the left of center.  This gives you an exposure closer to what the camera’s light meter selected.


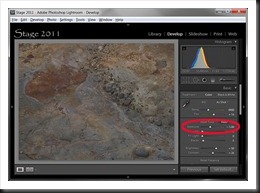
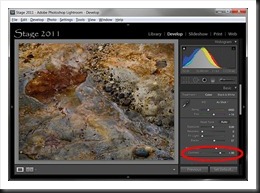
expose to the right 3From there you can continue with your regular workflow.  Here’s an example of some additional adjustments: Blacks to set a black point, Contrast to add interest (contrast is always more interesting than flat) and Brightness to liven it up a little.  There are many adjustments you might perform but these few simple ones serve to illustrate the point.


expose to the right 4But another technique would be to take the opposite approach.  Instead of normalizing the exposure, start by setting the black point with the Blacks adjustment.  This has a different effect on the histogram.  Instead of the entire histogram sliding towards the left, the shadow tail is extended without much change in the mid-tones or highlights.  This technique expands the dynamic range of the photograph.


expose to the right 5You can further expand the dynamic range by adding contrast.  With both shadow and highlight areas to work on the Contrast adjustment both brightens and further darkens the image.

In practice you can try both techniques.  Just create two virtual images from the original file and apply one technique to one and the other technique to the other.  Often the first few adjustments you make on an image have an influence on the finished photograph.  So compare the two and decide which one you want to continue with.

This is not about whether one technique is better than the other but rather to give you more options when working with the photographs that you have exposed to the right.

We do photography workshops.  Come on out and join us.  Click here to check us out.

You can also check out our photography.  Click here.

(2299)

Lightroom Tutorial – Shooting RAW

Follow along as I show you how to turn an overexposed mistake into a pretty decent sunset photograph.

Last night I ran across an example of why we shoot in RAW (not in the RAW – puhleeeze).

Digital SLR cameras and a few point and shoot camera support the RAW file format for our images.  RAW is essentially what the sensor captured – unprocessed, uncompressed, unadulterated.  It takes a bit to get used to but once you do you’ll not go back to JPEG, the other file format.

One of the benefits of RAW is it gives you a lot more flexibility including recovering from poorly exposed images, especially over exposed.  Now, if you’ve read any of my histogram posts (search this blog for Histograms to find them), you know that the single most important thing to avoid as far as exposure is concerned is highlight clipping.  But with RAW you have a chance to recover an overexposed image and turn it into something very acceptable.  It doesn’t always work but sometimes it does.

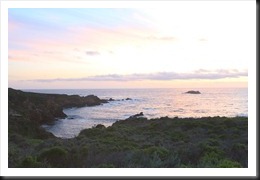
big_sur_scouting_110424__A1P2014-1OK, so I was scanning images in Lightroom last night and ran across this one.  It’s washed out except for the foreground and there is a tremendous amount of highlight clipping in the upper right hand corner.  (I wouldn’t blame you if you stopped reading hear and said, “There’s no way he can do anything with that image.  It’s a mess.”  Which it is.  But humor me and read on.)

By the way, you can click on the images to see them in a larger format.

Continue reading “Lightroom Tutorial – Shooting RAW”

(1781)

Mastering Exposure–Histograms Part 4

Learn more about histograms. We explore the histogram that results from low contrast scenes – how to capture it and what can be done with it in post processing.

In this series of articles we’ve been exploring the histogram.  In the first two articles we discussed what it is.  Now we’re looking at different types of histograms and exploring how to work with them both in the field and during the post processing.  If you want to review or catch up, here are the links to the preceding three posts.

Mastering Exposure – Histograms Part 1: Introduction

Mastering Exposure – Histograms Part 2:  A Closer Look

Mastering Exposure – Histograms Part 3: The Rocky Mountain Histogram

In this article I want to discuss my favorite histogram, the Mole Hill histogram.  I like this one because so much can be done with it in the post processing.  Subtle colors and tonalities can be revealed in soft radiant light.  It lends itself to some of the most creative and expressive images.

Read on and we’ll look at what it is, the conditions in which it occurs, how to photograph it and how to work with it in the post processing to reveal the scene in all of its hidden glory.

Continue reading “Mastering Exposure–Histograms Part 4”

(4699)

Mastering Exposure–Histograms Part 2

Take a deep dive into the often misunderstood histogram and discover the critical role it plays in capturing great photographs.

A few weeks ago I published the first of a series of articles on histograms, “Mastering Exposure – Histograms Part 1.”  I eventually want to talk about different types of histograms and how to work with them in the field and during the post processing.  But before getting into that I want to take a deeper dive into the histogram itself.

Continue reading “Mastering Exposure–Histograms Part 2”

(2737)