Creating Images with Impact – Black Point

Add Impact to your Images by setting a black point. Here’s the how and why.

In this series of blog posts were talking about how to create Images with Impact. You know what I’m talking about. These are those images that really grab our attention, that capture our imaginations. There’s something special about them and it doesn’t have to be a mystery how they are created. There are a few simple techniques that you can use in Lightroom and Photoshop to add impact to your images. Now if you don’t use Photoshop, you can still do everything were talking about in Lightroom.

In the first article we talked about utilizing the full dynamic range of your medium. This is something Ansel Adams taught in his books and classes that was an essential element of his stunning landscape photographs. As he developed his technique which became known as the Zone System, the primary goal was to use the full dynamic range of his medium which, in his case, was the black and white print.

So we talked about that technique first because it is the most appropriate place to start. I do want to add that in color photography or color prints not every print benefits from a white point but virtually all prints benefit from a black point – which is what we want to talk about in this article.

IMG_0012-2

What exactly is a black point? It is small portions of the print that are pure black. If you’re printing on paper than these are small portions that are the blackest black that the combination of paper and ink can achieve. As a side note, different combinations of paper and ink achieve different levels of blackness. But regardless of the combination you use, the blackest black that can be achieved is your black point.

You want to keep the black point areas very, very small because they have no detail. And generally speaking we like to see detail in our shadows, another guideline that I picked up from studying Ansel Adams. But you don’t want to eliminate black points, that is, in most cases. There are a few exceptions to this rule that I will talk about later.

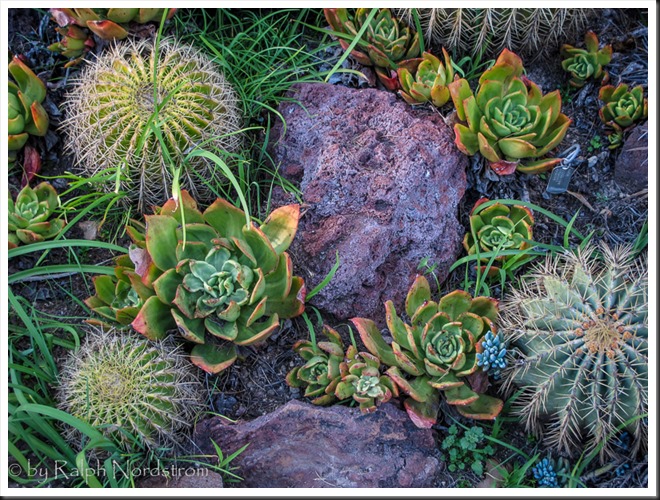
Let’s take a look at the before and after images of our photograph. I shot this at the Huntington Library in South Pasadena a few weeks ago. It’s in their incredible cactus garden – endlessly fascinating.

Continue reading “Creating Images with Impact – Black Point”

(8353)

Mastering Light – Sunrise and Sunset

Getting the most out of sunrises and sunsets.

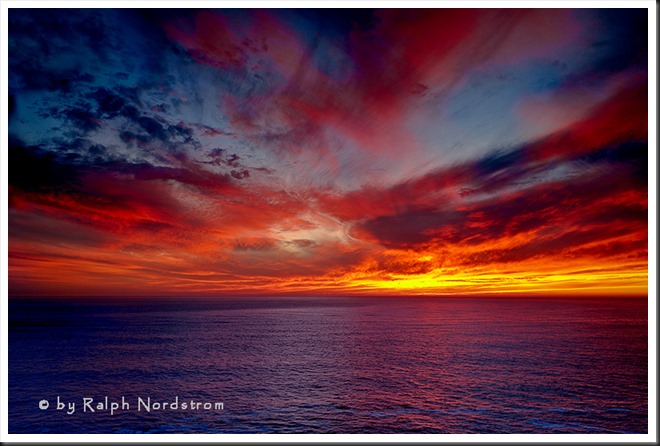
We all love a beautiful sunset, especially when the clouds glow with color. The same happens with sunrise although there may not be as many of us up to enjoy it. There’s something special about sunsets and sunrises that bring joy and wonder to our hearts.

sunset_marin_headlands_2010

My personal favorite is sunrise. I like to arrive while it’s still dark and set up my camera in the cold, crisp morning air. I like standing under the fading stars waiting for the sun to come. I like the stillness of the earth at that time of day. For me, it’s magical.

To get the most out of sunrises and sunsets, it’s helpful to know what’s going on in the sky. (I’ll talk just about sunrises now but much of the same things apply to sunsets.) A lot depends on the clouds. If the sky is completely overcast then you’re not likely to have much of a sunrise or sunset. If the sky is clear then you’ll have a totally different experience. But if the sky is strewn with scattered clouds you may be in for a wonderful experience.  And yet it’s hard to predict.

Continue reading “Mastering Light – Sunrise and Sunset”

(4826)

Making a Photograph – Two Sides of the Coin

Landscape photography in the digital age requires an unlikely but necessary blending of technical and creative skills. But keep life simple; don’t let the technical drown out the creative.

I recently read an article by William Neill in the September Outdoor Photography magazine titled “Need to Know” that really resonated with me.  His main point is, don’t let the acquisition of gear and techniques interfere with the experience.  There’s so much information out there, so many people offering advice on techniques for composing, exposing and post processing.  But in Neill’s journey he has developed what he calls, ‘… a simple but effective tool set.”

A foundation of gear and technique is important in capturing the experience.  But it is the experience that is what we’re out there for, not histograms or depth of field or leading lines.

joshua_tree_140920__SM32515_6_7_8_9-Edit


Continue reading “Making a Photograph – Two Sides of the Coin”

(784)

Mastering Exposure – Expose to the Right

Expose to the Right – put it to the test by creating and comparing actual images.

Over the years there has been a lot of interest in the concept of ‘Expose to the right.’  This is something that is commonly done in digital photography where you intentionally overexpose an image.  The idea is that in digital images there is more information to work with in the brighter tonalities than there is in the darker.  And this will give you more to work with in the darkroom (Lightroom and Photoshop) which will result in a better image.

I’ve written several posts on this topic and if the concept is new to you please read these.  I’m not going to go into the theory here; that is spelled out in these posts.

Lightroom Tutorial – Expose to the Right

Expose to the right – Revisited

Now, I understand the theory.  I’m a computer guy; I had better understand it.  But I’ve always wondered if the promise of a better image actually worked out in real life.  So I did a test during our recent workshop to Big Sur.

Continue reading “Mastering Exposure – Expose to the Right”

(2299)

Two Minutes of Light

Luck favors those who are parepared – and patient.

You read this story again and again.  The setting may be different but the plot is always the same.

It’s a dreary, overcast day.  You had planned this photo session for months, scouting it on Google Earth for the best location, checked the sun position on TPE (The Photographer’s Ephemeris), and received inspiration from the photographs of other photographers.  You made travel plans and booked lodging.

You arrived early at the iconic location, having traveled across the country and driven many miles in a rental car to get there.  But as you approach the sky turns dark with low hanging, gray clouds.  The light is a disappointment but you walk out to a viewpoint and set up anyway.  You keep telling yourself that good fortune happens to those who are prepared.

The minutes tick by and the sun, unseen behind a thick cloak of clouds, continues its inexorable decent to the horizon.  Other photographers join you and you ask each other, “Will it happen?”  Most shrug their shoulders and reply, “It doesn’t look like it will.”  It turns chilly and a cold breeze starts blowing.  Many photographers mutter, “It’s not going to happen,” pack up their gear and head back to their cars and a warm meal waiting them in the comfort of a nearby restaurant.

Continue reading “Two Minutes of Light”

(1173)

Mastering Strong Photographs – Optimum Exposure

Get optimum exposures in your photographs by mastering these basic techniques.

One of the four qualities of a strong landscape photograph is Optimum Exposure. (The other three are Appropriate Sharpness, Fantastic Light and Strong Composition).  While all four qualities are essential to a strong photograph, the foundation is always and always has been a spot on exposure (did you catch the pun?).  An optimum exposure starts in the field and ends in the darkroom.  Here is an overview, a checklist if you will, of the camera skills you need.

Basic Exposure Controls

One of the greatest advances provided by the digital camera is instant exposure feedback on the photograph you just took.  There are two settings that provide this.  The first and most important is the Histogram.  It can alert you not only to whether your image is over exposed, under exposed or exposed just right but can also alert you to serious exposure problems that require special techniques.  (You can read the series of posts on the histogram here:  Mastering Exposure – Histograms Part 4.)  So configuring your camera to display the histogram (and checking it after every shot) is one essential technique to have.

Related to the histogram is the “blinkies” or Highlight Warning.  This setting causes any areas that have highlight clipping to blink when the image is displayed on the LCD screen immediately after it is captured.  This provides instant warning of the most fateful flaw of all – highlight clipping.

Aperture Priority is the exposure mode I use more than 90% of the time when out shooting.  There are times I use Shutter Priority and Manual but most of the time I turn to Aperture Priority.  This is because depth of field is often the primary consideration (remember the second of the four essential qualities – Appropriate Sharpness?).  And aperture priority is one of the key factors that affects depth of field.

When the histogram tells you that you have over or under exposed your image you need to correct and re-shoot.  And to do that you need to know about Exposure Compensation.  This control overrides your camera by increasing or decreasing the exposure your camera’s light meter calculated.  In this way if your camera has overexposed the image a little, you can apply negative exposure compensation to decrease the exposure.

ISO controls the sensitivity of the cameras sensor.  Lower ISOs decrease sensitivity requiring more light for an optimum exposure.  But the image quality is better.  Higher ISOs increase the sensitivity which is good for low light situations because they require less light.  But the trade-off is poorer image quality.  I normally set ISO to 100 and only change it when I can’t get the exposure I want.

Advanced Exposure Controls

There is one situation in particular that the camera simply can’t handle.  It is referred to as High Dynamic Range.  This occurs when the dynamic range of the scene you are photographing exceeds the dynamic range that your camera’s sensor is capable of capturing.  When this occurs you have four choices.

1. You can choose not to photograph the scene.  This was a fairly commonly chosen option in the film days because there was literally no way of capturing the image without it suffering from highlight clipping.

2. You can underexpose the image so that the highlights are rendered without clipping.  This makes the shadows totally black and you end up with silhouettes, often times a very nice effect.  You can use exposure compensation to accomplish this.

3. You can use a graduated neutral density filter to darken the bright parts of the image without darkening the shadows.  This works well when the sky is bright, the foreground is dark and there’s pretty much of a straight line between the two.

4. You can take multiple bracketed exposures that span the dynamic range of the scene and then blend them together in the darkroom on your computer.  To do this you need to know how to set up Automatic Exposure Bracketing (or AEB) on your camera.

Summary of Camera Techniques

So here is a summary of the camera techniques you need to be able to do in order to achieve Optimum Exposures.

  • Histogram
  • “Blinkies”
  • Aperture Priority (and other exposure modes)
  • Exposure Compensation
  • ISO
  • Automatic Exposure Bracketing (AEB)

If you’re not familiar with any of these I suggest you pull out your camera’s manual and look them up.  Then go out and practice them until they become second nature to you.  This way you can focus on the creative rather than the technical when out in the field.

There’s more work to be done regarding exposure (and the broader subject of tonality) in the darkroom.  But, particularly in the digital age, capturing a RAW image that provides the optimum information with which to work in the darkroom is the first and absolutely essential step.  And by mastering these techniques you will avoid the disappointment of having to discard what would have been a great photograph because you didn’t nail the exposure.


If you like this post please feel free to share it on Facebook or with your friends.

We always enjoy hearing from you so please leave a comment and share your experiences and insights with the rest of us.

We do photography workshops.  Come on out and join us.  Click here to check us out.

You can also check out our photography.  Click here.

(2008)

Lightroom Tutorial – Workflow Made Easy

Simplify your Lightroom workflow with these easy steps.

Lightroom is a great tool. It’s quick and easy to use – once you get the hang of it. But sometimes mastering the workflow, the steps you go through to take a raw file to a ‘final’ image, can be a bit daunting.

Let me say up front that Lightroom is an important part of my workflow but it’s not the only part.  Every photograph I work on starts in Lightroom but is completed in Photoshop.  Nevertheless, Lightroom gets a photograph to about 80% of the final product.  I know many people who use Lightroom exclusively and Photoshop only in rare circumstances if at all.

So back to the workflow.  Can it really be made easy?  Yes it can.  There are four major steps (not counting import – see Lightroom Tutorial – Importing Photographs):

  1. Mechanical adjustments like dust spot removal and cropping
  2. Tonality adjustments
  3. Hue adjustments
  4. Saturation adjustments

Let’s skip the first step and start with the second.  The example will be in Lightroom 4.

Continue reading “Lightroom Tutorial – Workflow Made Easy”

(7135)

Making a Photograph – The Four Pillars

Explore the four things that make a great landscape photograph – Fantastic Light, Strong Composition, Appropriate Sharpness and Optimum Exposure.

I’ve been giving a lot of thought recently to what goes in to making a great landscape photograph. It turns out there are four things, four pillars if you will.  Four, that’s a good number.  There are the four legs of a table or the four wheels of a car.  And not to forget the four sacred directions of the Native Americans.

In landscape photography the four pillars are evenly divided between the aesthetics and the technical.  So what are they?  The two aesthetic pillars are Fantastic Light and Strong Composition.  No surprise there.  The two technical pillars are Appropriate Sharpness and Optimum Exposure.  No surprise there either.  If just one of those pillars is missing, well, the table collapses, the image suffers.

Let’s look at them one by one….

joshua_tree_spring_sunrise_2011
Joshua Tree Spring Sunrise (2011)
(click on the images to enlarge them)

Continue reading “Making a Photograph – The Four Pillars”

(7186)

Mastering Exposure–Histograms Part 4

Learn more about histograms. We explore the histogram that results from low contrast scenes – how to capture it and what can be done with it in post processing.

In this series of articles we’ve been exploring the histogram.  In the first two articles we discussed what it is.  Now we’re looking at different types of histograms and exploring how to work with them both in the field and during the post processing.  If you want to review or catch up, here are the links to the preceding three posts.

Mastering Exposure – Histograms Part 1: Introduction

Mastering Exposure – Histograms Part 2:  A Closer Look

Mastering Exposure – Histograms Part 3: The Rocky Mountain Histogram

In this article I want to discuss my favorite histogram, the Mole Hill histogram.  I like this one because so much can be done with it in the post processing.  Subtle colors and tonalities can be revealed in soft radiant light.  It lends itself to some of the most creative and expressive images.

Read on and we’ll look at what it is, the conditions in which it occurs, how to photograph it and how to work with it in the post processing to reveal the scene in all of its hidden glory.

Continue reading “Mastering Exposure–Histograms Part 4”

(4699)

Mastering Exposure–Histograms Part 3

This is the third post in a series on the histogram. This post discusses the Rocky Mountain histogram, what it is, when you can get it, how to photograph and how to do the post processing.

This is the third post in a continuing series on the oft misunderstood but oh so important histogram.  In the first two posts we discussed the histogram in general.  If you missed them, click on these links.

Mastering Exposure – Histograms Part 1

Mastering Exposure – Histograms Part 2

Recap

To recap, the histogram displays a graph of the tonal values in the scene you are about to photograph.  It shows how the dynamic range of the scene matches and fits into the dynamic range of your camera’s sensor.  There are two critical pieces of information a histogram tells you:

  1. If your exposure is correct
  2. If you have problems capturing the dynamic range of the scene

To recap, the exposure is displayed by the position of the histogram curve within the boundaries of the graph area.  As you increase the exposure the histogram moves to the right.  As you decrease the exposure it moves to the left.  If the exposure is increased so that the histogram moves all the way up against the right side of the graph area you will have highlight clipping. Likewise, if it moves all the way to the left side you will have shadow clipping.

The dynamic range of the scene is displayed as the breadth of the histogram,  The wider the histogram the greater the dynamic range of the scene.  The narrower the histogram the lower the dynamic range.  When the histogram is so wide that it extends from one end of the graph area to the other you are facing a situation where your camera’s sensor will have a difficult time capturing the full dynamic range of the scene.  The worst case is you will have both highlight and shadow clipping.

Continue reading “Mastering Exposure–Histograms Part 3”

(2316)