Lightroom Tutorial – Workflow Made Easy

Simplify your Lightroom workflow with these easy steps.

Lightroom is a great tool. It’s quick and easy to use – once you get the hang of it. But sometimes mastering the workflow, the steps you go through to take a raw file to a ‘final’ image, can be a bit daunting.

Let me say up front that Lightroom is an important part of my workflow but it’s not the only part.  Every photograph I work on starts in Lightroom but is completed in Photoshop.  Nevertheless, Lightroom gets a photograph to about 80% of the final product.  I know many people who use Lightroom exclusively and Photoshop only in rare circumstances if at all.

So back to the workflow.  Can it really be made easy?  Yes it can.  There are four major steps (not counting import – see Lightroom Tutorial – Importing Photographs):

  1. Mechanical adjustments like dust spot removal and cropping
  2. Tonality adjustments
  3. Hue adjustments
  4. Saturation adjustments

Let’s skip the first step and start with the second.  The example will be in Lightroom 4.

Continue reading “Lightroom Tutorial – Workflow Made Easy”

(7129)

Taking Your Photography to the Next Level

Our art, photography, can be a rich and rewarding endeavor and an ever fascinating journey of self-discovery. Be open to the possibilities and hone your skills. Become really good at what you do best.

“Did you manipulate your photograph?”  “Did you use a filter?”  “Do you use a Mac?” “Do you crop your images?” “I’ll have a nicer day than you; I’m not shooting a Canon.”  Yes, someone actually said that to me at Bridal Vale Falls in the Columbia River Gorge of Oregon in response to my cheery, “Have a nice day.”  I guess when you take the entire population of photographers you will always find those that are prejudiced and closed minded just like any other population.  They think they are right and anyone that disagrees with them is wrong.  It’s that simple.

The current issue of Lenswork magazine, the premier journal for black and white photography, has an article by guest contributor Jim Kasson titled “Previsualization in the Digital Age.”  I couldn’t wait to read it.  In my workshops and lectures I’ve always advocated that an artist interprets reality and communicates that interpretation through her or his art.  In landscape photography I’ve encouraged our workshop attendees to leave their camera gear in the car until they connect with a location and only then set up their cameras to try to capture what is is they are experiencing.  Previsualization, the anticipation of what the finished work will look like, is a big part of communicating what you are feeling.

Continue reading “Taking Your Photography to the Next Level”

(4504)

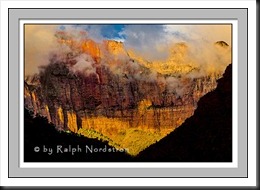
The Making of a Photograph – Clearing Storm, West Temple 2012

A clearing storm in beautiful Zion Naitonal Park contributes to an exciting photogrpah of the West Temple. Read how this photograph was created.

As I drive across the Mojave Desert late one Thursday night not long ago, heading north on I-15, I have a sense of harmony, of unity with the night, the highway, my car.  The pavement ahead eases into the beam of my headlights, grows brighter as it draws closer and then slips back into darkness as it slides underneath.  Nights like this are a joy.  I’m in a groove, a state of calm serenity and anticipation.  Tomorrow I’ll be returning to Zion National Park, something I always look forward to.  I didn’t notice the faint flashes of light.

Powerful thunderstorms were roiling over eastern California and southern Nevada that night, The dark clouds glowed with flickers of light and precious water dropped on the parched desert.  it was a huge storm and I was chasing it.  Approaching the state line the casino lights of Prim were reflected, bright and shimmering, on what is normally a dry lake bed.  A half hour later as Las Vegas finally came into view, the glitz and glamor of the gaudy hotels was dwarfed by the grandeur of bolts of lightning streaking for miles across the turbulent sky.

The following morning workers were cleaning up after the storm but it hadn’t fully passed.  Storm clouds still blanketed the sky for the remainder of the journey to Zion.  A detour to Kolob Terrace to check the aspens was, I suppose, inevitable.  The falling snow up in the high country was a surprise.  And a delight.  Sunrise the next morning was looking promising.

The best location in Zion that gets the full sunrise treatment is West Temple.  I’ve photographed it many times but never got anything that I was excited about.  The most popular location to shoot from is the ‘patio’ behind the museum but on this morning I chose a less visited one – the 2nd switchback on Tunnel Road.  The expectation of clearing storm clouds, the choice of shooting locations – everything worked out just right.

west_temple_clearing_storm_121013

Continue reading “The Making of a Photograph – Clearing Storm, West Temple 2012”

(1881)

Mastering Composition – Working the Shot

How can you create a strong composition? Here’s one method that really works.

There’s no doubt that composition is one of the key elements of a successful image.  You can have all the other factors of a great shot – fantastic light, optimum exposure and appropriate sharpness – but with a weak composition you have a weak photograph. 

I know photographers that work slowly enough to work out the strongest composition before they press the shutter.  I admire these people immensely.  But I don’t work that way, especially in an area I’m unfamiliar with.

A short while ago I was driving south through Utah on beautiful highway 89 traveling between Bryce Canyon and Zion National Parks after wrapping up a successful photography workshop.  I came upon a stand of cottonwood trees that were in full autumn splendor.  I had to pull over.

I grabbed my point and shoot (Canon G11) and started scouting for photographs.  I like to use the G11 for that, scouting for compositions that are worth the effort of setting up my big Canon.  I found two compositions that were promising.

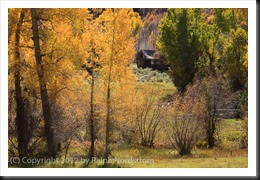
The second proved to be the most interesting, at least in terms of how the final composition evolved.  Behind the cottonwoods was a meadow with a dilapidated shack.  It was so Utah!  I set up what I thought would be an interesting composition.
bryce_121019__SM33931

(Click on the images to enlarge them.)

I positioned my camera so that there would be a narrow opening to the meadow and the shack.  It is a tight composition that draws the viewers eye to the shack which is placed in a very strong position within the frame.  It has a feeling of depth with a strong foreground opening up to the shack in the background.

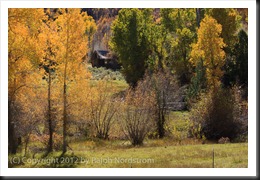
I was feeling good about this composition and then I noticed a glowing cottonwood just outside the frame to the right so I moved the camera a couple of feet to the right and created this image.
bryce_121019__SM33935

The golden cottonwoods on the left are balanced by the single, smaller cottonwood to the right.  This arrangement has the effect of placing more emphasis on the autumnal trees.  The eye makes three stops, first at the cottonwoods on the left, then to the right and finally works its way back to the shack in the back.

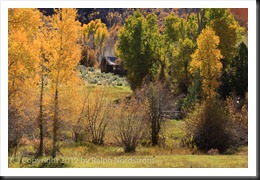
I was pretty  pleased with these two compositions and thought I had something to work with when I got home.  So I disassembled everything and put  it back in my camera bag, collapsed the tripod and started back toward the car.  I hadn’t gone 5 steps when I looked back up toward the shack and saw there was another blaze of cottonwoods right next to it.  So I swung my backpack back down to the ground and set up again for this shot.
bryce_121019__SM33939

Now there are three sources of golden light for the eye to explore – the cottonwoods to the left, the one a little further back on the right and the ones way in the back by the shack.  (Odd numbers of things are always good.)  The image is well balanced and every element in it contributes to the entire impression.

There’s a story here, a story of living in this beautiful valley during a time that is gone and will probably never return.  It must not have been an easy life but one of honest, hard work and the satisfaction of living in a place of such splendid beauty.  We would do it differently today with more conveniences and comforts.  And maybe, just maybe, miss out on the more intimate connection with Mother Earth that living in such a simple shack must have provided.


I’d be interested to hear which of the three compositions you like the most.  Please leave a comment saying which one you like and why.  It will make for a very interesting dialog.

If you enjoyed this post please feel free to Like it and share it with your friends.  You can use the links at the top.

Join me on an upcoming workshop.  Click here for more details.

To see more of my photographs click here.

WordPress Tags: Composition,Shot,image,exposure,area,Utah,highway,Bryce,Canyon,Zion,National,Parks,photography,workshop,trees,splendor,Canon,worth,effort,Behind,shack,Click,images,viewers,depth,foreground,background,arrangement,emphasis,tripod,steps,backpack,numbers,element,valley,life,satisfaction,conveniences,connection,Mother,Earth,factors,compositions,feet,cottonwood,cottonwoods,camera,three

(1276)

Ansel Adams – The Making of 40 Photographs: Rock and Surf

Insight into the way Ansel Adams made the photograph “Rock and Surf” and some thoughts on photographing the surf.

I was fortunate to be in Big Sur last week photographing that magnificent coast with the members of our workshop.  Ansel Adams made some beautiful photographs here as did, of course, Edward Weston.  An increasingly common technique used by photographers is to employ a neutral density filter to get very long exposures that turn the ocean into a sea of ethereal mist.  Many of these photographs are incredibly beautiful.  Personally, I connect with the power and energy of the ocean, something these beautiful photographs do not capture.

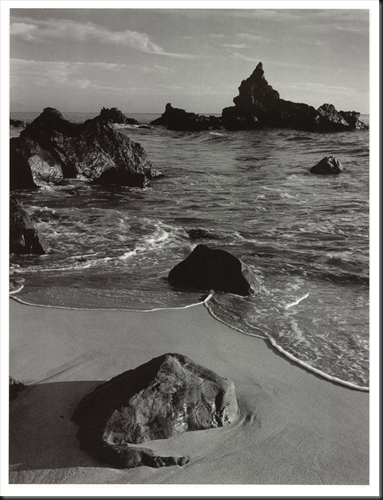
Adams’ technique was to stop the motion in of the surf as in this photograph titled “Rock and Surf.”  Freezing the water was essential to the effectiveness of the composition.

rock and surf

Rock and Surf (1951)
Ansel Adams

Continue reading “Ansel Adams – The Making of 40 Photographs: Rock and Surf”

(3575)

The Surprises in the Camera

Do we always know what we’re going to get when we press the shutter or are we sometimes in for a pleasant surprise?

“No tears in the writer, no tears in the reader.  No surprise in the writer, no surprise in the reader.”  Robert Frost

In my workshops I talk about feeling a place before you photograph it.  In fact we do an exercise.  When we arrive at the location I ask the participants to leave their cameras in the car for at least fifteen minutes and just quietly wander around the area until it speaks to them.  Only then can they get their cameras and try to capture what they are feeling.

This is a wonderful way of slowing down and getting in touch with the essence of a place.

But I must confess it doesn’t always work that way for me.

Continue reading “The Surprises in the Camera”

(686)

Mastering Exposure–Histograms Part 3

This is the third post in a series on the histogram. This post discusses the Rocky Mountain histogram, what it is, when you can get it, how to photograph and how to do the post processing.

This is the third post in a continuing series on the oft misunderstood but oh so important histogram.  In the first two posts we discussed the histogram in general.  If you missed them, click on these links.

Mastering Exposure – Histograms Part 1

Mastering Exposure – Histograms Part 2

Recap

To recap, the histogram displays a graph of the tonal values in the scene you are about to photograph.  It shows how the dynamic range of the scene matches and fits into the dynamic range of your camera’s sensor.  There are two critical pieces of information a histogram tells you:

  1. If your exposure is correct
  2. If you have problems capturing the dynamic range of the scene

To recap, the exposure is displayed by the position of the histogram curve within the boundaries of the graph area.  As you increase the exposure the histogram moves to the right.  As you decrease the exposure it moves to the left.  If the exposure is increased so that the histogram moves all the way up against the right side of the graph area you will have highlight clipping. Likewise, if it moves all the way to the left side you will have shadow clipping.

The dynamic range of the scene is displayed as the breadth of the histogram,  The wider the histogram the greater the dynamic range of the scene.  The narrower the histogram the lower the dynamic range.  When the histogram is so wide that it extends from one end of the graph area to the other you are facing a situation where your camera’s sensor will have a difficult time capturing the full dynamic range of the scene.  The worst case is you will have both highlight and shadow clipping.

Continue reading “Mastering Exposure–Histograms Part 3”

(2312)

Backup Your Photos

Presenting a solution for backing up your iimportant photo files while also being able to share them between computers.

Some time ago I thought I had lost a year’s worth of RAW files.  I was using Photoshop Bridge which I rarely  use (I use Lightroom to manage my photos) and it had inadvertently moved the folder when I thought the folder was deleted.  It took a couple of days to find copies of all the supposedly deleted files, only to find a week or so later that they were all still there, just in a different location.

That launched an ongoing effort to come up with a better backup strategy.  The solution is still evolving but it’s to a point where it’s worth sharing with you.

Continue reading “Backup Your Photos”

(1819)

Photographic Challenges – A Solution

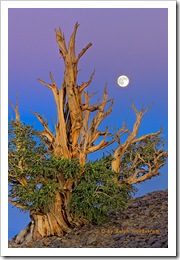
A few weeks ago I posed a photographic challenge.  What decisions would you make to capture the Bristlecone Moon image?  Here’s the photograph again.

bristlecone_moon_2008Bristlecone Moon (2008)

This shot poses some interesting challenges and here’s a link to the first post that spells out the situation in case you missed it.

Photographic Challenge – the Situation

The planning for this photograph actually began several months before. I had the idea of photographing a bristlecone pine with the full moon as it rose behind it through the earth shadow.  The earth shadow is that ribbon of color that is projected in the sky above the horizon directly opposite the rising or, in this case, setting sun.  So the first step was to select a full moon weekend, contact my buddy, Eric Winter and head up to Grand View campground in the White Mountains.  We arrived three days before the full moon to scout the area and find a tree that had everything I was looking for – an open view to the east that looked down on the Great Basin below.  I also new I needed to have enough room to back away from the tree so I could use a telephoto and thus increase the relative size of the moon.

There are only two named bristlecone groves in the Whites – Schulman Grove where the oldest tree is found (4,700 years old) and the remote Patriarch Grove.  The Schulman Grove is at the end of the paved road and just a few miles from Grand View campground.  The Patriarch Grove is another 8 miles down a dirt road and when the rangers say it’s a 45 minute drive you’d better believe them cause it is.

The first day we scouted the Patriarch Grove but unfortunately, it is in a broad   depression that has a large hill to the east.  There weren’t any trees that had what I was looking for.  The next day we killed some time in Bishop and dropped into Vern Clevenger’s gallery.  Vern and I chatted and I told him what I  had in mind.  He advised me to get the shot one or two nights before the full moon, not the night of the full moon.  It turned out to be a critical piece of advice that I needed.

So back up to the Whites and back out the dirt road in a search for THE tree.  We scouted a couple of places but none worked out.  We climbed back into the truck and continued down the road.  “What about that tree?” Eric asked as we drove by.  It was perfect.  Throwing the truck into reverse, we backed up and parked off to the side of the road.

The tree had a clear view of the eastern horizon.  There was a large hill to the west but all that meant was that the tree would be dropping into a shadow long before the sun dipped  below the horizon.  There was enough space to use my 70-200 lens and back up far enough to fill the frame with the tree.

I had printed the moon charts from the internet so I new the precise time and azimuth of the moonrise and was able to figure out where I wanted to position myself.

I started working with compositions well before the moon was due and decided to crop off the ends of the branches because I liked the proportion better.  Then I sat on Mother Earth and quietly waited.  The shadow from the hill to the west crept across the road toward the tree and finally swallowed it.  I sat, looking to the east, waiting for the moon to rotate into view.  Sitting up high on the side of the White Mountains I got a strong sense of the earth turning on its axis, rotating until the moon appeared above the horizon.  One moment it wasn’t there and the next it was.  It was time to go to work.

The moonrise was playing out just like I had hoped.  This is when I get nervous.  “Slow down, don’t make a mistake,” I kept telling myself.  Depth of field: f/16.  Shutter speed: 1.2 sec at ISO 100.  Too slow.  Bump the ISO to 200.  I heard Ansel Adams speak years ago at Pasadena City College.  He told the story of taking “Moonrise over Hernandez.”  He didn’t have time to take out his spot meter and do his usual zone thing.  So he exposed for the moon.  He knew it was in full sunlight and he knew what its luminance was without having to measure it.  So he put the moon in Zone VII and fired away.  I was thinking of him when I realized that I needed to shoot HDR if I wanted the moon to be more than a blank white disk, if I wanted to catch the man in the moon.

So I turned on the camera’s Highlight Tone Priority function to gain a little extra dynamic range, kept the ISO at 200 and bracketed the exposure by one stop.    The focal length was 185 mm and the total elapsed time for the three exposures was about 2 1/2 seconds.  At 185 mm you have 3.2 seconds to get your shot off without the moon (or stars) moving perceptibly.  (There’s a formula for calculating that.  It’s 600/focal length in mm.  It’s a handy formula to know.  See Ten Tips for Exciting Nighttime Photography.)

So that’s pretty much the whole story.  There are other ways go solve this challenge.  Carefully exposing the moon to fall at the right end of the histogram without highlight clipping would result in a capture in which both shadows and highlights could be recovered in Lightroom or Photoshop.  A graduated neutral density filter is problematic because it would cover part of the tree.  So HDR works well in this situation because you get a good exposure on both the moon and the tree.

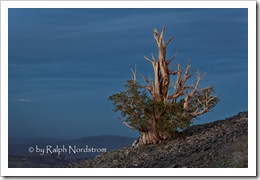
I’ve returned to this tree several times since September of 2008 when this photograph was taken.  It’s one of the stops on our Eastern Sierra workshop.  Each time I return it has a different feel to it, a different mood.  Here’s what it said to me this year.

bristlecone_dusk_2010 Bristlecone Dusk (2010)

It’s a remarkable tree and I plan to keep on coming back.

Join me on an upcoming workshop.

To see more of my photographs click here.

(903)

Cliché

Cliché, to many photographers this is a dirty word.  Photographs of Yosemite Valley from Tunnel View, the Tetons from Ox Bow Bend, the Watchman in Zion from the bridge, Delicate Arch – all are considered by many to be clichés.

What exactly is a cliché?  Something that has lost its originality, ingenuity, impact from long overuse.  In other words, it’s been done before – and many times.  Some have gone so far as to suggest that there are no photographs left in Yosemite Valley that are not clichés.

Not all of us agree.

Continue reading “Cliché”

(728)